

Hello lovely readers! If you’re as passionate about Italian cuisine as I am, you’re in for a treat. I’ve curated 11 stunning recipes that are perfect for elevating your next dinner party. From vibrant antipasto skewers to sweet and creamy tiramisu, these dishes are a feast for both your eyes and taste buds. Get ready to impress your guests with these Italian delights!
Antipasto Skewers With Fresh Mozzarella and Basil
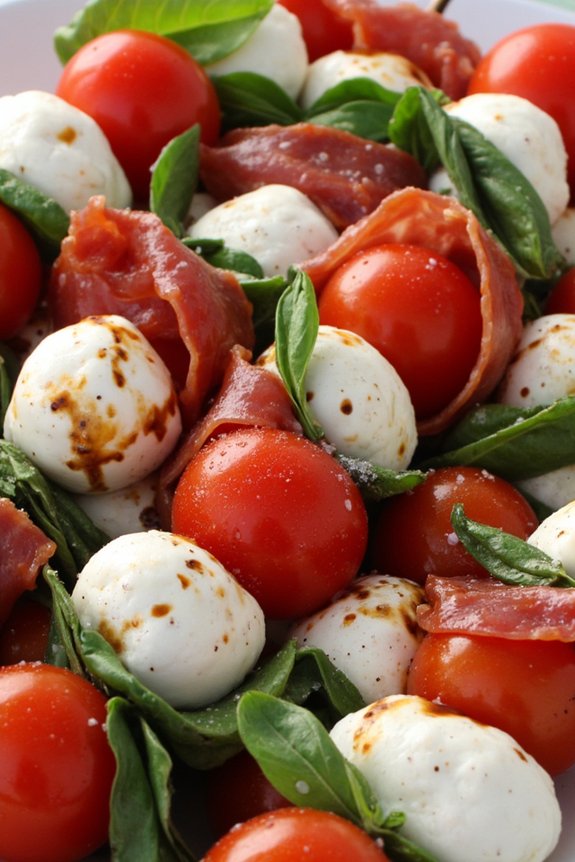
Antipasto Skewers With Fresh Mozzarella and Basil are a delightful and invigorating way to start your Italian dinner party. These skewers are an excellent way to showcase fresh ingredients and vibrant flavors, making them a perfect appetizer that’s both visually appealing and delicious.
The combination of creamy mozzarella, fragrant basil, juicy cherry tomatoes, and savory cured meats offers a quintessential taste of Italy that will leave your guests enthusiastic for the next course.
This recipe serves 4-6 people and is perfect for preparing ahead of time. The skewers are easy to assemble and can be customized based on your preferences or dietary restrictions. Whether you’re hosting a casual gathering or a more formal affair, these antipasto skewers are sure to be a hit. Pair them with a crisp glass of Italian white wine for a harmonious start to your evening.
Ingredients (serving size: 4-6 people):
- 20 cherry tomatoes
- 20 fresh mozzarella balls (bocconcini)
- 20 fresh basil leaves
- 20 slices of salami or prosciutto
- 1/4 cup extra-virgin olive oil
- 1 tablespoon balsamic glaze
- Salt and pepper to taste
- 20 wooden skewers
Instructions:
- Prepare the Ingredients: Begin by washing the cherry tomatoes and basil leaves under running water. Pat them dry with a paper towel to remove excess moisture. Confirm the mozzarella balls are drained and ready to use.
- Assemble the Skewers: Take a wooden skewer and gently slide on a cherry tomato, followed by a basil leaf, a mozzarella ball, and a folded slice of salami or prosciutto. Repeat the process until all the skewers are assembled, ensuring each skewer has an equal amount of each ingredient.
- Season the Skewers: Arrange the skewers on a serving platter. Drizzle them with extra-virgin olive oil and balsamic glaze. Sprinkle a pinch of salt and a dash of pepper over the skewers to enhance the flavors.
- Chill and Serve: If not serving immediately, cover the platter with plastic wrap and refrigerate for up to an hour. This will allow the flavors to meld together, enhancing the taste of the skewers. Remove from the fridge 10 minutes before serving to bring them to room temperature.
Extra Tips:
When making Antipasto Skewers With Fresh Mozzarella and Basil, consider using a variety of colored cherry tomatoes to add visual interest to your platter.
If you prefer a vegetarian version, simply omit the meat or replace it with marinated artichokes or roasted bell peppers. To prevent the skewers from getting soggy, make sure all ingredients are thoroughly dried before assembly.
Additionally, you can experiment with different herbs like oregano or thyme for a unique twist on the classic recipe. Enjoy the process of creating these delicious skewers, and let your creativity shine!
Prosciutto-Wrapped Melon With Balsamic Reduction
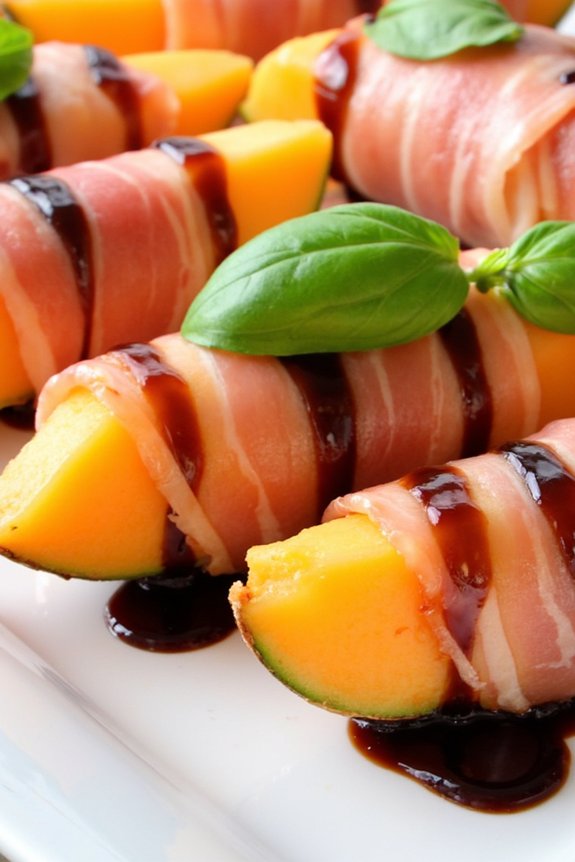
Prosciutto-Wrapped Melon With Balsamic Reduction is a classic Italian appetizer that combines the sweetness of ripe cantaloupe melon with the savory, salty flavor of prosciutto. This dish is perfect for a light starter at your Italian dinner party, offering a revitalizing yet indulgent experience for your guests. The balsamic reduction adds a tangy depth, bringing all the flavors together in a delightful harmony.
This elegant dish not only pleases the palate but is also visually appealing, making it a great choice for any occasion. The preparation of Prosciutto-Wrapped Melon With Balsamic Reduction is simple and requires minimal cooking, allowing you to focus on enjoying time with your guests. By using high-quality ingredients, such as fresh, ripe melon and authentic Italian prosciutto, you guarantee the best possible flavor.
The balsamic reduction can be prepared in advance, saving you time on the day of your party. This recipe serves 4-6 people, making it an ideal choice for a small gathering or as part of a larger spread of appetizers.
Ingredients:
- 1 ripe cantaloupe melon
- 12 slices of prosciutto
- 1 cup balsamic vinegar
- Freshly ground black pepper (to taste)
- Fresh basil leaves (for garnish)
Cooking Instructions:
- Prepare the Melon: Start by cutting the cantaloupe melon in half and removing the seeds. Slice each half into wedges, removing the rind from each wedge. Aim for about 12 wedges, as this will pair perfectly with the 12 slices of prosciutto.
- Wrap with Prosciutto: Take each melon wedge and wrap it with a slice of prosciutto. Confirm the prosciutto is snugly wrapped around the melon, but not too tight to crush the fruit. Place each wrapped wedge on a serving platter.
- Make the Balsamic Reduction: Pour the balsamic vinegar into a small saucepan and heat over medium heat. Allow it to come to a simmer, then reduce the heat to low. Let it simmer until it reduces by half and becomes a thick syrup, which usually takes about 10-15 minutes. Stir occasionally. Once done, remove from heat and let it cool slightly.
- Drizzle and Garnish: Drizzle the balsamic reduction over the prosciutto-wrapped melon wedges. Add a few grinds of freshly ground black pepper, if desired. Garnish with fresh basil leaves for an added burst of color and flavor.
Extra Tips:
When choosing a cantaloupe melon, look for one that feels heavy for its size and has a sweet, fragrant aroma, indicating ripeness. If you prefer a thicker balsamic reduction, allow it to simmer longer, but keep an eye on it to prevent burning.
The reduction can be stored in an airtight container and refrigerated for up to a week, making it convenient to prepare in advance. Feel free to experiment with different herbs, such as mint, for a unique twist on this classic dish.
Burrata With Roasted Cherry Tomatoes and Pesto
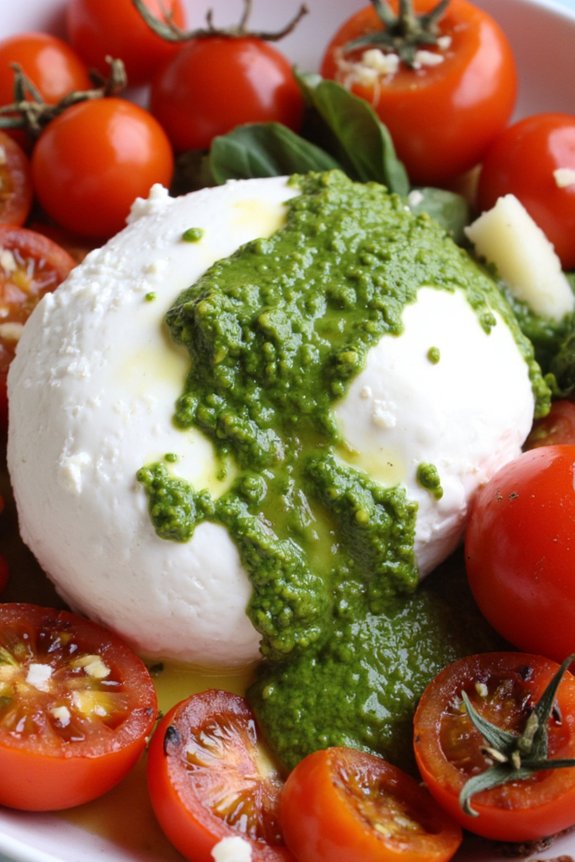
Burrata With Roasted Cherry Tomatoes and Pesto is a delightful and elegant dish that’s perfect for an Italian dinner party. The creamy texture of burrata cheese pairs beautifully with the sweetness of roasted cherry tomatoes and the aromatic flavors of fresh basil pesto. This dish isn’t only a feast for the taste buds but also a visual delight, with vibrant colors that make it an impressive starter or side dish.
To create this dish, you’ll first need to roast the cherry tomatoes to bring out their natural sweetness and enhance their flavor. The burrata cheese, with its creamy center and delicate outer shell, will be served at room temperature to guarantee it maintains its luscious texture. The homemade pesto, made with fresh basil leaves, pine nuts, garlic, Parmesan cheese, and olive oil, adds a burst of flavor and ties all the elements together. This dish serves 4-6 people, making it ideal for a small gathering.
Ingredients:
- 2 balls of burrata cheese
- 4 cups cherry tomatoes
- 1/4 cup olive oil
- Salt and pepper to taste
- 2 cups fresh basil leaves
- 1/2 cup pine nuts
- 2 cloves garlic
- 1/2 cup grated Parmesan cheese
- 1/2 cup extra-virgin olive oil
- Crusty bread, to serve
Instructions:
- Preheat the Oven: Start by preheating your oven to 400°F (200°C). This will guarantee that it’s hot enough to roast the tomatoes effectively.
- Prepare the Cherry Tomatoes: Place the cherry tomatoes on a baking sheet. Drizzle with 1/4 cup of olive oil and season with salt and pepper. Toss the tomatoes to coat them evenly.
- Roast the Tomatoes: Place the baking sheet in the preheated oven and roast the tomatoes for about 15-20 minutes, or until they’re soft and slightly blistered. Remove from the oven and let them cool slightly.
- Make the Pesto: While the tomatoes are roasting, prepare the pesto. In a food processor, combine the fresh basil leaves, pine nuts, garlic, and Parmesan cheese. Pulse until the ingredients are finely chopped.
- Add Olive Oil: With the food processor running, slowly drizzle in the extra-virgin olive oil until the pesto reaches your desired consistency. You want it to be smooth but not too runny.
- Assemble the Dish: Place the burrata cheese on a serving platter. Surround it with the roasted cherry tomatoes.
- Drizzle with Pesto: Generously drizzle the homemade pesto over the burrata and tomatoes.
- Serve: Pair with slices of crusty bread for scooping up the cheese and tomatoes. Serve immediately for the best flavor.
Extra Tips:
When making this dish, remember that the quality of the ingredients plays a significant role in the final taste. Fresh, ripe cherry tomatoes and high-quality burrata cheese make a world of difference.
If you don’t have pine nuts for the pesto, you can substitute them with walnuts or almonds for a different nutty flavor. Guarantee the burrata is at room temperature before serving to enjoy its creamy texture fully.
Finally, feel free to adjust the amount of garlic in the pesto according to your preference for a milder or stronger flavor.
Classic Margherita Pizza With Fresh Herbs

Margherita Pizza, an Italian classic, is a simple yet delightful dish that showcases the beauty of fresh ingredients. Originating from Naples, this pizza features a thin, crispy crust topped with vibrant tomato sauce, creamy mozzarella, and aromatic fresh herbs. Perfect for an Italian dinner party, this pizza is a crowd-pleaser with its fresh flavors and inviting presentation.
Whether you’re an experienced home chef or a beginner, this Margherita Pizza is bound to impress your guests with its authentic taste and aroma.
To make this pizza, you’ll need to start with a good quality pizza dough, as it forms the foundation of your dish. The sauce should be made from ripe tomatoes that are bursting with flavor, while the mozzarella should be fresh and of the highest quality you can find. The use of fresh basil and oregano is vital, as they provide the signature taste and fragrance that elevate this pizza from ordinary to extraordinary.
For a serving size of 4-6 people, follow the ingredients and instructions below to create your own Classic Margherita Pizza With Fresh Herbs.
Ingredients:
- 1 lb pizza dough
- 1 cup tomato sauce
- 12 oz fresh mozzarella cheese, sliced
- 2 tablespoons extra virgin olive oil
- 1 teaspoon salt
- 1/2 teaspoon freshly ground black pepper
- Fresh basil leaves (about 15-20 leaves)
- Fresh oregano leaves (about 1 tablespoon, optional)
- 1/4 cup grated Parmesan cheese (optional)
- Cornmeal or flour for dusting
Cooking Instructions:
- Preheat the Oven: Begin by preheating your oven to 475°F (245°C). If you have a pizza stone, place it in the oven while it heats up. This will help achieve a crispy crust.
- Prepare the Dough: On a lightly floured surface, stretch or roll out the pizza dough to a 12-inch circle (or your desired shape and size). Transfer the dough to a pizza peel or a baking sheet sprinkled with cornmeal to prevent sticking.
- Add the Sauce: Spread the tomato sauce evenly over the surface of the dough, leaving a small border around the edges for the crust. Use the back of a spoon to guarantee an even layer.
- Layer the Cheese: Arrange the fresh mozzarella slices evenly over the sauce. Be sure to cover the pizza fairly well but leave some gaps to allow the sauce to bubble through.
- Season the Pizza: Drizzle the olive oil over the top and sprinkle with salt and freshly ground black pepper to taste. If desired, add a sprinkle of grated Parmesan cheese.
- Bake the Pizza: Carefully slide the pizza onto the preheated pizza stone or place the baking sheet in the oven. Bake for about 10-12 minutes or until the crust is golden brown and the cheese is melted and bubbly.
- Add Fresh Herbs: Once out of the oven, immediately scatter the fresh basil leaves and oregano over the hot pizza. The heat will release the herbs’ aromas and flavors.
- Slice and Serve: Allow the pizza to cool for a minute or two, then slice and serve while hot. Enjoy this classic Margherita Pizza with a fresh, crisp side salad for a complete meal.
Extra Tips:
For an even crispier crust, try using a pizza stone and let it heat thoroughly in the oven before placing the pizza on it.
If fresh tomatoes are in season, consider making a simple fresh tomato sauce by blending ripe tomatoes with a pinch of salt and a splash of olive oil.
Additionally, remember to keep an eye on the pizza while it’s baking, as ovens vary and the pizza can go from perfectly cooked to overdone quickly.
If you’re a fan of extra flavor, feel free to experiment by adding a few thin slices of garlic or a sprinkle of red pepper flakes to the sauce before baking.
Creamy Mushroom Risotto With Parmesan

Creamy Mushroom Risotto With Parmesan is a classic Italian dish that brings together the earthiness of mushrooms and the rich flavor of parmesan in a creamy rice base. This dish is perfect for an intimate dinner party or a comforting family meal.
Risotto is known for its comforting texture and depth of flavors, which are achieved by gradually cooking the rice while continuously stirring and adding broth. The key to a perfect risotto is patience and attention, ensuring that the rice absorbs the flavors and achieves the perfect creamy consistency.
This particular recipe features mushrooms, which add a rich umami flavor to the dish. The mushrooms are sautéed until golden brown, releasing their flavors into the risotto. The Parmesan cheese then adds a sharp and nutty taste, enhancing the overall richness of the dish. This recipe is designed to serve 4-6 people and is sure to be a hit at your next Italian-themed dinner party.
Ingredients (Serves 4-6):
- 1 ½ cups Arborio rice
- 8 ounces fresh mushrooms (such as cremini or button), sliced
- 1 small onion, finely chopped
- 2 cloves garlic, minced
- 4 tablespoons unsalted butter
- 1 tablespoon olive oil
- 4 cups chicken or vegetable broth
- ½ cup dry white wine
- 1 cup grated Parmesan cheese
- Salt and pepper to taste
- Fresh parsley, chopped (optional, for garnish)
Cooking Instructions:
- Prepare the Broth: In a saucepan, bring the chicken or vegetable broth to a simmer over low heat. It’s important to keep the broth warm throughout the cooking process.
- Sauté the Mushrooms: In a large skillet or saucepan, heat the olive oil and 2 tablespoons of butter over medium heat. Add the sliced mushrooms and cook until they’re golden brown and have released their moisture, about 5-7 minutes. Remove the mushrooms from the pan and set aside.
- Cook the Aromatics: In the same pan, add the remaining 2 tablespoons of butter. Once melted, add the chopped onion and garlic. Sauté until the onion is translucent and fragrant, about 3-4 minutes.
- Toast the Rice: Add the Arborio rice to the pan with the onions and garlic. Stir continuously for about 2 minutes, ensuring that each grain of rice is coated with butter and slightly toasted.
- Deglaze with Wine: Pour in the dry white wine and cook, stirring constantly, until the wine is fully absorbed by the rice.
- Cook the Risotto: Begin adding the warm broth, one ladle at a time, to the rice. Stir continuously and allow each ladle of broth to be absorbed before adding the next. This process should take about 18-20 minutes until the rice is creamy and al dente.
- Incorporate Mushrooms and Cheese: Once the rice is cooked to your desired consistency, stir in the sautéed mushrooms and grated Parmesan cheese. Season with salt and pepper to taste.
- Serve: Remove the risotto from heat and let it sit for a minute. Serve hot, garnished with fresh parsley if desired.
Extra Tips: Achieving the perfect creamy consistency in risotto requires patience. Don’t rush the process of adding broth and allow the rice to absorb each addition fully.
Stirring constantly is essential as it helps to release the starch from the rice, contributing to the dish’s creamy texture. If you prefer a more intense mushroom flavor, consider using a mix of different mushroom varieties or incorporating some porcini mushrooms.
A good quality Parmesan is vital as it adds a depth of flavor that complements the earthiness of the mushrooms. Enjoy your Creamy Mushroom Risotto With Parmesan with a glass of white wine for the ultimate Italian dining experience.
Homemade Ravioli With Spinach and Ricotta Filling
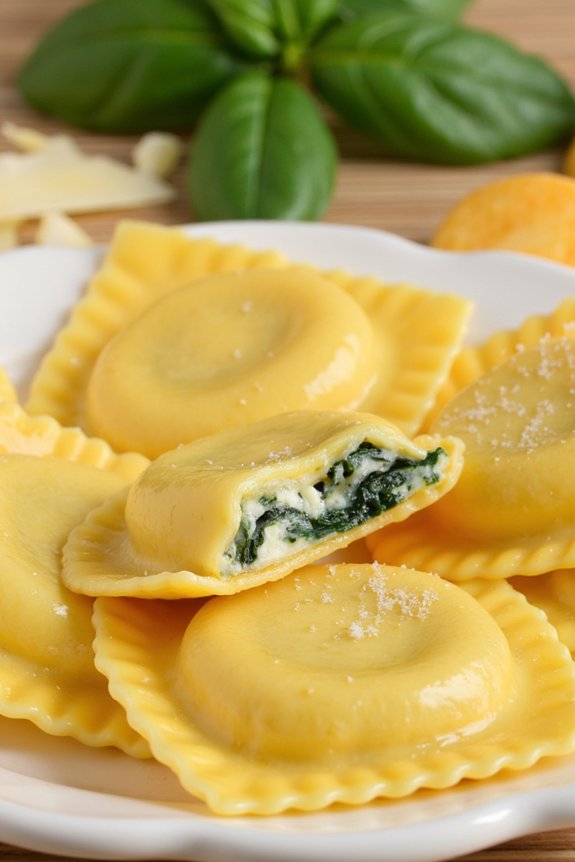
Homemade Ravioli With Spinach and Ricotta Filling is a classic Italian dish that’s sure to impress your guests at any dinner party. This delightful recipe combines the rich flavors of fresh spinach and creamy ricotta cheese, enveloped in tender, homemade pasta. The ravioli is then cooked to perfection and can be served with a variety of sauces, such as a simple sage butter sauce or a rich tomato and basil sauce, making it a versatile choice for any occasion.
Preparing homemade ravioli may seem challenging, but with a little patience and practice, you can create this delicious dish from scratch. The key to perfect ravioli is in the dough, which should be smooth, elastic, and rolled out thinly to allow the filling to shine through. The spinach and ricotta filling is simple yet flavorful, with a hint of nutmeg to enhance the taste.
Once you’ve mastered the art of making homemade pasta, you’ll find that crafting your own ravioli isn’t only rewarding but also a fun and creative process.
Ingredients (Serves 4-6):
- 2 cups all-purpose flour
- 3 large eggs
- 1 tablespoon olive oil
- 1 teaspoon salt
- 1 cup fresh spinach, chopped
- 1 cup ricotta cheese
- 1/4 cup grated Parmesan cheese
- 1/4 teaspoon ground nutmeg
- Salt and pepper to taste
- 1 egg, beaten (for egg wash)
- Extra flour for dusting
Cooking Instructions:
- Prepare the Pasta Dough: In a large mixing bowl, combine the flour and salt. Make a well in the center and add the eggs and olive oil. Gradually incorporate the flour into the liquid, using a fork to stir until a dough begins to form. Knead the dough on a lightly floured surface for about 8-10 minutes until it becomes smooth and elastic. Wrap in plastic wrap and let it rest for at least 30 minutes.
- Make the Filling: While the dough rests, prepare the filling. In a skillet over medium heat, sauté the chopped spinach until wilted. Allow it to cool slightly, then squeeze out any excess moisture. In a bowl, mix the spinach, ricotta cheese, Parmesan cheese, and nutmeg. Season with salt and pepper to taste. Set aside.
- Roll Out the Dough: Once the dough has rested, divide it into four equal parts. Using a pasta machine or rolling pin, roll out each portion into a thin sheet, about 1/16-inch thick. If using a pasta machine, start with the widest setting and gradually move to the thinnest.
- Assemble the Ravioli: Lay one pasta sheet on a floured surface. Place small spoonfuls of filling, about 1 inch apart, on the sheet. Brush the edges and the areas between the filling with the beaten egg wash. Lay another pasta sheet on top, pressing around each mound of filling to seal and remove any air bubbles. Use a ravioli cutter or sharp knife to cut out individual ravioli.
- Cook the Ravioli: Bring a large pot of salted water to a boil. Carefully drop the ravioli into the boiling water and cook for 3-4 minutes, or until they float to the surface. Use a slotted spoon to remove them from the water and transfer them to a serving plate.
- Serve: Serve the ravioli hot with your choice of sauce. Garnish with additional Parmesan cheese and fresh basil, if desired.
Extra Tips:
When making homemade pasta, it’s important to confirm that the dough is well-kneaded to achieve the right texture. Resting the dough allows the gluten to relax, making it easier to roll out. If you find the dough too sticky, sprinkle a little more flour.
When sealing the ravioli, make sure there are no air pockets inside, as this can cause them to burst during cooking. Finally, experiment with different sauces to find your favorite combination; a simple brown butter and sage sauce can wonderfully complement the flavors of the spinach and ricotta filling.
Lemon Herb Grilled Chicken With Asparagus
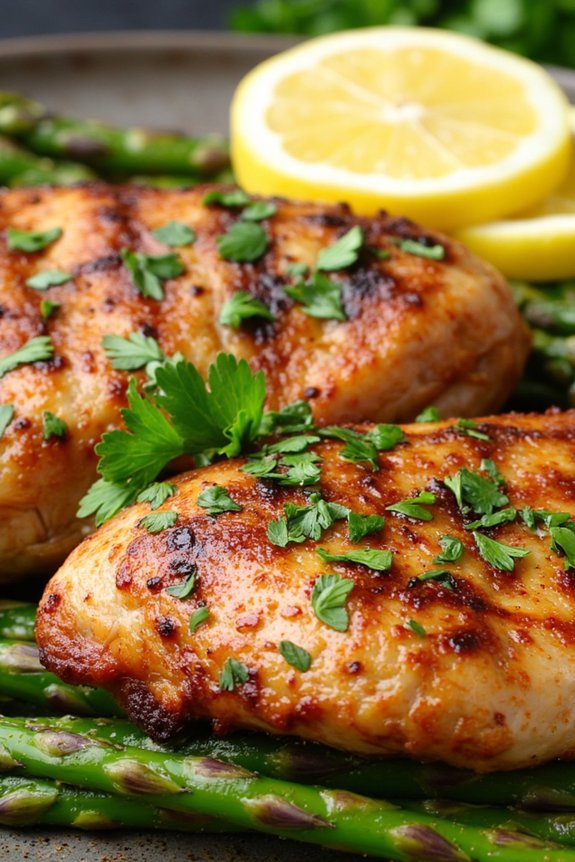
Lemon Herb Grilled Chicken With Asparagus is a delightful dish that combines the zesty flavors of lemon with the aromatic essence of herbs. This recipe is perfect for an Italian dinner party, offering a healthy and flavorful main course that’s sure to impress your guests.
The chicken is marinated in a blend of lemon juice, garlic, and a mix of fresh herbs, then grilled to perfection alongside tender asparagus for a meal that’s both vibrant and satisfying.
Serving 4-6 people, this dish isn’t only easy to prepare but also quick to cook, making it an ideal choice for entertaining. Asparagus complements the lemon herb chicken beautifully, adding a touch of elegance and a pop of color to the plate.
Whether you’re planning a casual gathering or a more formal affair, Lemon Herb Grilled Chicken With Asparagus is sure to be a hit.
Ingredients:
- 4 boneless, skinless chicken breasts
- 1 pound asparagus, trimmed
- 1/4 cup olive oil
- 1/4 cup fresh lemon juice
- 3 cloves garlic, minced
- 1 tablespoon fresh thyme, chopped
- 1 tablespoon fresh rosemary, chopped
- 1 teaspoon salt
- 1/2 teaspoon black pepper
- Lemon wedges, for serving
- Fresh parsley, chopped, for garnish
Instructions:
- Prepare the Marinade: In a medium bowl, whisk together the olive oil, lemon juice, minced garlic, chopped thyme, rosemary, salt, and black pepper until well combined.
- Marinate the Chicken: Place the chicken breasts in a large resealable plastic bag or a shallow dish. Pour the marinade over the chicken, ensuring each piece is well coated. Seal the bag or cover the dish, and refrigerate for at least 30 minutes, or up to 2 hours for more intense flavor.
- Preheat the Grill: Preheat your grill to medium-high heat. While the grill is heating, remove the chicken from the marinade and let it sit at room temperature for about 10 minutes.
- Grill the Chicken: Place the chicken on the grill and cook for 5-7 minutes on each side, or until the internal temperature reaches 165°F (75°C) and the chicken is nicely charred.
- Grill the Asparagus: While the chicken is grilling, toss the asparagus with a little olive oil, salt, and pepper. Place the asparagus on the grill and cook for 4-5 minutes, turning occasionally, until tender and slightly charred.
- Serve: Arrange the grilled chicken and asparagus on a serving platter. Garnish with lemon wedges and chopped parsley. Serve immediately while hot.
Extra Tips:
When grilling, make sure to oil the grill grates to prevent the chicken from sticking.
If you prefer a more pronounced lemon flavor, add some lemon zest to the marinade. For a smokier taste, consider using a charcoal grill. If using a gas grill, you can add a small piece of hickory or mesquite wood to infuse a smoky aroma.
Always let the chicken rest for a few minutes before serving to lock in the juices, ensuring a moist and flavorful bite every time.
Osso Buco With Gremolata
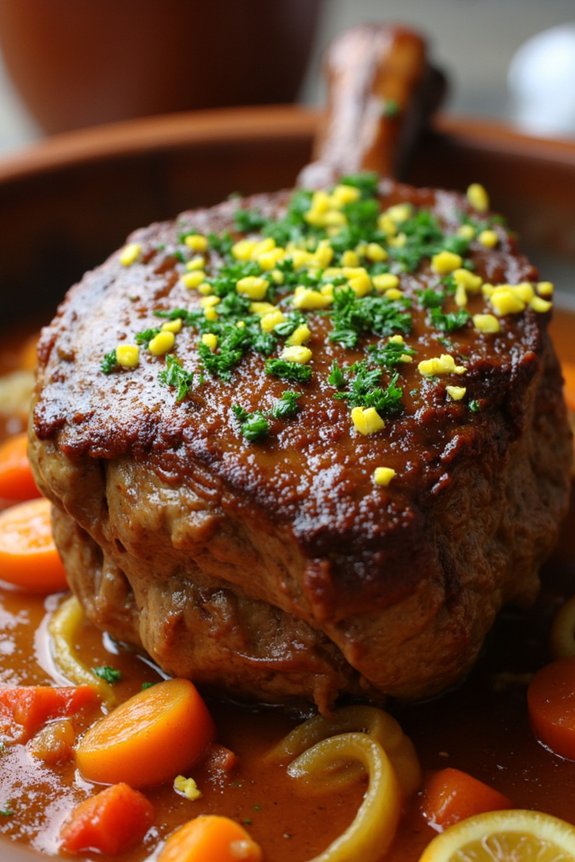
Osso Buco with Gremolata is a classic Italian dish that’s perfect for a dinner party, offering a delightful combination of flavors and textures. Traditionally made with veal shanks, the dish is braised slowly to produce tender, flavorful meat that falls off the bone. The richness of the Osso Buco is beautifully complemented by gremolata, a zesty mixture of lemon zest, garlic, and parsley, adding a revitalizing contrast to the dish.
Serve it with risotto or polenta for a complete and satisfying meal that will impress your guests. This dish is a celebration of Italian culinary traditions, showcasing the significance of quality ingredients and patience in cooking. The braising process allows the flavors to meld together, creating a harmonious balance of savory and aromatic elements.
Osso Buco with Gremolata isn’t only delicious but also a visually stunning centerpiece for your dinner table. With a bit of preparation and care, you can bring this authentic Italian experience to your home, transporting your guests to the heart of Italy with every bite.
Ingredients (serves 4-6):
- 4-6 veal shanks (about 1 1/2 inches thick)
- Salt and freshly ground black pepper
- 1/2 cup all-purpose flour
- 1/4 cup olive oil
- 1 onion, finely chopped
- 2 carrots, diced
- 2 celery stalks, diced
- 3 cloves garlic, minced
- 1 cup dry white wine
- 2 cups chicken or beef broth
- 1 can (14 oz) diced tomatoes
- 2 tablespoons tomato paste
- 2 bay leaves
- 1 teaspoon thyme
- Zest of 1 lemon
- 2 tablespoons fresh parsley, chopped
Cooking Instructions:
- Prepare the Veal Shanks:
- Season the veal shanks with salt and pepper on both sides. Dredge them lightly in flour, shaking off any excess.
- Brown the Meat:
- In a large, heavy-bottomed pot or Dutch oven, heat the olive oil over medium-high heat. Add the veal shanks and brown them on all sides, about 4-5 minutes per side. Remove the shanks and set aside.
- Sauté the Vegetables:
- In the same pot, add the chopped onion, carrots, and celery. Sauté until the vegetables are soft and the onion is translucent, about 5-7 minutes. Add the minced garlic and cook for an additional minute.
- Deglaze the Pan:
- Pour in the white wine to deglaze the pan, scraping up any browned bits from the bottom. Let the wine reduce by half.
- Add Liquids and Seasonings:
- Stir in the chicken or beef broth, diced tomatoes, and tomato paste. Add the bay leaves and thyme. Bring the mixture to a simmer.
- Braise the Osso Buco:
- Return the veal shanks to the pot, submerging them in the liquid. Cover the pot with a lid and reduce the heat to low. Allow the shanks to braise for about 2 to 2 1/2 hours, or until the meat is tender and falling off the bone.
- Prepare the Gremolata:
- While the Osso Buco is braising, mix together the lemon zest, chopped parsley, and a clove of minced garlic in a small bowl. Set aside.
- Finish and Serve:
- Once the Osso Buco is done, remove the bay leaves and discard them. Serve the veal shanks topped with a generous sprinkle of gremolata, alongside your choice of risotto or polenta.
Extra Tips:
When making Osso Buco with Gremolata, make certain you have a good quality veal shank with the bone in, as the bone marrow adds a rich depth of flavor to the dish. If veal isn’t available, beef shanks can be a suitable substitute.
It’s vital to brown the meat properly to seal in the juices and develop a deep, rich flavor. When making the gremolata, use a microplane to finely zest the lemon for the best texture and flavor. For an added touch, consider adding a splash of lemon juice to the braising liquid towards the end of cooking for a bright, tangy finish.
Saffron and Seafood Risotto

Saffron and Seafood Risotto is an exquisite Italian dish that combines the luxurious aroma of saffron with the fresh, briny flavors of seafood, resulting in a creamy and indulgent meal perfect for a dinner party. This dish isn’t only a feast for the senses but also a reflection of the beautiful simplicity of Italian cuisine.
With its golden hue and rich, velvety texture, Saffron and Seafood Risotto will surely be a standout dish at your gathering, impressing your guests with its elegance and taste.
The key to a perfect risotto lies in the careful preparation and patience required to coax out the creamy consistency from the rice. Arborio rice is traditionally used for risotto due to its high starch content, which is vital for achieving the desired texture.
The addition of saffron, a coveted spice known for its vibrant color and unique flavor, elevates the dish to new heights. By incorporating a mix of seafood such as shrimp, mussels, and calamari, the risotto becomes a delightful symphony of flavors and textures. This recipe serves 4-6 people, making it an ideal choice for a special occasion or a cozy family meal.
Ingredients:
- 1 cup Arborio rice
- 3 tablespoons olive oil
- 1 medium onion, finely chopped
- 2 cloves garlic, minced
- 1/2 cup dry white wine
- 4 cups seafood or chicken stock, heated
- 1/2 teaspoon saffron threads
- 1/2 pound shrimp, peeled and deveined
- 1/2 pound mussels, cleaned and debearded
- 1/2 pound calamari, cleaned and sliced into rings
- 1/4 cup grated Parmesan cheese
- 2 tablespoons unsalted butter
- Salt and pepper to taste
- 2 tablespoons fresh parsley, chopped
- Lemon wedges, for garnish
Instructions:
- Prepare the Saffron: Start by soaking the saffron threads in 2 tablespoons of warm water to release their color and flavor. Set aside while you prepare the risotto.
- Cook the Aromatics: In a large, heavy-bottomed pan, heat the olive oil over medium heat. Add the chopped onion and minced garlic, cooking until the onion becomes translucent and fragrant, about 3-4 minutes.
- Toast the Rice: Add the Arborio rice to the pan, stirring well to coat each grain with the oil. Cook for 2 minutes, allowing the rice to toast slightly.
- Deglaze with Wine: Pour in the white wine, stirring continuously as it simmers until mostly absorbed by the rice. This step not only adds flavor but also helps in releasing the starches from the rice.
- Incorporate the Stock and Saffron: Add the saffron along with its soaking liquid to the pan. Begin adding the heated stock, one ladleful at a time, stirring frequently and allowing each addition of liquid to be absorbed before adding the next. Continue this process for about 18-20 minutes until the rice is creamy and al dente.
- Cook the Seafood: In a separate pan, heat a tablespoon of olive oil over medium-high heat. Add the shrimp, mussels, and calamari, cooking until the shrimp are pink and the mussels have opened, about 5 minutes. Discard any mussels that don’t open.
- Combine and Finish: Gently fold the cooked seafood into the risotto. Stir in the Parmesan cheese and butter, mixing until melted and well incorporated. Season with salt and pepper to taste.
- Garnish and Serve: Remove from heat and sprinkle with fresh parsley. Serve immediately, garnished with lemon wedges for an extra burst of freshness.
Extra Tips:
When making risotto, it’s important to maintain a consistent simmer and to stir frequently to encourage the rice to release its starches, creating that signature creamy texture.
Keep your stock warm throughout the cooking process to guarantee it incorporates smoothly without lowering the temperature of the risotto. Be patient and resist the urge to add too much stock at once as gradual incorporation is key.
If you prefer a richer flavor, you can substitute half of the stock with clam juice or fish stock. Finally, verify all seafood is fresh and properly cleaned to enhance the dish’s overall quality and taste.
Tiramisu With Mascarpone and Espresso
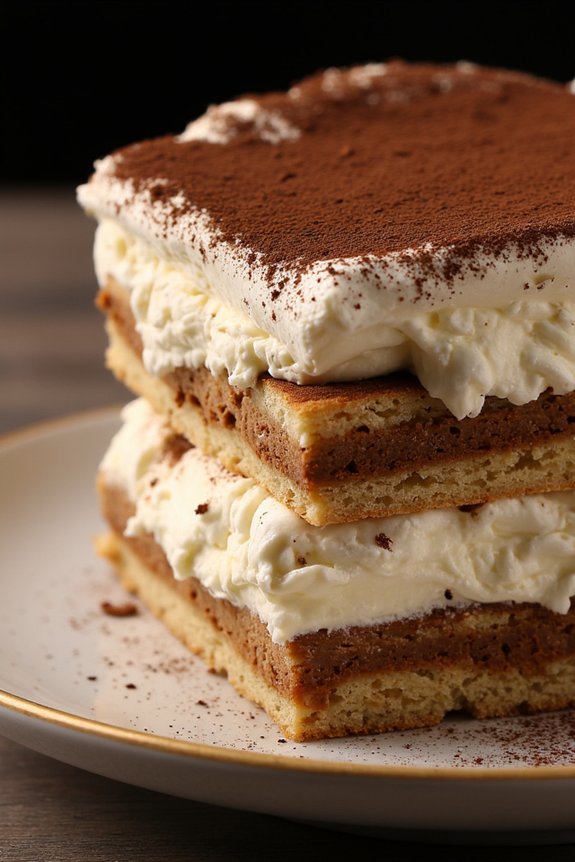
Tiramisu With Mascarpone and Espresso is a classic Italian dessert that combines layers of coffee-soaked ladyfingers with a rich, creamy mascarpone filling, all dusted with cocoa powder. This dessert is known for its luxurious texture and the perfect balance of flavors between the bitter espresso and the sweet, creamy filling. It’s an ideal choice for an Italian dinner party as it can be made in advance, allowing the flavors to meld beautifully.
The essence of a traditional Tiramisu is its simplicity; it requires no baking and only a handful of ingredients to create a decadent treat that leaves a lasting impression. The key is to use high-quality ingredients, especially the espresso and mascarpone, to guarantee each bite is flavorful and authentic. The following recipe serves 4-6 people and is sure to become a favorite among your guests.
Ingredients:
- 6 large egg yolks
- 3/4 cup granulated sugar
- 2/3 cup milk
- 1 1/4 cups heavy cream
- 1/2 teaspoon pure vanilla extract
- 1 pound mascarpone cheese
- 1 cup strong brewed espresso, cooled
- 1/4 cup coffee liqueur (optional)
- 24 ladyfingers
- Unsweetened cocoa powder, for dusting
- Dark chocolate shavings (optional), for garnish
Instructions:
- Prepare the Custard Base: In a medium saucepan, whisk together the egg yolks and sugar until well combined. Gradually whisk in the milk. Place the saucepan over medium heat and cook, stirring constantly, until the mixture thickens slightly, about 8-10 minutes. Don’t allow it to boil. Once thickened, remove from heat and let it cool slightly.
- Whip the Cream: In a separate bowl, using an electric mixer, whip the heavy cream and vanilla extract until stiff peaks form. Set aside.
- Combine Mascarpone and Custard: In a large bowl, gently fold the mascarpone cheese into the cooled custard mixture until smooth and well combined. Then, gently fold in the whipped cream until no streaks remain.
- Prepare the Coffee Mixture: In a shallow dish, combine the espresso and coffee liqueur. Quickly dip each ladyfinger into the coffee mixture, making sure they’re well soaked but not falling apart.
- Assemble the Tiramisu: In a 9×9 inch dish, arrange a single layer of soaked ladyfingers. Spread half of the mascarpone mixture over the ladyfingers. Repeat with another layer of soaked ladyfingers and the remaining mascarpone mixture.
- Chill and Serve: Cover the dish with plastic wrap and refrigerate for at least 4 hours, or overnight. Before serving, dust the top with cocoa powder and garnish with chocolate shavings if using.
Extra Tips: To achieve the best flavor, it’s important to let the tiramisu chill for several hours or overnight. This allows the ladyfingers to fully absorb the espresso and mascarpone flavors. If you prefer a stronger coffee taste, you can increase the amount of espresso or coffee liqueur.
Make sure not to oversoak the ladyfingers to avoid a soggy texture. For a touch of elegance, consider serving the tiramisu in individual cups or glasses, which also makes for easier portioning.
Panna Cotta With Mixed Berry Compote

Panna Cotta With Mixed Berry Compote is a classic Italian dessert that’s both elegant and simple to prepare, making it an excellent choice for an Italian dinner party. The creamy, silky texture of the panna cotta pairs beautifully with the sweet and slightly tart mixed berry compote, providing a delightful contrast of flavors and textures.
This dish can be prepared in advance, allowing you to focus on other elements of your dinner party while ensuring your guests are treated to a memorable dessert.
The origins of panna cotta are rooted in the Piedmont region of Italy, where it’s traditionally made with cream, sugar, and gelatin. The addition of a mixed berry compote brings a modern twist to this classic dessert. The compote is made using a combination of fresh or frozen berries, which are quickly cooked down with sugar and a hint of lemon juice to create a vibrant topping.
This recipe serves 4-6 people, making it ideal for a small gathering or intimate dinner party.
Ingredients:
*For the Panna Cotta:*
- 2 cups heavy cream
- 1 cup whole milk
- 1/2 cup granulated sugar
- 1 tablespoon unflavored gelatin
- 1 teaspoon vanilla extract
For the Mixed Berry Compote:
- 2 cups mixed berries (such as strawberries, blueberries, raspberries, blackberries)
- 1/4 cup granulated sugar
- 1 tablespoon lemon juice
- 1 teaspoon lemon zest
Cooking Instructions:
- Prepare the Gelatin: In a small bowl, sprinkle the gelatin over 2 tablespoons of cold water. Let it sit for about 5 minutes to bloom and soften.
- Heat the Cream Mixture: In a saucepan, combine the heavy cream, milk, and sugar. Heat over medium heat until the sugar dissolves and the mixture is hot but not boiling. Stir occasionally to prevent the cream from scorching.
- Incorporate Gelatin: Remove the saucepan from the heat. Add the softened gelatin and vanilla extract to the hot cream mixture, stirring well until the gelatin is fully dissolved.
- Pour and Chill: Pour the panna cotta mixture into individual serving glasses or ramekins. Cover each with plastic wrap and refrigerate for at least 4 hours or until set.
- Make the Berry Compote: In another saucepan, combine the mixed berries, sugar, lemon juice, and lemon zest. Cook over medium heat, stirring frequently, until the berries have broken down and the mixture thickens slightly, about 10 minutes. Allow the compote to cool before serving.
- Serve: Once the panna cotta is set, spoon the cooled berry compote over each panna cotta. Optionally, garnish with fresh mint leaves.
Extra Tips:
For best results, use fresh seasonal berries for the compote, but frozen berries will also work if fresh ones aren’t available.
Be sure to taste the compote and adjust the sugar according to the natural sweetness of the berries. Additionally, you can experiment with different flavorings in the panna cotta such as almond extract or a splash of liqueur for a personalized touch.
Remember to allow enough chilling time for the panna cotta to fully set, as this is essential for achieving the desired silky texture.