

As a passionate bread lover, I’m thrilled to share 15 herb-filled Italian 00 flour bread recipes with you. Picture the heavenly scent of rosemary and garlic focaccia wafting through your kitchen. Enjoy the satisfying crunch of thyme and olive oil breadsticks. Each recipe offers a taste of Italy, turning simple ingredients into a masterpiece. Let’s explore these delightful loaves together.
Rosemary and Garlic Focaccia
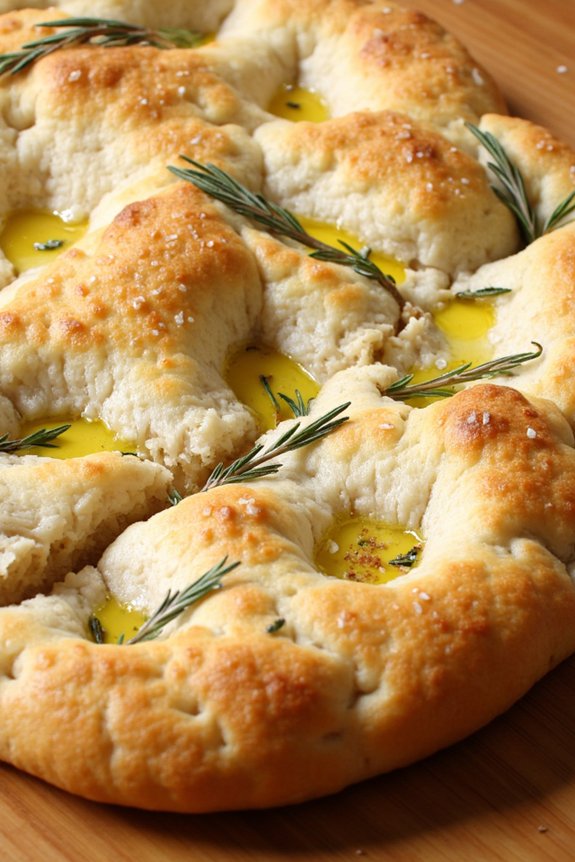
Focaccia is a classic Italian bread that’s well-loved for its light, fluffy texture and flavorful crust. This Rosemary and Garlic Focaccia recipe infuses the bread with the aromatic scents of fresh rosemary and the rich taste of garlic, making it a perfect accompaniment to any meal.
Whether served as an appetizer, a side, or even used as a base for sandwiches, this focaccia is sure to impress your family and friends.
The beauty of this recipe lies in its simplicity and versatility. With basic ingredients and a little bit of effort, you can create a bread that’s both rustic and elegant. The rosemary provides a fragrant earthy note, while the garlic adds a subtle depth of flavor. Olive oil is essential, not just for its taste, but also for achieving the focaccia’s characteristic crispy crust.
This recipe serves 4-6 people, making it ideal for a small gathering or family meal.
Ingredients:
- 2 1/4 teaspoons active dry yeast
- 1 3/4 cups warm water (about 110°F)
- 1 tablespoon sugar
- 5 cups all-purpose flour
- 1 tablespoon salt
- 1/4 cup extra-virgin olive oil, plus more for drizzling
- 2 tablespoons fresh rosemary, chopped
- 4 cloves garlic, minced
- Coarse sea salt, for sprinkling
Instructions:
- Activate the Yeast: In a large bowl, combine the warm water and sugar. Sprinkle the yeast over the top and let it sit for about 5-10 minutes until it becomes foamy. This indicates that the yeast is active and ready to use.
- Prepare the Dough: Add the flour and salt to the yeast mixture, mixing gradually to combine. Once the flour is incorporated, add 1/4 cup of olive oil and continue kneading the dough until it’s smooth and elastic, about 10 minutes. You can use a stand mixer with a dough hook for convenience.
- First Rise: Transfer the dough to a lightly oiled bowl, cover it with a damp cloth, and let it rise in a warm place for about 1 hour, or until the dough has doubled in size.
- Prepare the Topping: While the dough is rising, mix together the chopped rosemary and minced garlic in a small bowl. Set aside.
- Shape the Dough: Once the dough has risen, punch it down to release any air bubbles. Transfer it to a well-oiled baking sheet, stretching and pressing it with your fingers to fit the size of the pan. The dough should be about 1/2 inch thick.
- Second Rise: Cover the dough loosely with plastic wrap and let it rise again for about 20-30 minutes until slightly puffy.
- Add Toppings: Preheat your oven to 425°F (220°C). Use your fingers to create dimples all over the surface of the dough. Drizzle the dough generously with olive oil, ensuring it pools in the dimples. Sprinkle the rosemary and garlic mixture evenly over the top, and finish with a sprinkle of coarse sea salt.
- Bake: Place the focaccia in the preheated oven and bake for 20-25 minutes, or until the top is golden brown and the bread sounds hollow when tapped.
- Cool and Serve: Remove the focaccia from the oven and let it cool slightly on a wire rack. Cut into squares or slices and serve warm or at room temperature.
Extra Tips:
For a more intense flavor, consider infusing the olive oil with garlic and rosemary by gently heating them together before adding them to the dough and as a topping.
You can also experiment with additional toppings such as olives, sun-dried tomatoes, or caramelized onions for a unique twist.
If you’re short on time, the dough can be prepared a day in advance and allowed to rise slowly in the refrigerator overnight. Just remember to bring it back to room temperature before proceeding with the shaping and baking steps.
Basil and Sun-Dried Tomato Ciabatta
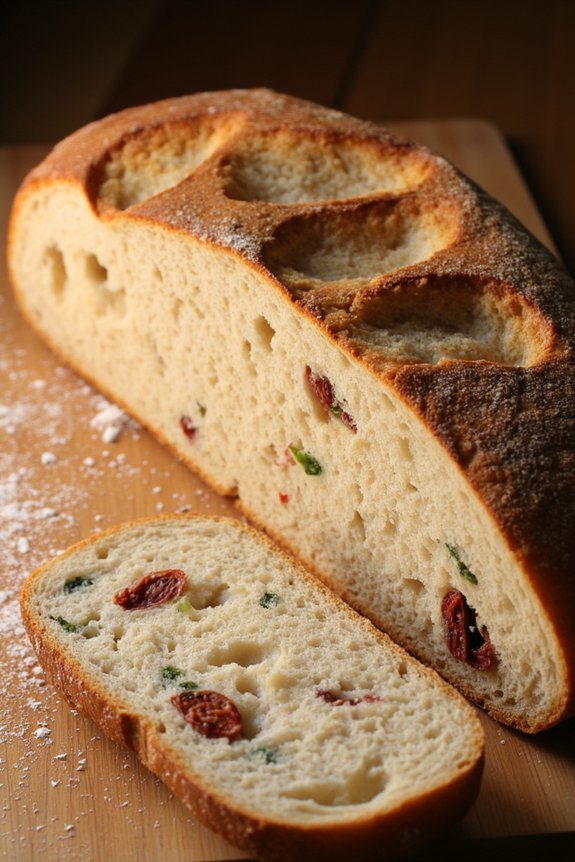
Basil and Sun-Dried Tomato Ciabatta is a delightful variation on the classic Italian bread, offering a burst of Mediterranean flavors with each bite. This bread is characterized by its airy texture, crispy crust, and the aromatic combination of fresh basil and tangy sun-dried tomatoes. Perfect as a side for Italian dishes, a base for sandwiches, or simply enjoyed on its own, this ciabatta will bring a touch of Italy to your kitchen.
The process of making ciabatta can seem intimidating due to its unique texture, but with patience and attention to detail, it’s quite achievable at home. The key lies in the dough’s high hydration and gentle handling, which create the signature holes and chewy texture. Infusing the dough with basil and sun-dried tomatoes not only adds color but also infuses the bread with a rich, savory flavor profile that complements a wide range of dishes.
Ingredients (Serves 4-6):
- 3 1/4 cups all-purpose flour
- 1 1/2 cups warm water
- 1 1/2 teaspoons salt
- 1 teaspoon sugar
- 2 teaspoons active dry yeast
- 1/4 cup olive oil
- 1/2 cup chopped sun-dried tomatoes
- 1/4 cup chopped fresh basil
Instructions:
- Activate the Yeast: In a small bowl, combine the warm water, sugar, and yeast. Stir gently and let it sit for about 5-10 minutes until it becomes frothy, indicating the yeast is activated.
- Mix the Dough: In a large mixing bowl, combine the flour and salt. Make a well in the center and pour in the yeast mixture and olive oil. Stir with a wooden spoon until a shaggy dough forms.
- Knead the Dough: Transfer the dough onto a floured surface and knead for about 8-10 minutes until it becomes smooth and elastic. If the dough is too sticky, sprinkle a little more flour as needed.
- Incorporate Flavors: Gently fold in the chopped sun-dried tomatoes and basil into the dough until evenly distributed.
- First Rise: Place the dough in a lightly oiled bowl, cover with a damp cloth, and allow it to rise in a warm place for about 1.5 to 2 hours, or until doubled in size.
- Shape the Ciabatta: Turn the dough out onto a floured surface, gently deflate it, and divide it into two equal portions. Shape each portion into a rough rectangle, being careful not to expel too much air.
- Second Rise: Place the shaped dough onto a parchment-lined baking sheet, cover with a damp cloth, and let it rise for another 45 minutes.
- Preheat the Oven: While the dough is rising, preheat your oven to 450°F (230°C). Place a baking stone or an inverted baking sheet inside to heat up.
- Bake the Bread: Once the oven is preheated, carefully slide the parchment with the dough onto the hot stone or baking sheet. Bake for 20-25 minutes, or until the bread is golden brown and sounds hollow when tapped on the bottom.
- Cool the Bread: Remove the ciabatta from the oven and let it cool on a wire rack before slicing.
Extra Tips: For the best texture, make sure your dough remains slightly sticky, as this high hydration level is essential for ciabatta’s airy crumb. Be gentle when incorporating the sun-dried tomatoes and basil to preserve the dough’s structure. If you don’t have a baking stone, a preheated heavy-duty baking sheet will work just as well. Finally, store any leftover bread in a paper bag to maintain its crispy crust.
Thyme and Olive Oil Breadsticks
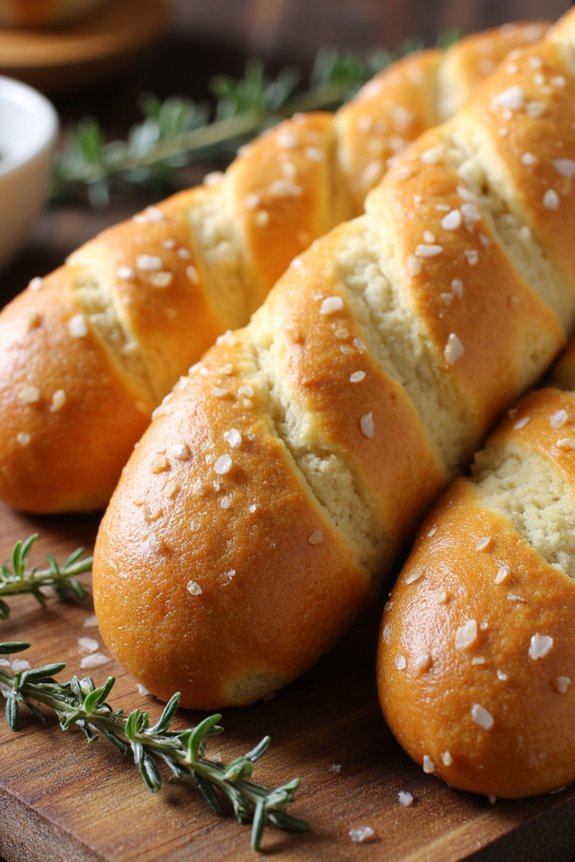
Thyme and Olive Oil Breadsticks are a delightful addition to any Italian meal, providing a light and savory complement to soups, salads, or as a standalone appetizer.
These breadsticks are infused with the aromatic essence of thyme and the rich, fruity undertones of olive oil. They’re perfect for dipping in sauces or enjoying on their own, offering a crispy exterior with a soft, chewy interior. Making these breadsticks at home allows you to enjoy them fresh out of the oven, with the added bonus of filling your kitchen with an irresistible aroma.
Creating these breadsticks is a straightforward process that involves making a simple dough, shaping it into sticks, and baking them to golden perfection. The key to their flavor lies in the quality of the olive oil and the freshness of the thyme, both of which should be chosen with care to guarantee the best result.
This recipe will yield enough breadsticks to serve 4-6 people, making it a great choice for family dinners or small gatherings.
Ingredients (Serves 4-6):
- 2 1/4 cups all-purpose flour
- 1 packet (2 1/4 teaspoons) active dry yeast
- 1 teaspoon salt
- 1 tablespoon sugar
- 1 cup warm water (about 110°F/45°C)
- 1/4 cup extra virgin olive oil
- 1 tablespoon fresh thyme leaves, chopped
- Additional olive oil for brushing
- Coarse sea salt for sprinkling
Cooking Instructions:
- Prepare the Dough: In a large mixing bowl, dissolve the sugar in the warm water, then sprinkle the yeast on top. Let it sit for about 5 minutes until it becomes frothy, indicating that the yeast is active.
- Mix Ingredients: Add the olive oil, salt, and 1 tablespoon of chopped thyme to the yeast mixture. Gradually add the flour, mixing with a wooden spoon until a dough begins to form.
- Knead the Dough: Transfer the dough to a floured surface and knead for about 8-10 minutes until it becomes smooth and elastic. If the dough is sticky, add a little more flour as needed.
- First Rise: Place the dough in a lightly oiled bowl, cover it with a damp cloth, and let it rise in a warm place for about 1 hour, or until it has doubled in size.
- Shape the Breadsticks: Preheat the oven to 400°F (200°C). Punch down the risen dough and divide it into 12 equal pieces. Roll each piece into a long, thin stick about 10-12 inches in length.
- Prepare for Baking: Arrange the breadsticks on a baking sheet lined with parchment paper. Brush them lightly with olive oil and sprinkle with coarse sea salt and additional thyme leaves.
- Bake: Place the baking sheet in the preheated oven and bake for 12-15 minutes, or until the breadsticks are golden and crisp.
- Cool and Serve: Allow the breadsticks to cool slightly on a wire rack before serving. They’re best enjoyed warm or at room temperature.
Extra Tips: To guarantee your Thyme and Olive Oil Breadsticks have the perfect texture, make sure not to over-knead the dough, as this can make the breadsticks tough.
If you prefer a slightly softer breadstick, you can adjust the baking time by a couple of minutes. Additionally, experimenting with different herbs such as rosemary or oregano can add a unique twist to this classic recipe.
Finally, storing any leftovers in an airtight container will help maintain their freshness for a few days.
Sage and Parmesan Sourdough

Sage and Parmesan Sourdough is a unique twist on the traditional sourdough bread, combining the earthy, aromatic flavor of sage with the rich, nutty taste of Parmesan cheese. This bread is perfect for those who enjoy the complexity of sourdough with an added gourmet touch, making it an ideal addition to any dinner table, whether as a side or the main attraction.
The fermentation process of sourdough not only imparts a delightful tang but also aids in digestion, making this bread a wholesome choice for family meals.
Crafting Sage and Parmesan Sourdough requires a bit of patience, as the sourdough starter needs time to develop the perfect flavor and texture. However, the end result is well worth the wait, resulting in a loaf that’s flavorful, chewy, and beautifully aromatic.
The combination of fresh sage and grated Parmesan not only enhances the taste but also adds a delightful aroma that will fill your kitchen as it bakes. This recipe serves 4-6 people, guaranteeing everyone gets to enjoy a slice (or two) of this delicious bread.
Ingredients:
- 500g bread flour
- 300g active sourdough starter
- 325ml water
- 10g salt
- 50g grated Parmesan cheese
- 2 tablespoons chopped fresh sage
- Extra flour for dusting
Instructions:
- Prepare the Dough: In a large mixing bowl, combine the bread flour and water. Mix until a rough dough forms. Cover the bowl with a damp cloth and let it sit for 30 minutes to allow the flour to hydrate.
- Add the Starter and Salt: After 30 minutes, add the active sourdough starter and salt to the dough. Mix well using your hands or a dough scraper until the ingredients are fully combined. The dough will be sticky, but this is normal.
- Knead the Dough: Transfer the dough onto a lightly floured surface. Knead it for about 10 minutes until it becomes smooth and elastic. You may need to add a little more flour if the dough is too sticky, but avoid adding too much.
- First Rise: Place the kneaded dough into a clean, lightly oiled bowl. Cover it with a damp cloth and let it rise at room temperature for about 3-4 hours, or until it has doubled in size.
- Incorporate Sage and Parmesan: Once the dough has risen, gently stretch it into a rectangular shape on a floured surface. Sprinkle the chopped sage and grated Parmesan evenly over the dough. Fold the dough over itself several times to incorporate the sage and cheese.
- Shape the Loaf: Shape the dough into a round or oval loaf. Place it seam-side down onto a piece of parchment paper dusted with flour.
- Second Rise: Cover the loaf with a damp cloth and let it rise for another 2-3 hours at room temperature, or until it has risen considerably.
- Preheat the Oven: Preheat your oven to 230°C (450°F). Place a Dutch oven or a heavy baking pot with a lid inside to heat up.
- Bake the Bread: Carefully remove the hot pot from the oven. Using the parchment paper, lift the dough and place it inside the pot. Score the top of the loaf with a sharp knife. Cover with the lid and bake for 20 minutes. Remove the lid and bake for another 20-25 minutes until the bread is golden brown and sounds hollow when tapped on the bottom.
- Cool Down: Remove the bread from the pot and let it cool on a wire rack for at least 1 hour before slicing.
Extra Tips: For the best results, make sure your sourdough starter is active and bubbly before using it in the dough. This will guarantee a good rise and flavor.
If you prefer a stronger sage flavor, you can increase the amount of sage to taste. Additionally, if you don’t have a Dutch oven, you can bake the loaf on a preheated baking stone with a pan of water placed in the oven to create steam, which helps develop a crispy crust.
Oregano and Black Olive Baguette
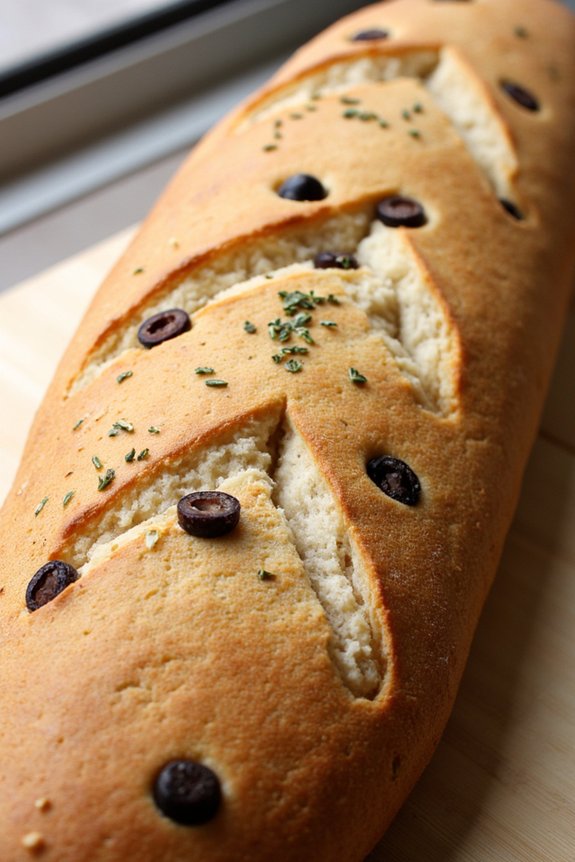
Oregano and Black Olive Baguette is an exquisite Italian bread that combines the earthy aroma of oregano with the briny kick of black olives. This delightful baguette is perfect for accompanying soups, salads, or serving as a flavorful base for a sandwich. The crispy crust and soft, flavorful interior make it an irresistible addition to your baking repertoire.
Whether you’re an experienced baker or just starting out, this recipe is designed to guide you through the process of creating a perfect baguette that will impress your family and friends.
The key to a successful Oregano and Black Olive Baguette lies in using quality ingredients and allowing time for the dough to develop flavor and texture through proper fermentation. The addition of oregano brings a fragrant herbal note, while the black olives add a savory depth that complements the bread’s natural sweetness.
The following recipe will yield enough for a serving size of 4-6 people, guaranteeing everyone has a chance to enjoy this delicious bread.
Ingredients:
- 500g all-purpose flour
- 10g salt
- 10g sugar
- 7g instant yeast
- 300ml warm water
- 50g black olives, pitted and chopped
- 1 tablespoon dried oregano
- 2 tablespoons olive oil
Instructions:
- Prepare the Dough: In a large mixing bowl, combine the flour, salt, sugar, and instant yeast. Mix well to evenly distribute the dry ingredients.
- Add Wet Ingredients: Create a well in the center of the dry mixture and pour in the warm water and olive oil. Mix until a rough dough begins to form.
- Knead the Dough: Turn the dough out onto a floured surface and knead for about 10 minutes until it becomes smooth and elastic. Incorporate the chopped black olives and dried oregano into the dough during the last few minutes of kneading.
- First Rise: Place the dough in a lightly oiled bowl, cover with a damp cloth, and let it rise in a warm place for approximately 1-2 hours or until it has doubled in size.
- Shape the Baguettes: Once risen, punch down the dough to release any air bubbles. Divide the dough into two equal portions. Shape each portion into a baguette by flattening the dough into a rectangle, then folding the long edges toward the center, and rolling it into a log shape.
- Second Rise: Place the shaped baguettes onto a parchment-lined baking sheet. Cover them with a damp cloth and let them rise again for about 30-45 minutes until they’re puffy.
- Preheat and Score: Preheat your oven to 220°C (428°F). Just before baking, use a sharp knife to make a few diagonal slashes across the top of each baguette.
- Bake the Baguettes: Bake in the preheated oven for 20-25 minutes until the baguettes are golden brown and sound hollow when tapped on the bottom.
- Cool: Remove the baguettes from the oven and let them cool on a wire rack before slicing.
Extra Tips:
For the best results, make sure your water is at the right temperature; it should be warm to the touch but not hot. This guarantees that the yeast activates properly without killing it.
If you prefer a stronger olive flavor, consider using Kalamata olives, which have a richer taste. Additionally, if you like a crunchier crust, place a small pan of water at the bottom of the oven while baking to create steam. This steam helps develop a crisp exterior on the baguettes.
Enjoy your Oregano and Black Olive Baguette freshly baked for the best flavor and texture!
Chive and Ricotta Flatbread
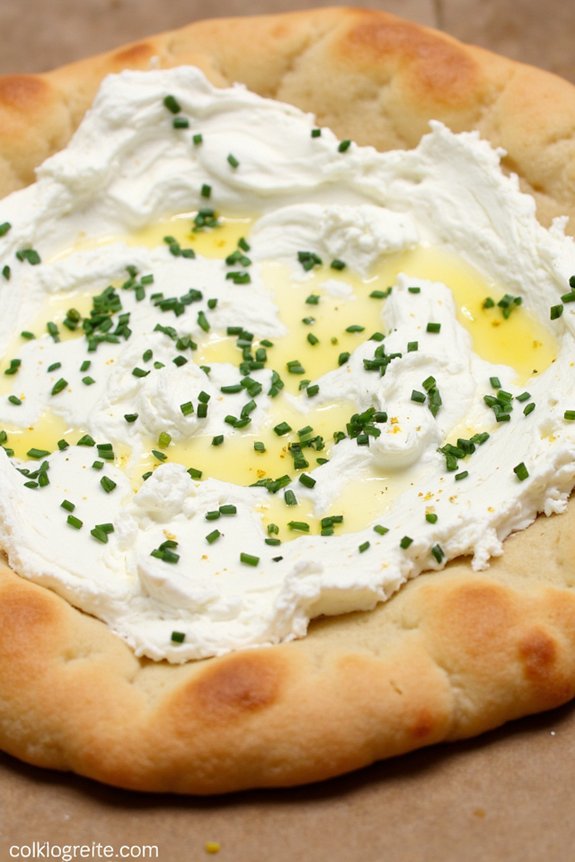
Chive and Ricotta Flatbread is a delightful Italian-inspired dish that combines the fresh, aromatic flavor of chives with the creamy richness of ricotta cheese, all atop a perfectly crisp flatbread base. This dish is a wonderful appetizer or side dish that can complement a variety of meals or stand alone as a light meal itself.
The combination of the soft, creamy ricotta and the subtle oniony taste of the chives creates a harmonious blend of flavors that’s enhanced by the warmth and crunch of the freshly baked flatbread.
This recipe is perfect when you need a quick, yet impressive, dish for a dinner party or a family gathering. With simple ingredients and straightforward preparation, even novice cooks can create this elegant dish.
The flatbread serves as a canvas for the rich ricotta and fresh chives, and can be customized with additional toppings to suit your personal taste preferences. Whether you’re serving this flatbread as a starter or a main course, it’s sure to be a crowd-pleaser.
Ingredients (serving size: 4-6 people):
- 2 cups all-purpose flour
- 1 teaspoon salt
- 1 teaspoon baking powder
- 1/4 cup olive oil
- 3/4 cup warm water
- 1 cup ricotta cheese
- 1/4 cup finely chopped fresh chives
- 1/4 cup grated Parmesan cheese
- 1 tablespoon lemon zest
- Salt and pepper to taste
- Additional olive oil for brushing
Cooking Instructions:
- Prepare the Dough: In a large mixing bowl, combine the flour, salt, and baking powder. Gradually add the olive oil and warm water, stirring until a dough forms. Knead the dough on a floured surface for about 5 minutes until smooth and elastic. Cover the dough with a clean cloth and let it rest for 20 minutes.
- Preheat the Oven: While the dough is resting, preheat your oven to 475°F (245°C). If you have a pizza stone, place it in the oven to heat up as well.
- Roll Out the Dough: Divide the dough into two equal portions. Roll each portion out on a lightly floured surface to form thin, round flatbreads, about 1/4 inch thick.
- Prepare the Topping: In a medium bowl, mix the ricotta cheese, chopped chives, grated Parmesan, and lemon zest. Season the mixture with salt and pepper to taste, guaranteeing it’s well combined and evenly seasoned.
- Assemble the Flatbread: Place the rolled-out dough onto a baking sheet or preheated pizza stone. Spread the ricotta mixture evenly over each flatbread, leaving a small border around the edges. Brush the edges with a little olive oil to help them crisp up.
- Bake the Flatbread: Transfer the flatbreads to the oven and bake for 10-12 minutes, or until the edges are golden brown and the cheese has melted and slightly browned.
- Serve: Remove from the oven and let cool slightly before slicing. Serve warm, garnished with additional chives if desired.
Extra Tips:
When making Chive and Ricotta Flatbread, verify the dough is rolled out thinly to achieve a crisp texture. If you prefer a more substantial base, you can roll it slightly thicker, but be aware that the baking time may need to be adjusted.
For added flavor, consider incorporating other herbs or toppings such as garlic, thyme, or caramelized onions. Using a preheated pizza stone can enhance the crispiness of the flatbread, but if you don’t have one, a regular baking sheet will suffice.
Experiment with different cheeses or even a drizzle of honey for a unique twist on this classic dish.
Dill and Lemon Zest Panini

Dill and Lemon Zest Panini is a delightful Italian-inspired sandwich that combines the fresh flavors of dill and bright citrus notes of lemon zest. This panini is perfect for a light lunch or a quick dinner, offering a revitalizing twist on traditional Italian bread recipes. The herbaceous dill complements the zesty lemon, creating a harmonious blend of flavors that pair beautifully with the melty cheese and crispy bread.
Whether you’re a seasoned chef or a home cook, this panini is simple to prepare and sure to impress your family and friends.
To make this Dill and Lemon Zest Panini, you’ll start by preparing a flavorful spread that infuses the sandwich with its signature taste. The spread is made with a combination of cream cheese, fresh dill, and grated lemon zest, which is then generously applied to slices of Italian bread. The bread is then layered with fresh vegetables and your choice of protein, like turkey or chicken, before being grilled to perfection. This recipe is intended to serve 4-6 people, making it an ideal choice for a family meal or small gathering.
Ingredients:
- 8 slices of Italian bread
- 1/2 cup cream cheese
- 2 tablespoons fresh dill, finely chopped
- 1 tablespoon lemon zest
- 8 slices of turkey or chicken breast
- 4 slices of provolone or mozzarella cheese
- 1 medium cucumber, thinly sliced
- 1 medium tomato, sliced
- 2 tablespoons olive oil
- Salt and pepper to taste
Cooking Instructions:
- Prepare the Spread: In a small bowl, mix the cream cheese, chopped dill, and lemon zest until well combined. This mixture will serve as the spread for your panini, providing the essential dill and lemon flavor.
- Assemble the Panini: Lay out the Italian bread slices on a clean surface. Spread a generous amount of the dill and lemon cream cheese mixture on one side of each bread slice.
- Layer the Ingredients: On half of the bread slices, layer 2 slices of turkey or chicken, followed by a slice of cheese, a few cucumber slices, and tomato slices. Season with salt and pepper to taste.
- Close the Sandwiches: Place the remaining bread slices, spread side down, on top of the layered ingredients to form a sandwich.
- Heat the Panini Press: Preheat a panini press or a large skillet over medium heat. If using a skillet, a heavy pan or a spatula can be used to press the sandwiches down.
- Cook the Panini: Brush the outside of each sandwich with olive oil. Place the sandwiches on the panini press or skillet. Cook for about 3-5 minutes on each side, or until the bread is golden brown and the cheese has melted.
- Serve: Remove the panini from the heat, let it cool slightly, then cut each sandwich in half. Serve warm.
Extra Tips:
For the best results, use fresh, high-quality ingredients, especially when it comes to the dill and lemon zest, as they’re key to the panini’s flavor profile.
If you prefer a spicier kick, consider adding a pinch of red pepper flakes to the cream cheese spread. Additionally, feel free to customize the panini with your favorite vegetables or proteins to suit your taste.
Finally, if you don’t have a panini press, you can achieve similar results with a grill pan or a regular skillet by applying pressure with a heavy object. Enjoy your delicious Dill and Lemon Zest Panini!
Tarragon and Pumpkin Seed Loaf
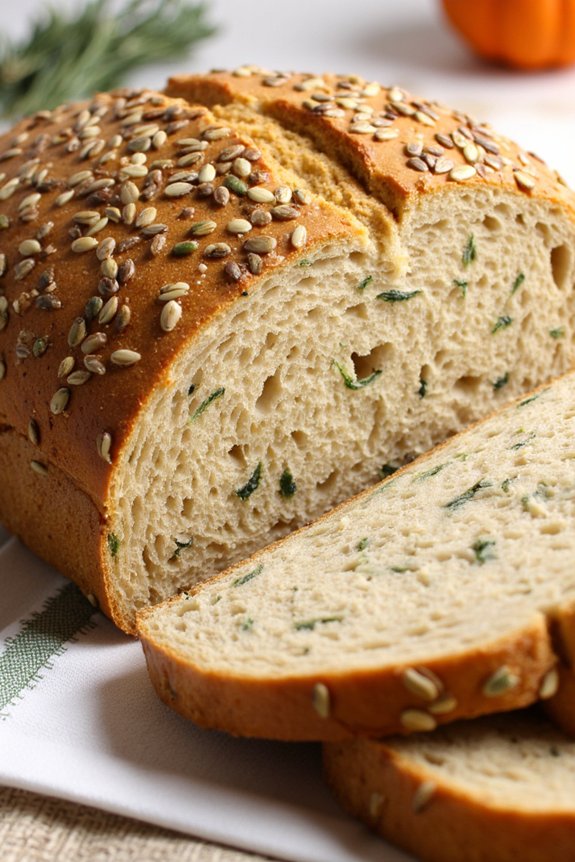
The Tarragon and Pumpkin Seed Loaf is a delightful twist on traditional Italian bread, combining the aromatic notes of tarragon with the nutty crunch of pumpkin seeds. This artisanal bread is perfect for those who enjoy experimenting with flavors and textures. It’s a wonderful addition to any meal, whether served as a side dish or as the base for a gourmet sandwich.
The loaf boasts a golden crust with a soft, airy interior, making it as pleasing to the eyes as it’s to the palate. This recipe is designed for a serving size of 4-6 people, providing enough to share with family or friends. The preparation process is straightforward, though it requires some patience as the dough needs time to rise.
The combination of yeast, herbs, and seeds results in a bread that’s both fragrant and satisfying. For those looking to add a unique touch to their baking repertoire, the Tarragon and Pumpkin Seed Loaf is an excellent choice.
Ingredients:
- 500g all-purpose flour
- 10g salt
- 7g active dry yeast
- 300ml warm water
- 2 tablespoons olive oil
- 2 tablespoons fresh tarragon, chopped
- 50g pumpkin seeds
- 1 tablespoon honey
Instructions:
- Prepare the Dough: In a large mixing bowl, combine the flour and salt. In a separate bowl, dissolve the yeast in the warm water and let it sit for about 5 minutes until it becomes frothy. Add the olive oil and honey to the yeast mixture, then pour it into the dry ingredients. Mix until a rough dough forms.
- Incorporate Flavors: Add the chopped tarragon and pumpkin seeds into the dough. Knead the dough on a floured surface for about 10 minutes until it becomes smooth and elastic. This step is vital for developing the gluten structure, which will give the bread its chewy texture.
- First Rise: Place the dough in a lightly oiled bowl, cover it with a damp cloth, and let it rise in a warm place for about 1 to 1.5 hours, or until it has doubled in size.
- Shape the Loaf: Once risen, gently punch down the dough to expel some of the air. Shape it into a loaf and place it on a baking sheet lined with parchment paper. Cover it loosely with a cloth and let it rise again for about 30-45 minutes.
- Preheat and Bake: Preheat your oven to 220°C (428°F). Once the loaf has risen, make a few shallow slashes on the top with a sharp knife. This allows the bread to expand properly while baking. Bake for 25-30 minutes or until the loaf is golden brown and sounds hollow when tapped on the bottom.
- Cool and Serve: Remove the loaf from the oven and let it cool on a wire rack for at least 15 minutes before slicing. This cooling period is essential to guarantee the bread’s texture sets properly.
Extra Tips:
For the best results, confirm your ingredients are at room temperature before starting, as this helps with yeast activation and dough consistency. If you’re using dried tarragon instead of fresh, use only half the amount since dried herbs have a more concentrated flavor.
Additionally, if you prefer a more pronounced pumpkin seed flavor, consider toasting the seeds lightly before adding them to the dough. This will enhance their nutty taste and add an extra layer of flavor to your loaf.
Parsley and Pecorino Dinner Rolls
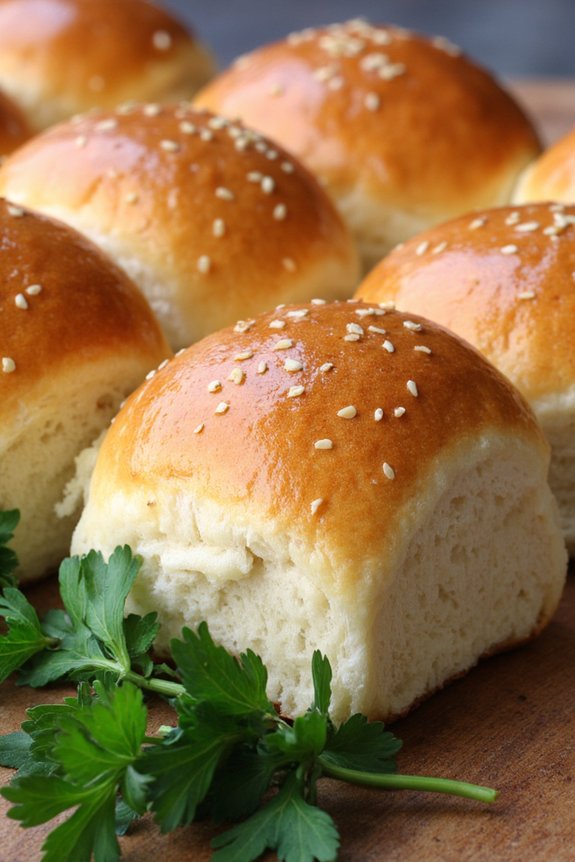
Parsley and Pecorino Dinner Rolls are a delightful addition to any Italian-themed meal. These fluffy, flavorful rolls are infused with the aromatic freshness of parsley and the rich, nutty taste of Pecorino cheese. Perfect for serving alongside a main course, these dinner rolls are sure to impress your guests with their gourmet appeal.
The combination of herbs and cheese not only adds a burst of flavor but also elevates the humble dinner roll into something truly special.
To prepare these delicious rolls, you’ll begin by making a simple dough that incorporates the key ingredients of parsley and Pecorino. The dough is then shaped into individual rolls and baked to golden perfection. The result is a warm, inviting aroma that fills your kitchen and a taste that’s as comforting as it’s sophisticated. Serve these rolls warm, perhaps with a pat of butter, and watch them disappear from the table in no time.
Ingredients (Serves 4-6)
- 3 1/2 cups all-purpose flour
- 1 packet (2 1/4 teaspoons) active dry yeast
- 1 cup warm water (110°F)
- 1/4 cup olive oil
- 1 tablespoon sugar
- 1 teaspoon salt
- 1 cup grated Pecorino cheese
- 1/2 cup finely chopped fresh parsley
- 1 egg (for egg wash)
- 1 tablespoon milk
Instructions
- Prepare the Yeast: In a small bowl, dissolve the sugar in warm water. Sprinkle the active dry yeast over the water and let it sit for about 5 minutes until it becomes frothy. This indicates that the yeast is active and ready to use.
- Mix the Dough: In a large mixing bowl, combine the flour and salt. Make a well in the center and add the yeast mixture and olive oil. Stir until the dough begins to come together.
- Add Flavorings: Fold in the grated Pecorino cheese and chopped parsley. Mix until evenly distributed throughout the dough.
- Knead the Dough: Turn the dough out onto a lightly floured surface and knead for about 8-10 minutes until smooth and elastic. Add more flour if the dough is sticky.
- First Rise: Place the dough in a lightly oiled bowl, cover with a damp cloth, and let it rise in a warm, draft-free place for about 1 hour or until doubled in size.
- Shape the Rolls: Punch down the dough to release air. Divide it into 12 equal pieces and shape each piece into a ball. Place them on a baking sheet lined with parchment paper, leaving some space between each roll.
- Second Rise: Cover the rolls with a kitchen towel and let them rise for another 30 minutes until they’ve puffed up.
- Preheat the Oven: While the rolls are rising, preheat your oven to 375°F (190°C).
- Egg Wash: In a small bowl, beat the egg with the milk. Brush this mixture over the tops of the rolls to give them a glossy finish.
- Bake: Bake the rolls in the preheated oven for 20-25 minutes, or until they’re golden brown and sound hollow when tapped on the bottom.
- Cool: Remove the rolls from the oven and let them cool on a wire rack for at least 10 minutes before serving.
Extra Tips
When making these Parsley and Pecorino Dinner Rolls, verify that the water used for activating the yeast isn’t too hot, as this can kill the yeast. Instead, aim for a temperature that’s warm to the touch, about 110°F.
Additionally, if you’d like a more intense flavor, consider adding more Pecorino or even a touch of garlic powder to the dough. Finally, for a softer crust, cover the rolls with a clean kitchen towel while they cool.
Cilantro and Lime Ciabatta
Cilantro and Lime Ciabatta is a delightful twist on the classic Italian bread, infusing it with the tangy zest of lime and the aromatic essence of cilantro. This bread is perfect for those who love a burst of flavor in every bite, making it a versatile choice for sandwiches, as an accompaniment to soups and salads, or simply enjoyed on its own with a bit of olive oil.
The soft, airy texture of the ciabatta, combined with the vibrant undertones of cilantro and lime, creates a unique culinary experience that’s both invigorating and satisfying. Making this bread at home allows you to control the quality of ingredients and the intensity of flavors, ensuring a perfect balance that suits your palate.
The process of creating Cilantro and Lime Ciabatta involves a few simple steps that will fill your kitchen with the irresistible aroma of fresh-baked bread, while also providing a gratifying baking experience. Whether you’re an experienced baker or a novice looking to try something new, this recipe is straightforward enough to follow and will certainly impress both family and friends with its delightful taste and texture.
Ingredients (Serving size: 4-6 people):
- 4 cups all-purpose flour
- 1 1/2 cups warm water
- 1 packet (2 1/4 teaspoons) active dry yeast
- 2 tablespoons olive oil
- 1 teaspoon salt
- Zest of 2 limes
- Juice of 1 lime
- 1/2 cup chopped fresh cilantro
Cooking Instructions:
- Activate the Yeast: In a small bowl, combine the warm water and yeast. Let it sit for about 5 minutes, or until the mixture becomes frothy. This indicates that the yeast is active and ready to use.
- Mix the Dry Ingredients: In a large mixing bowl, combine the flour and salt. Stir in the lime zest and chopped cilantro to evenly distribute the flavors.
- Combine and Knead: Make a well in the center of the dry ingredients and add the yeast mixture, olive oil, and lime juice. Stir until the dough starts to come together. Turn the dough out onto a floured surface and knead for about 10 minutes, or until the dough is smooth and elastic.
- First Rise: Place the kneaded dough in a lightly oiled bowl, cover it with a damp cloth, and let it rise in a warm area for about 1-2 hours, or until it doubles in size.
- Shape the Loaves: Once the dough has risen, gently punch it down to release any air bubbles. Divide the dough into two equal portions and shape each into a rectangular loaf. Place the loaves onto a baking sheet lined with parchment paper.
- Second Rise: Cover the loaves with a damp cloth and allow them to rise again for about 30 minutes. Preheat your oven to 425°F (220°C) during this time.
- Bake: Once the loaves have risen, place them in the preheated oven and bake for 25-30 minutes, or until they’ve a golden-brown crust and sound hollow when tapped on the bottom.
- Cool and Serve: Remove the bread from the oven and let it cool on a wire rack before slicing. The cooling process allows the bread to set and makes slicing easier.
Extra Tips: When kneading the dough, be mindful not to add too much flour, as the dough should remain slightly sticky for the characteristic texture of ciabatta. If you find the dough too sticky to handle, lightly flour your hands instead of adding extra flour to the dough.
For an aromatic twist, try adding a bit of minced garlic or a sprinkle of chili flakes to the dough during mixing for an added depth of flavor. Enjoy your homemade Cilantro and Lime Ciabatta fresh for the best taste, though it can be stored in an airtight container for a couple of days.
Lavender and Honey Breakfast Loaf
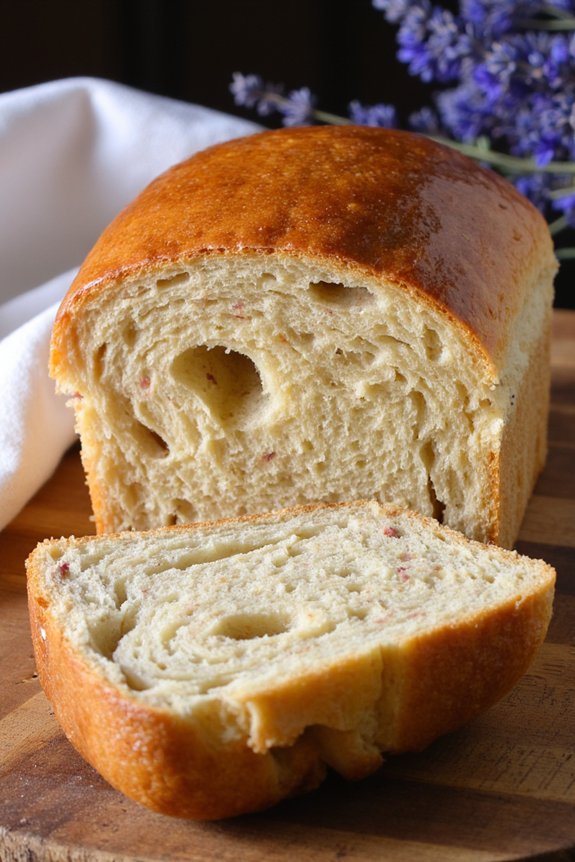
Lavender and Honey Breakfast Loaf is a delightful twist on traditional Italian bread, combining the soothing aroma of lavender with the natural sweetness of honey. This loaf is perfect for a cozy breakfast or a relaxing afternoon snack, offering a unique and fragrant experience that’s sure to elevate your morning routine.
The gentle floral notes of lavender pair beautifully with the rich, golden honey, creating a harmonious balance of flavors that’s both comforting and invigorating. Whether enjoyed on its own, lightly toasted, or spread with a bit of butter, this breakfast loaf is a wonderful way to start your day.
This recipe yields a loaf that serves 4-6 people, making it an ideal choice for family breakfasts or small gatherings. The preparation process is straightforward, requiring just a few simple ingredients to create a memorable and aromatic loaf. With a little time and patience, you can bring the taste of Italian-inspired lavender and honey bread to your table, offering a homemade treat that’s sure to impress.
Follow the steps below to create this deliciously fragrant Lavender and Honey Breakfast Loaf.
Ingredients:
- 3 cups all-purpose flour
- 2 teaspoons dried culinary lavender
- 1 packet (2 1/4 teaspoons) active dry yeast
- 1/4 cup honey
- 1 teaspoon salt
- 1 cup warm milk (about 110°F)
- 2 tablespoons unsalted butter, melted
- 1 large egg
- 1 tablespoon honey for glazing
Instructions:
- Prepare the Dry Ingredients: In a large mixing bowl, whisk together the flour, dried lavender, and salt. Confirm the lavender is evenly distributed throughout the flour for a consistent floral flavor in every bite.
- Activate the Yeast: In a separate small bowl, dissolve the yeast in the warm milk. Let it sit for about 5 minutes until it becomes frothy, indicating that the yeast is activated and ready to work its magic in the dough.
- Combine Wet Ingredients: Add the melted butter, honey, and egg to the yeast mixture, and stir until well combined. This mixture will provide the necessary moisture and sweetness to the dough.
- Mix the Dough: Gradually add the wet ingredients to the dry ingredients, stirring with a wooden spoon until the mixture comes together into a soft dough. If necessary, use your hands to knead the dough gently in the bowl until it forms a cohesive ball.
- Knead the Dough: Transfer the dough to a lightly floured surface and knead for about 8-10 minutes until it becomes smooth and elastic. This step is essential for developing the gluten structure that will give the bread its texture.
- First Rise: Place the dough in a lightly oiled bowl, cover it with a damp cloth or plastic wrap, and let it rise in a warm, draft-free area for 1-1.5 hours, or until it has doubled in size.
- Shape the Loaf: Once risen, punch down the dough gently to release excess air. Shape it into a loaf and place it in a greased loaf pan. Cover it again and let it rise for another 30-45 minutes.
- Preheat and Prepare for Baking: Preheat your oven to 350°F (175°C) during the second rise. Just before baking, brush the top of the loaf with the additional tablespoon of honey for a beautiful golden glaze.
- Bake the Loaf: Place the loaf in the preheated oven and bake for 30-35 minutes, or until the top is golden brown and the loaf sounds hollow when tapped on the bottom.
- Cool and Serve: Remove the loaf from the oven and let it cool in the pan for about 10 minutes, then transfer it to a wire rack to cool completely before slicing.
Extra Tips:
For the best results, confirm that your lavender is culinary-grade to avoid any bitterness. If you prefer a more subtle lavender flavor, reduce the amount slightly.
Keep an eye on the rise times, as they can vary depending on the temperature and humidity of your kitchen. The loaf can be stored in an airtight container for a few days, or you can freeze slices to enjoy later. For an extra touch, serve with a dollop of lavender-infused butter or a drizzle of additional honey.
Mint and Feta Braided Bread
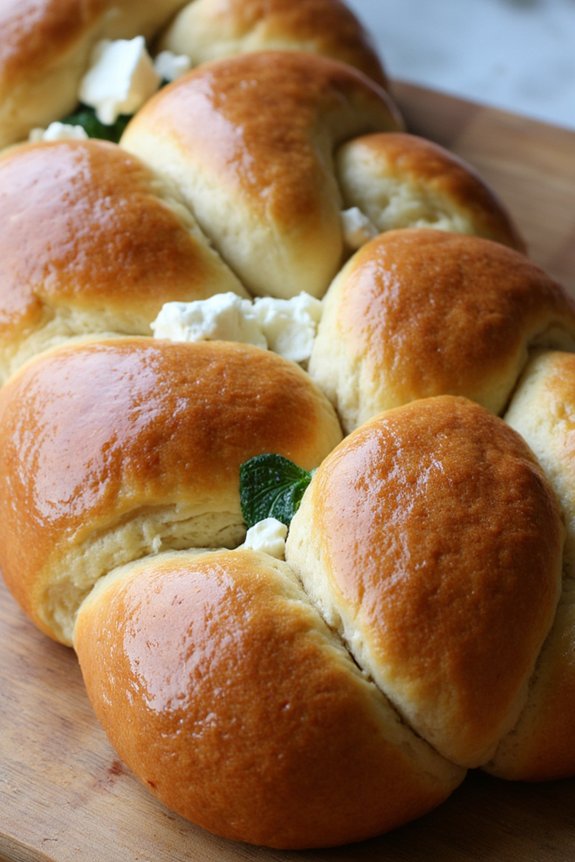
Mint and Feta Braided Bread is a delightful variation of traditional Italian bread that combines the fresh flavors of mint and the rich, tangy taste of feta cheese. This bread not only looks impressive with its braided design but also offers a unique twist of flavors that will elevate any dining experience.
Whether served as a side dish, appetizer, or as part of a brunch spread, this bread is certain to impress your guests with its aromatic and savory profile.
Making Mint and Feta Braided Bread is a rewarding culinary endeavor that combines the art of bread-making with the creativity of flavor pairing. The process involves creating a soft, yeasty dough, infusing it with chopped mint leaves, and crumbled feta, and carefully braiding it to perfection.
The result is a beautifully golden loaf that’s as pleasing to the eye as it’s to the palate. The following recipe will guide you through the steps to create this delicious bread, perfect for serving 4-6 people.
Ingredients:
- 3 1/2 cups all-purpose flour
- 1 packet (2 1/4 teaspoons) active dry yeast
- 1 cup warm water (about 110°F)
- 1/4 cup olive oil
- 1 teaspoon salt
- 2 tablespoons sugar
- 1 cup crumbled feta cheese
- 1/2 cup fresh mint leaves, finely chopped
- 1 egg (for egg wash)
- 1 tablespoon milk (for egg wash)
Instructions:
- Activate the Yeast: In a small bowl, dissolve the sugar in warm water and sprinkle the yeast over the top. Allow it to sit for about 5-10 minutes until it becomes frothy. This indicates that the yeast is active.
- Prepare the Dough: In a large mixing bowl, combine the flour and salt. Make a well in the center and add the yeast mixture and olive oil. Mix the ingredients together until a dough begins to form.
- Knead the Dough: Transfer the dough to a lightly floured surface and knead it for about 8-10 minutes until it becomes smooth and elastic. If the dough is sticky, you can add a little more flour as needed.
- First Rise: Place the kneaded dough in a lightly oiled bowl, cover it with a damp cloth, and let it rise in a warm place for about 1 hour, or until it has doubled in size.
- Prepare the Filling: Once the dough has risen, punch it down and turn it out onto a floured surface. Roll it out into a rectangle about 1/4 inch thick. Sprinkle the crumbled feta cheese and chopped mint evenly over the surface of the dough.
- Shape the Bread: Roll the dough up tightly, starting from one of the long edges, to form a log. Cut the log in half lengthwise and carefully twist the two halves together, keeping the cut sides facing up to reveal the filling. Pinch the ends together to seal the braid.
- Second Rise: Place the braided dough onto a parchment-lined baking sheet. Cover it with a damp cloth and let it rise for another 30 minutes.
- Prepare the Egg Wash: In a small bowl, whisk together the egg and milk. Brush the egg wash over the surface of the risen dough to give it a beautiful golden color when baked.
- Bake the Bread: Preheat your oven to 375°F (190°C). Bake the bread in the preheated oven for 30-35 minutes, or until it’s golden brown and sounds hollow when tapped on the bottom.
- Cool and Serve: Once baked, remove the bread from the oven and let it cool on a wire rack for at least 10 minutes before slicing and serving.
Extra Tips:
When making Mint and Feta Braided Bread, verify your yeast is fresh and active for the best rise. If your kitchen is cold, you can create a warm environment by turning your oven to the lowest setting for a few minutes, then turning it off and placing the dough inside to rise.
For a variation, you can add other herbs like dill or parsley to the filling or sprinkle sesame seeds on the egg wash for added texture. Remember to handle the dough gently when shaping to verify the filling stays intact and the braid holds its shape.
Enjoy your freshly baked bread warm for the best flavor experience!
Marjoram and Walnut Boule
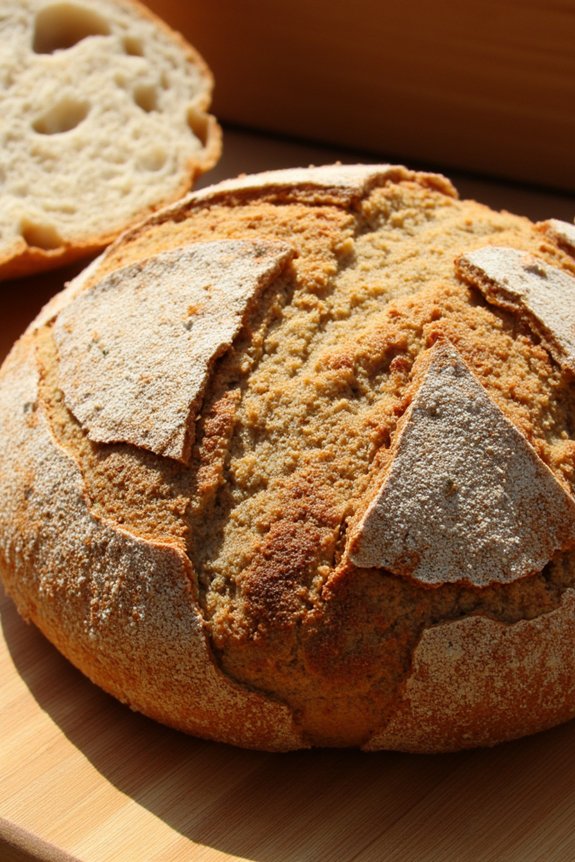
The Marjoram and Walnut Boule is a rustic Italian bread known for its aromatic flavor and delightful texture. Combining the earthy, slightly sweet notes of marjoram with the rich, nutty flavor of walnuts, this boule is perfect for pairing with cheeses, soups, or simply enjoyed with a drizzle of olive oil.
The traditional boule shape, with its round and crusty exterior, makes it an appealing centerpiece at any meal. By incorporating whole walnuts and fresh marjoram, this bread offers a unique twist on the classic Italian boule, making it both a flavorful and visually appealing addition to any table.
Baking this bread requires a bit of patience and love, as it involves the process of letting the dough rise and develop its flavors. The result is a beautifully golden crust enclosing a soft, aromatic crumb filled with crunchy walnuts.
Whether you’re an experienced baker or a novice in the kitchen, this recipe is straightforward and rewarding, providing a delightful homemade bread experience. Let’s explore the ingredients and instructions needed to create this delicious Marjoram and Walnut Boule for a serving size of 4-6 people.
Ingredients:
- 500g all-purpose flour
- 300ml warm water
- 10g salt
- 7g instant yeast
- 2 tablespoons fresh marjoram, chopped
- 100g walnuts, roughly chopped
- 1 tablespoon olive oil
Instructions:
- Prepare the Dough: In a large mixing bowl, combine the flour, salt, and instant yeast. Mix well to guarantee the yeast and salt are evenly distributed throughout the flour.
- Add Wet Ingredients: Slowly pour in the warm water and olive oil. Stir the mixture with a wooden spoon or your hands until a rough dough forms.
- Incorporate Flavorings: Add the fresh marjoram and chopped walnuts into the dough. Knead the dough on a lightly floured surface for about 10 minutes until it becomes smooth and elastic.
- First Rise: Place the dough back into the mixing bowl, cover it with a damp cloth, and let it rise in a warm, draft-free location for about 1-2 hours, or until it has doubled in size.
- Shape the Boule: Once the dough has risen, gently punch it down to release the air. Shape it into a round boule by folding the edges towards the center and turning it over.
- Second Rise: Place the shaped boule onto a baking sheet lined with parchment paper. Cover it again with the damp cloth and let it rise for another 30-45 minutes.
- Preheat the Oven: Preheat your oven to 220°C (430°F) about 20 minutes before the second rise is complete. Place a shallow pan of water at the bottom of the oven to create steam, which will help develop a crusty exterior.
- Score and Bake: Just before baking, score the top of the boule with a sharp knife to allow steam to escape. Bake for 25-30 minutes or until the crust is golden brown and the bread sounds hollow when tapped on the bottom.
- Cool: Remove the boule from the oven and let it cool on a wire rack for at least 30 minutes before slicing.
Extra Tips:
For best results, use fresh marjoram as it provides a more vibrant flavor compared to dried herbs. If fresh marjoram is unavailable, you can substitute with a smaller quantity of dried marjoram.
When incorporating the walnuts, make sure they’re evenly distributed throughout the dough to avoid clumping. If you prefer a softer crust, you can omit the pan of water during baking.
Additionally, this bread can be stored at room temperature in a bread box for 2-3 days or frozen for longer storage. Simply reheat in the oven to restore its crusty texture before serving.
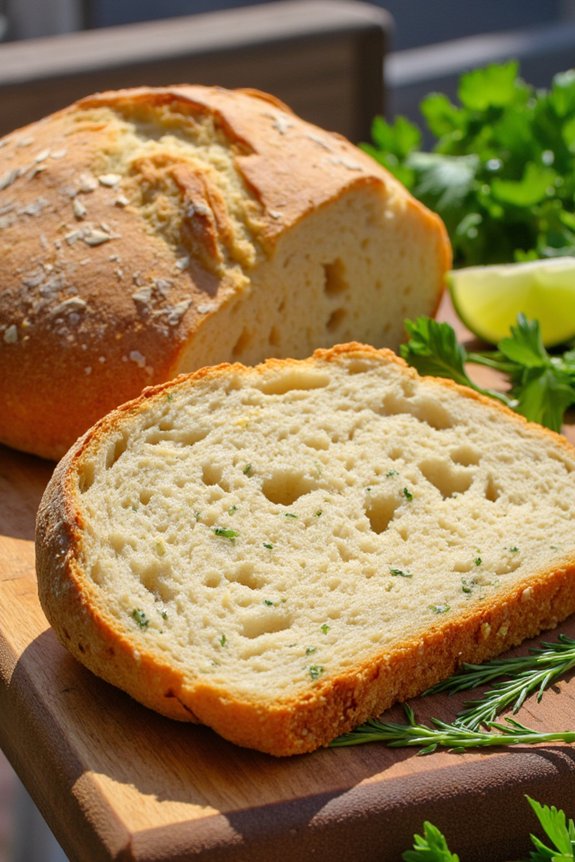
Coriander and Cumin Seed Rustic Loaf
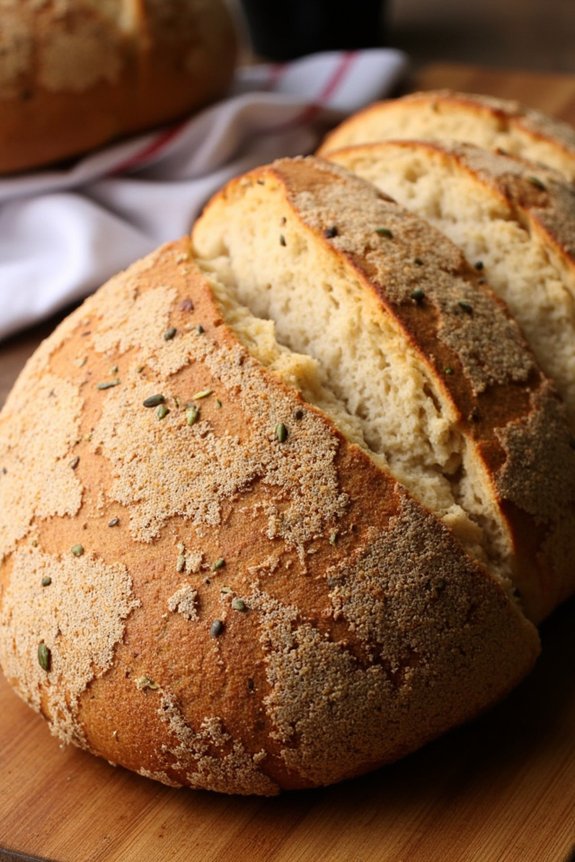
Coriander and Cumin Seed Rustic Loaf is a delightful take on traditional Italian bread, incorporating aromatic spices to elevate the classic flavors. This loaf is perfect for those who seek to add a touch of warmth and depth to their homemade bread. The combination of coriander and cumin seeds not only infuses the bread with a unique aroma but also provides a subtle crunch that complements the chewy texture of the bread.
Whether you’re serving it as an accompaniment to soups and stews or simply enjoying it with a slather of butter, this rustic loaf is sure to become a favorite in your baking repertoire.
The process of creating this loaf involves a series of simple steps that will guide you in crafting a beautifully textured bread. From mixing the dough to allowing it to rise and finally baking it to perfection, each stage plays a vital role in achieving the desired outcome. With a little patience and attention to detail, you’ll be rewarded with a bread that’s as pleasing to the eye as it’s to the palate.
This recipe yields a loaf that serves 4-6 people, making it ideal for family meals or small gatherings.
Ingredients:
- 500g bread flour
- 10g salt
- 7g instant yeast
- 1 tablespoon coriander seeds
- 1 tablespoon cumin seeds
- 350ml warm water
- 1 tablespoon olive oil
Instructions:
- Prepare the Seeds: Begin by toasting the coriander and cumin seeds in a dry skillet over medium heat until they become fragrant, about 2-3 minutes. Allow them to cool slightly before crushing them lightly using a mortar and pestle or the back of a spoon.
- Mix the Dry Ingredients: In a large mixing bowl, combine the bread flour, salt, and instant yeast. Stir in the toasted and crushed seeds until evenly distributed.
- Incorporate the Wet Ingredients: Make a well in the center of the flour mixture and pour in the warm water and olive oil. Stir with a wooden spoon until the dough begins to come together.
- Knead the Dough: Turn the dough out onto a lightly floured surface and knead for about 10 minutes, until it becomes smooth and elastic. This step is essential for developing the gluten structure that gives the bread its chewy texture.
- First Rise: Place the kneaded dough in a lightly oiled bowl, cover with a damp cloth, and let it rise in a warm place for about 1-2 hours, or until it has doubled in size.
- Shape the Loaf: Once the dough has risen, punch it down to deflate and shape it into a round loaf. Place it on a baking sheet lined with parchment paper.
- Second Rise: Cover the loaf with a damp cloth and let it rise again for about 30-45 minutes, until it has puffed up slightly.
- Preheat and Bake: Preheat your oven to 220°C (428°F). Just before baking, make a few slashes on top of the loaf with a sharp knife. Bake for 25-30 minutes, or until the loaf is golden brown and sounds hollow when tapped on the bottom.
- Cool and Serve: Allow the loaf to cool on a wire rack before slicing. Serve warm or at room temperature.
Extra Tips: When working with yeast dough, make sure that your water is warm but not hot, as excessive heat can kill the yeast, preventing the dough from rising.
Additionally, the initial rise time can vary depending on the ambient temperature of your kitchen; a warmer environment will speed up the process. Don’t rush the kneading process, as proper kneading is crucial for developing the gluten that gives the bread its structure and texture.
If you prefer a more pronounced flavor, you can increase the amount of coriander and cumin seeds slightly. Enjoy experimenting with this versatile recipe!
Fennel Seed and Orange Zest Brioche
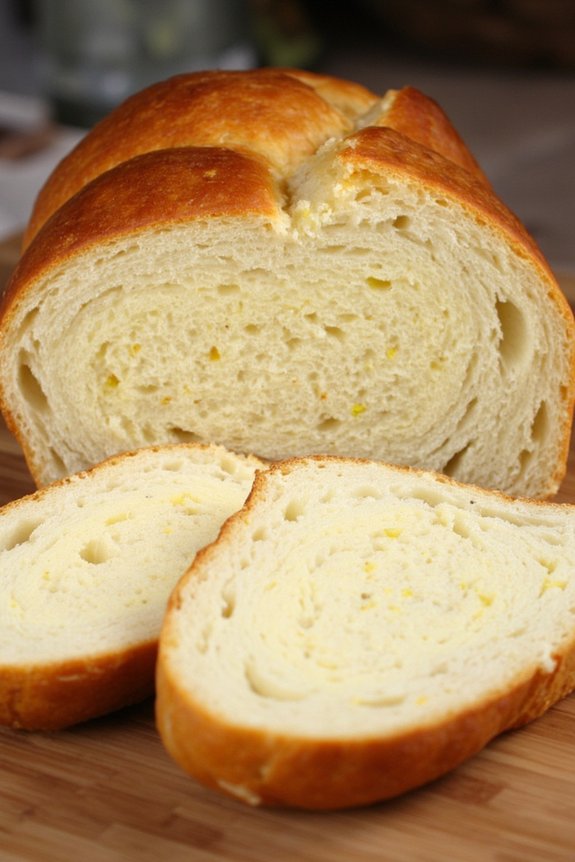
Fennel Seed and Orange Zest Brioche is a delightful twist on the classic French brioche, infusing it with the aromatic flavors of fennel seeds and the bright zest of oranges. This Italian-inspired bread is perfect for breakfast or as a sweet treat throughout the day. The buttery texture of the brioche combined with the unique flavor profile makes it an irresistible addition to any meal.
Whether served with a dollop of mascarpone or a drizzle of honey, this brioche is sure to impress. This recipe yields a loaf that serves 4-6 people, making it ideal for a family gathering or a cozy brunch with friends. The preparation requires a bit of patience, but the end result is well worth the effort.
With just a few ingredients and some love, you can create a bread that’s both fragrant and delectable. Follow the instructions carefully, and you’ll be rewarded with a brioche that’s fluffy, fragrant, and utterly delicious.
Ingredients (serving size: 4-6 people):
- 3 1/2 cups all-purpose flour
- 1/4 cup granulated sugar
- 2 1/4 teaspoons active dry yeast
- 1 teaspoon salt
- 1 tablespoon fennel seeds
- Zest of 1 large orange
- 4 large eggs, room temperature
- 1/2 cup whole milk, room temperature
- 1 cup unsalted butter, softened
- 1 egg for egg wash
Instructions:
- Activate the Yeast: In a small bowl, mix the yeast with half of the warm milk (about 1/4 cup) and a pinch of sugar. Let it sit for about 5-10 minutes until it becomes frothy, indicating that the yeast is active.
- Prepare the Dough: In a large mixing bowl, combine the flour, sugar, salt, fennel seeds, and orange zest. Create a well in the center and add the frothy yeast mixture, the remaining milk, and the eggs. Mix until a sticky dough forms.
- Knead the Dough: Transfer the dough to a lightly floured surface and knead by hand until smooth, about 10 minutes. Alternatively, you can use a stand mixer with a dough hook attachment on medium speed for about 5 minutes.
- Incorporate the Butter: Gradually add the softened butter, a tablespoon at a time, ensuring each piece is fully incorporated before adding the next. Continue kneading until the dough is smooth and elastic, which should take another 10 minutes.
- First Rise: Place the dough in a lightly oiled bowl, cover with a damp cloth, and let it rise in a warm place until it doubles in size, about 1.5 to 2 hours.
- Shape the Brioche: Once risen, punch down the dough gently, and then shape it into a loaf or divide it into smaller rolls as desired. Place the shaped dough into a greased loaf pan or on a baking sheet lined with parchment paper.
- Second Rise: Cover the shaped dough with a cloth and let it rise again until nearly doubled in size, about 1 hour.
- Preheat and Prepare for Baking: Preheat your oven to 375°F (190°C). Just before baking, brush the top of the brioche with a beaten egg to give it a glossy finish.
- Bake: Bake in the preheated oven for 25-30 minutes for a loaf, or until the top is golden brown and a skewer inserted into the center comes out clean.
- Cool: Allow the brioche to cool in the pan for 10 minutes, then transfer to a wire rack to cool completely before slicing.
Extra Tips:
To achieve the best texture, make sure all your ingredients, particularly the eggs and milk, are at room temperature before starting. Be patient during the rising process, as the dough needs time to develop its flavor and texture.
If you find the top of the brioche browning too quickly while baking, you can cover it with aluminum foil to prevent burning. Finally, this brioche can be stored in an airtight container at room temperature for a couple of days or frozen for longer storage. Enjoy your homemade Fennel Seed and Orange Zest Brioche with your favorite spreads or toppings!