

There’s nothing quite like the comforting aroma of freshly baked bread filling your kitchen. Tearing into a warm, crusty loaf brings a sense of rustic charm that’s hard to beat. As an enthusiast of Italian cuisine, I’ve curated a list of 14 delightful hearth bread recipes that embody the heart of traditional Italian baking. From the airy ciabatta to the herb-studded focaccia, each of these loaves has a unique story to share. Get ready to explore these mouthwatering recipes that are perfect for any meal.
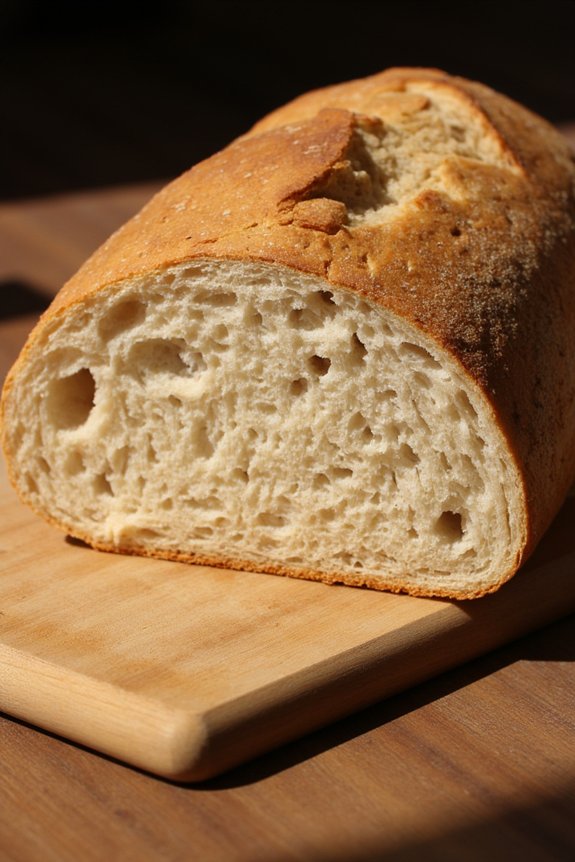
Classic Ciabatta Bread
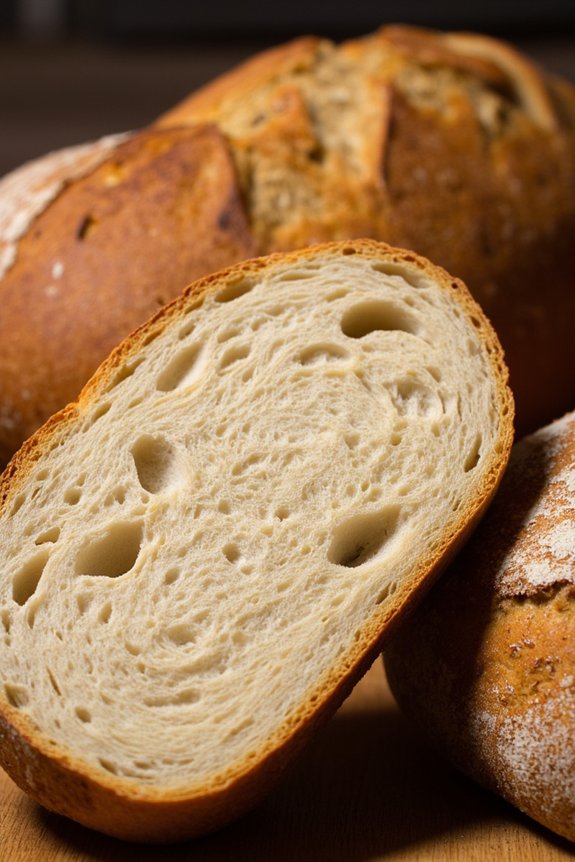
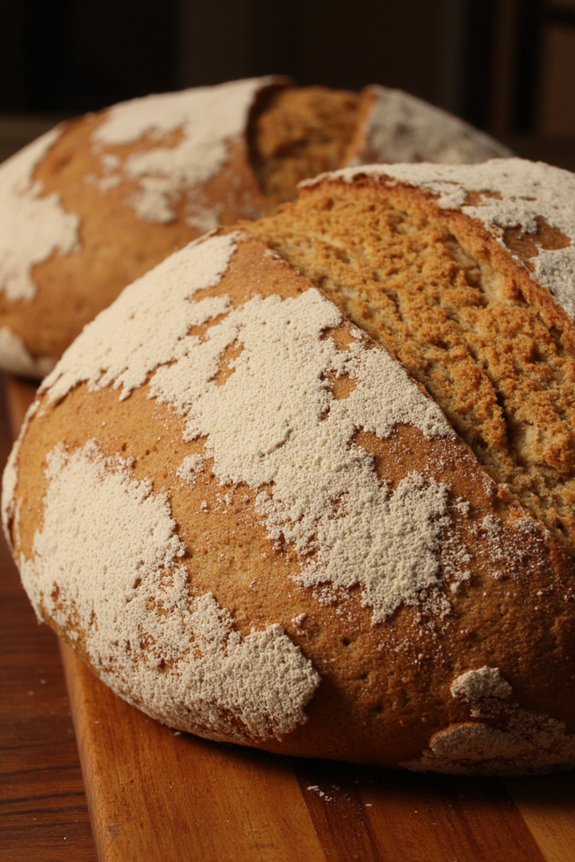
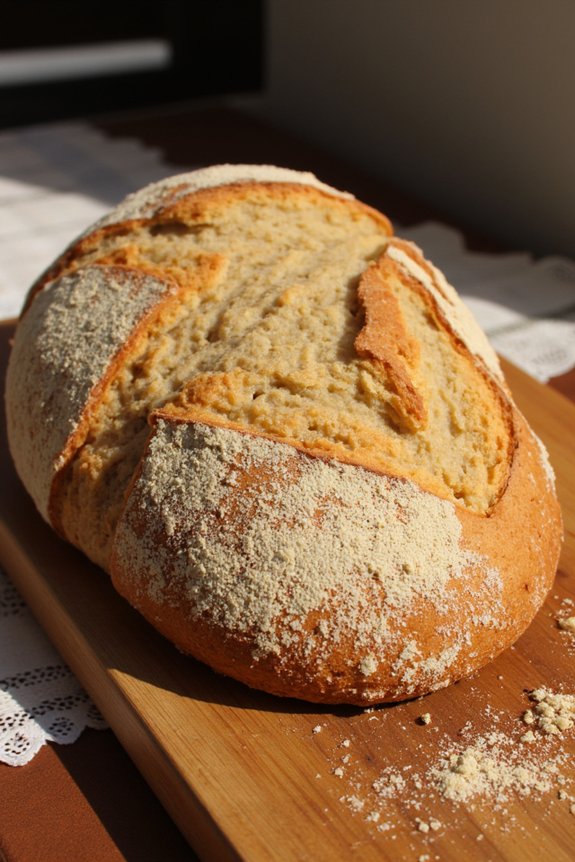
Ciabatta is a classic Italian hearth bread known for its rustic appearance, open crumb, and chewy texture. Its name, which means “slipper” in Italian, is inspired by its unique shape. The bread is perfect for sandwiches or simply enjoyed with olive oil and balsamic vinegar. The key to a perfect ciabatta is using high-hydration dough, which creates the signature airy texture.
Although this bread may seem intimidating, with a bit of patience and practice, you can obtain bakery-quality results at home. With only a few ingredients, this recipe focuses on technique and time, allowing the natural flavors of the flour to shine.
The process begins with creating a “biga,” or pre-ferment, which develops flavor and structure. The biga is mixed with additional flour, water, yeast, and salt to form a wet dough. This dough is then allowed to rise and develop gluten through a series of folds, rather than traditional kneading. The high hydration of the dough requires gentle handling to maintain the open crumb structure.
Once baked, the ciabatta boasts a crisp, golden crust with a soft, airy interior. This recipe yields two loaves, serving 4-6 people.
Ingredients:
*For the Biga:*
- 1 1/2 cups all-purpose flour
- 1/2 cup water
- 1/4 teaspoon active dry yeast
For the Dough:
- 2 cups all-purpose flour
- 1 1/4 cups water
- 3/4 teaspoon active dry yeast
- 2 teaspoons salt
Cooking Instructions:
- Prepare the Biga:
- In a small bowl, combine the flour, water, and yeast for the biga. Stir until a sticky dough forms. Cover the bowl with plastic wrap and let it sit at room temperature for 12-24 hours. The biga will develop a slightly bubbly and aromatic quality.
- Mix the Dough:
- In a large mixing bowl, combine the biga, flour, water, yeast, and salt. Mix until all ingredients are combined and a wet, sticky dough forms. It’s important not to add extra flour, even if the dough feels very sticky.
- First Rise:
- Cover the bowl with a damp cloth and let the dough rise at room temperature for 1 hour. After the first hour, perform a series of folds. Wet your hands to prevent sticking, lift one side of the dough, and fold it over itself. Rotate the bowl and repeat this folding technique a few more times.
- Second Rise and Fold:
- Let the dough rest for another 30 minutes, then repeat the folding process. Allow the dough to rise for an additional 30 minutes afterward.
- Shaping:
- Generously flour a work surface and gently turn the dough out onto it. Divide the dough in half and shape each into a rough rectangle. Handle the dough gently to preserve the air bubbles.
- Final Proof:
- Transfer the shaped dough to a well-floured cloth or parchment paper. Cover lightly with a damp cloth and let them proof for 45 minutes.
- Preheat Oven and Bake:
- Preheat your oven to 450°F (230°C) with a baking stone or an inverted baking sheet inside. Slide the loaves onto the preheated surface and bake for 20-25 minutes until the crust is golden brown and the loaves sound hollow when tapped on the bottom.
- Cool:
- Allow the ciabatta to cool on a wire rack before slicing. This resting period helps set the crumb structure and enhances flavor.
Extra Tips:
When making ciabatta, patience is key. The dough is very wet compared to other bread doughs, but resist the urge to add more flour. The high hydration is essential for achieving the characteristic open crumb.
Use a bench scraper and keep your hands wet when handling the dough to prevent sticking. Also, ascertain your oven is fully preheated before baking to achieve the best crust. Practice makes perfect, so don’t be discouraged if your first attempt isn’t perfect; each try will refine your technique and understanding of the dough.
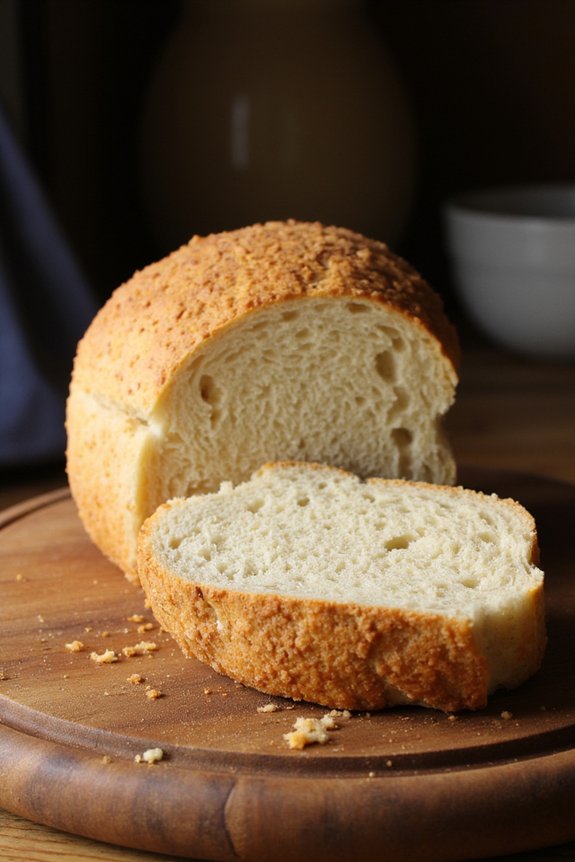
Traditional Pane Casareccio
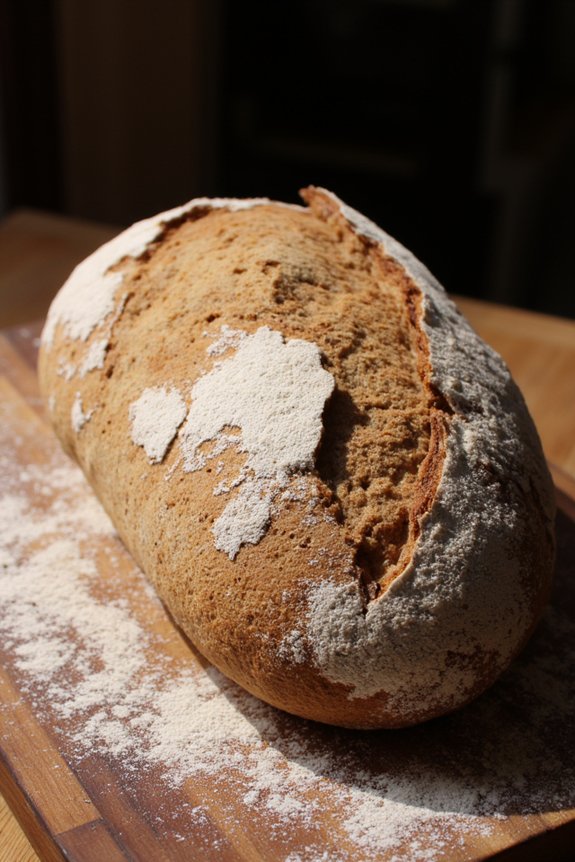
Pane Casareccio is a classic rustic Italian hearth bread that has been a staple in Italian homes for generations. This bread is characterized by its crisp crust and soft, airy crumb, making it perfect for pairing with olive oil, cheese, or simply enjoying on its own. The traditional method of making Pane Casareccio involves a slow fermentation process, which imparts a deep, rich flavor and a delightful aroma. This recipe will guide you through creating this timeless bread with its authentic taste and texture, perfect for family gatherings or complementing a cozy meal.
The heart of Pane Casareccio lies in its simplicity, using just a few basic ingredients to create a delicious and satisfying loaf. The dough is typically made with a combination of all-purpose flour and bread flour, which provides the perfect balance of strength and tenderness. A touch of olive oil adds richness, while the slow rise allows the flavors to develop fully. This recipe yields enough bread to serve 4-6 people, making it ideal for sharing with loved ones.
Ingredients (serves 4-6):
- 3 cups all-purpose flour
- 1 cup bread flour
- 2 teaspoons salt
- 1 teaspoon sugar
- 1 packet (2 1/4 teaspoons) active dry yeast
- 1 1/2 cups warm water (about 110°F)
- 2 tablespoons olive oil
Cooking Instructions:
- Activate the Yeast: In a small bowl, dissolve the sugar in 1/2 cup of the warm water. Sprinkle the yeast over the top and let it stand for about 5 to 10 minutes until foamy. This indicates the yeast is active.
- Mix the Dough: In a large mixing bowl, combine the all-purpose flour, bread flour, and salt. Make a well in the center and pour in the yeast mixture, the remaining warm water, and olive oil. Stir until a rough dough forms.
- Knead the Dough: Transfer the dough to a floured surface and knead for about 8-10 minutes until the dough is smooth and elastic. If the dough is sticky, sprinkle a little more flour as needed.
- First Rise: Place the dough in a lightly oiled bowl, turning it to coat with oil. Cover the bowl with a damp cloth or plastic wrap and let it rise in a warm, draft-free area until it doubles in size, about 1 to 1.5 hours.
- Shape the Loaf: Once risen, punch down the dough to release excess air. Shape it into a round or oval loaf and place it on a baking sheet lined with parchment paper.
- Second Rise: Cover the shaped loaf with a towel and let it rise again for about 30-45 minutes until puffy.
- Preheat the Oven: Preheat your oven to 450°F (230°C) while the dough is in its second rise.
- Slash and Bake: Just before baking, make a few slashes on the surface of the dough with a sharp knife. This helps the bread expand evenly. Place the loaf in the oven and bake for 25-30 minutes, or until the bread is golden brown and sounds hollow when tapped on the bottom.
- Cool the Bread: Remove the loaf from the oven and let it cool on a wire rack for at least 20 minutes before slicing. This allows the bread to set and makes it easier to cut.
Extra Tips:
For the best results, confirm that all your ingredients are at room temperature before beginning. Using a kitchen scale for measuring the flour can yield more consistent results.
If you prefer a chewier crust, place a shallow pan of water in the oven when preheating, which will create steam during baking. This steam helps develop a crisp, chewy crust.
Finally, resist the temptation to slice the bread immediately after baking, as cooling is essential for the perfect texture. Enjoy your Pane Casareccio fresh, or store it in a paper bag to maintain its crusty exterior.
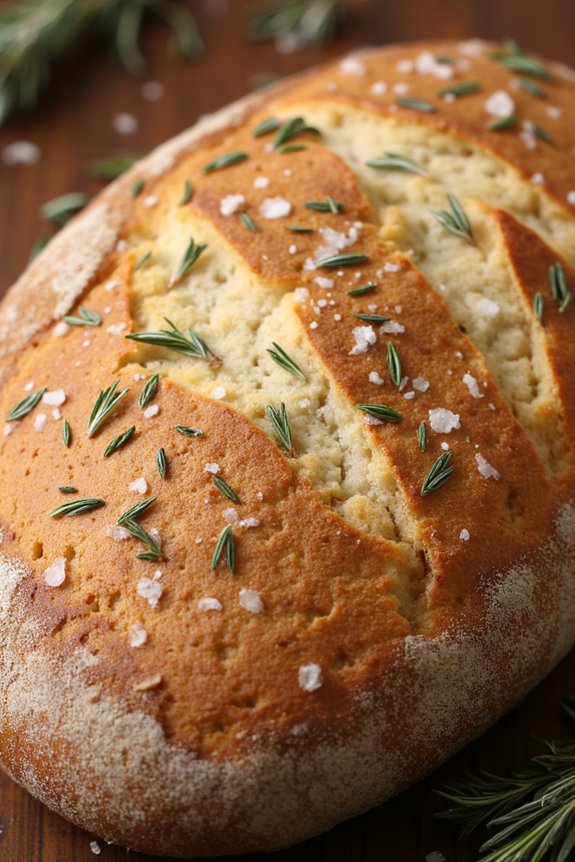
Savory Focaccia With Rosemary
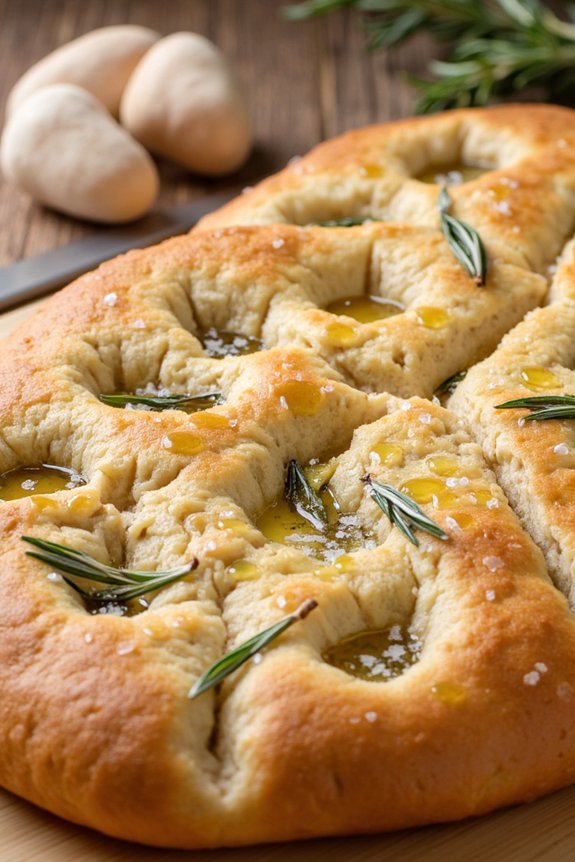
Savory Focaccia With Rosemary is a delightful addition to any meal, offering a fragrant and flavorful experience with its aromatic rosemary and rich olive oil base. This classic Italian bread is known for its golden crust and soft, airy interior, making it perfect for enjoying on its own or as an accompaniment to soups and salads.
The process of making focaccia is both therapeutic and rewarding, allowing the baker to engage with the dough through kneading, proofing, and decorating before baking it to perfection.
The rustic charm of Savory Focaccia With Rosemary lies in its simplicity, relying on high-quality ingredients to produce its distinctive taste. This recipe is designed for a serving size of 4-6 people, ensuring there’s plenty to share with family and friends. By following this recipe, you’ll create a homemade focaccia that captures the essence of traditional Italian baking, with the added satisfaction of making it from scratch.
Ingredients (Serving Size: 4-6 people):
- 4 cups all-purpose flour
- 1 ½ cups warm water (about 110°F/45°C)
- 2 teaspoons active dry yeast
- 2 teaspoons sugar
- 1 teaspoon salt
- ¼ cup extra virgin olive oil, plus more for greasing and drizzling
- 2 tablespoons fresh rosemary leaves
- Coarse sea salt, for sprinkling
Cooking Instructions:
- Activate the Yeast: In a small bowl, combine the warm water, sugar, and yeast. Stir gently and let it sit for about 5-10 minutes until it becomes frothy, indicating the yeast is active.
- Mix the Dough: In a large mixing bowl, combine the flour and 1 teaspoon of salt. Make a well in the center and add the frothy yeast mixture and ¼ cup of olive oil. Mix until a rough dough forms.
- Knead the Dough: Transfer the dough to a floured surface and knead for about 8-10 minutes, or until it becomes smooth and elastic. If the dough is too sticky, add a little more flour as needed.
- First Rise: Lightly oil a large bowl and place the dough inside, turning it to coat with oil. Cover the bowl with a damp cloth or plastic wrap and let it rise in a warm, draft-free area for about 1-2 hours, or until it has doubled in size.
- Prepare for Baking: Preheat your oven to 425°F (220°C). Grease a baking sheet or pan with olive oil. Punch down the risen dough and transfer it to the prepared pan, pressing it out to fit the shape of the pan.
- Add Toppings: Use your fingers to create dimples all over the surface of the dough. Drizzle with olive oil, then sprinkle the rosemary leaves and coarse sea salt evenly over the top.
- Second Rise: Cover the dough and let it rise again for about 20-30 minutes until slightly puffy.
- Bake the Focaccia: Place the pan in the preheated oven and bake for 20-25 minutes, or until the focaccia is golden brown and crisp on the edges.
- Cool and Serve: Remove the focaccia from the oven and let it cool slightly before cutting it into pieces. Serve warm or at room temperature.
Extra Tips:
For an extra burst of flavor, consider adding thinly sliced onions or cherry tomatoes on top before baking. If you prefer a softer texture, you can reduce the baking time slightly.
Remember to use fresh rosemary for the best taste and fragrance; dried rosemary can be used in a pinch, but it may not provide the same vibrant flavor. Storing leftover focaccia in an airtight container will help maintain its freshness for up to two days. Enjoy experimenting with different toppings and flavors to make this recipe your own.
Olive and Herb Studded Pugliese
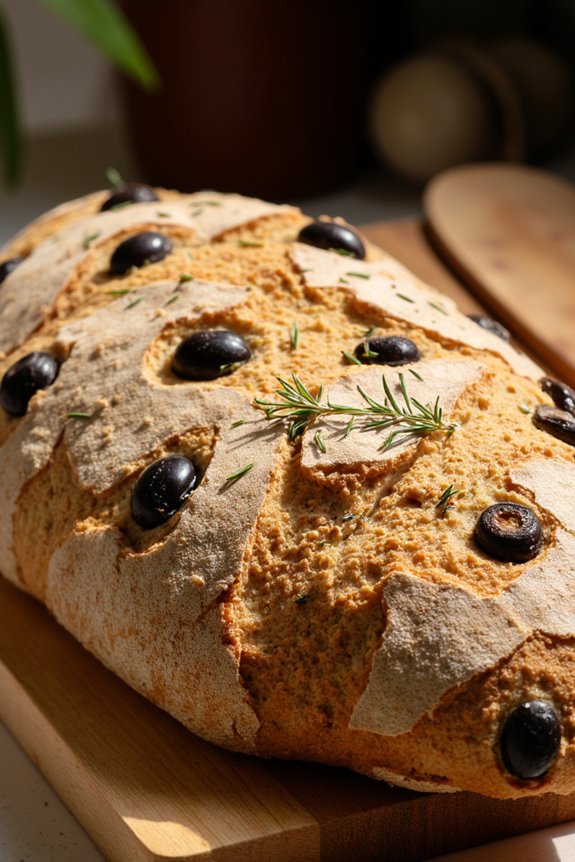
Pugliese bread is a rustic Italian hearth bread known for its light, airy texture and crisp crust. The addition of olives and herbs infuses the bread with a rich, savory flavor that pairs perfectly with a variety of dishes or can be enjoyed on its own. This traditional bread hails from the Puglia region of Italy, where it’s typically made using natural leavening techniques and high-quality ingredients.
Our recipe simplifies the process while maintaining the authentic taste and texture, making it accessible for home bakers.
This Olive and Herb Studded Pugliese recipe is designed to yield a loaf that serves 4-6 people. The dough is prepared with a mix of all-purpose and bread flour to achieve the perfect balance of chewiness and airiness. The olives add a subtle brininess, while the herbs bring a fragrant, earthy aroma. Baking this bread in a hot oven with steam guarantees a beautifully blistered crust, reminiscent of traditional Italian bakeries.
Ingredients for 4-6 servings:
- 2 cups all-purpose flour
- 2 cups bread flour
- 1 1/2 teaspoons salt
- 1 teaspoon sugar
- 1 1/4 teaspoons active dry yeast
- 1 3/4 cups warm water (about 110°F)
- 1/4 cup extra virgin olive oil
- 1 cup pitted and sliced black olives
- 1 tablespoon chopped fresh rosemary
- 1 tablespoon chopped fresh thyme
- Additional flour for dusting
Cooking Instructions:
- Prepare the Dough: In a large mixing bowl, combine the all-purpose flour, bread flour, salt, and sugar. In a separate small bowl, mix the yeast with warm water and let it sit for about 5 minutes until it becomes frothy. Pour the yeast mixture and olive oil into the flour mixture and stir until a dough begins to form.
- Incorporate Olives and Herbs: Add the sliced olives, rosemary, and thyme into the dough. Knead the dough on a floured surface for about 10 minutes until it becomes smooth and elastic. If the dough is sticky, gradually add more flour as needed.
- First Rise: Place the dough in a lightly oiled bowl, cover it with a damp cloth, and let it rise in a warm area for about 1 to 2 hours, or until it doubles in size.
- Shape the Loaf: Once the dough has risen, gently deflate it and shape it into a round loaf. Place the loaf seam-side down onto a baking sheet lined with parchment paper.
- Second Rise: Cover the loaf with a damp cloth and let it rise again for about 30-45 minutes, or until it has puffed up.
- Preheat the Oven: Preheat your oven to 450°F (230°C). Place a shallow pan of water on the lower rack to create steam.
- Bake the Bread: Dust the top of the loaf with flour and score it with a sharp knife to allow steam to escape. Bake for 25-30 minutes, until the crust is golden brown and the loaf sounds hollow when tapped on the bottom.
- Cool the Bread: Once baked, remove the loaf from the oven and let it cool on a wire rack for at least 20 minutes before slicing.
Extra Tips:
For the best results, use fresh herbs, as they provide a more vibrant flavor than dried ones. The temperature of the water is vital for activating the yeast, so make certain it’s warm but not too hot.
When shaping the loaf, be gentle to preserve the dough’s airy structure. If you prefer a more pronounced olive flavor, you can incorporate green olives or a mix of both black and green olives.
Finally, avoid slicing the bread while it’s still hot, as this can affect its texture. Enjoy your Olive and Herb Studded Pugliese with a drizzle of olive oil or alongside your favorite Italian dishes.
Rustic Pane Toscano
Rustic Pane Toscano is a traditional Italian bread renowned for its simple yet delightful taste. Originating from the Tuscany region of Italy, this bread is distinctive for its lack of salt, which was historically due to high salt taxes. This absence of salt gives Pane Toscano its unique ability to pair beautifully with savory dishes, cheeses, and olive oils, where the bread absorbs and complements the flavors.
With a crisp crust and a tender, airy crumb, it’s perfect for those who appreciate both the rustic charm and the natural flavors of high-quality ingredients.
The process of making Pane Toscano is a labor of love, requiring patience and attention to detail. The key to achieving its classic texture and flavor lies in the use of a natural starter, known as a biga, which is prepared a day in advance. This pre-fermentation step allows the bread to develop its characteristic aroma and crumb structure.
Once baked, this bread serves as a versatile accompaniment to any meal, whether it’s used to mop up the last drops of a rich sauce or enjoyed simply with a drizzle of extra virgin olive oil.
Ingredients (Serves 4-6):
- 500g all-purpose flour
- 10g active dry yeast
- 300ml lukewarm water
- 150g biga (prepared 12-24 hours in advance)
- Extra flour for dusting
Cooking Instructions:
- Prepare the Biga: The day before you plan to bake, mix 100g of flour with 100ml of water and a pinch of yeast. Stir until combined, cover, and let it rest at room temperature for 12-24 hours.
- Activate Yeast: In a small bowl, dissolve the active dry yeast in 50ml of lukewarm water. Let it sit for about 5 minutes until it’s frothy.
- Mix Dough: In a large mixing bowl, combine the prepared biga, remaining flour, yeast mixture, and the rest of the lukewarm water. Mix until a sticky dough forms.
- Knead: Transfer the dough to a floured surface and knead for about 10 minutes, or until it becomes smooth and elastic. Add more flour if necessary to prevent sticking.
- First Rise: Place the dough into a lightly greased bowl, cover it with a damp towel, and let it rise in a warm place for about 2 hours, or until it doubles in size.
- Shape the Loaf: Punch down the dough and transfer it back to the floured surface. Shape it into a round loaf, tucking the edges underneath to create tension on the surface.
- Second Rise: Place the shaped loaf on a baking sheet lined with parchment paper. Cover it again with a damp towel and let it rise for another hour.
- Preheat Oven: Preheat your oven to 220°C (430°F) about 30 minutes before baking. Place a shallow pan of water at the bottom of the oven to create steam, which helps form a crispy crust.
- Score and Bake: Just before baking, lightly dust the top of the loaf with flour and make a few shallow slashes on the surface. Bake for 30-35 minutes or until the crust is golden brown and the loaf sounds hollow when tapped on the bottom.
- Cool: Remove from the oven and let it cool on a wire rack before slicing.
Extra Tips:
When preparing Pane Toscano, verify your biga is bubbly and active before incorporating it into the dough, as this will greatly influence the bread’s flavor and texture.
For a more pronounced taste, consider using a mix of all-purpose and whole wheat flour. Additionally, while kneading, resist the temptation to add too much flour to the dough, as a slightly sticky dough will result in a softer crumb.
Finally, always allow the bread to cool completely before slicing to prevent the crumb from becoming gummy.
Crusty Pane Di Altamura
Crusty Pane Di Altamura is a traditional Italian bread known for its distinctively crusty exterior and soft, chewy interior. Originating from the Altamura region in southern Italy, this bread is made using a unique durum wheat flour known as semolina. The bread’s golden color and earthy flavor are a reflection of its simple yet impeccable ingredients.
Often referred to as the “bread of the sun,” Pane Di Altamura has been a staple in Italian households for centuries, celebrated for its ability to stay fresh for several days due to its thick, protective crust.
To achieve the perfect Pane Di Altamura, the dough requires ample time to ferment, allowing the flavors to develop fully. This process, combined with a high-temperature bake, creates the signature crust that’s both crispy and satisfying to bite into. While the recipe requires patience and attention, the result is a loaf that pairs beautifully with olive oil, cheese, or simply enjoyed on its own. Making Pane Di Altamura at home is a rewarding endeavor that brings the rustic charm of Italian baking into your kitchen.
Ingredients for 4-6 People:
- 500g semolina flour (fine durum wheat flour)
- 325ml warm water
- 10g salt
- 10g fresh yeast (or 5g active dry yeast)
- 1 teaspoon honey or sugar
- Additional semolina flour for dusting
Cooking Instructions:
- Prepare the Yeast Mixture: In a small bowl, dissolve the fresh yeast in 100ml of the warm water. Add the honey or sugar to the mixture and stir well. Let it sit for about 10 minutes until it becomes frothy, indicating that the yeast is active.
- Mix the Dough: In a large mixing bowl, combine the semolina flour and salt. Make a well in the center and pour in the yeast mixture along with the remaining warm water. Mix the ingredients together until a shaggy dough forms.
- Knead the Dough: Transfer the dough to a lightly floured surface and knead it for about 10 minutes until it becomes smooth and elastic. You may need to sprinkle a little more flour if the dough is too sticky.
- First Rise: Place the dough in a lightly oiled bowl, cover it with a damp cloth, and let it rise in a warm place for about 2 hours or until it has doubled in size.
- Shape the Loaf: Once the dough has risen, punch it down gently to release the air. Shape it into a round loaf by folding the edges into the center. Make sure the seams are on the bottom.
- Second Rise: Place the loaf on a baking sheet dusted with semolina flour. Cover it with a damp cloth and let it rise again for about 1 hour.
- Preheat the Oven: About 30 minutes before baking, preheat the oven to 230°C (450°F). Place a baking stone or an inverted baking sheet in the oven to heat up as well.
- Score and Bake the Bread: Once the loaf has risen, use a sharp knife to make a few slashes on the surface. Transfer the loaf to the hot baking stone or sheet and bake for about 30-35 minutes until the bread is golden brown and sounds hollow when tapped on the bottom.
- Cool the Bread: Remove the bread from the oven and let it cool on a wire rack for at least an hour before slicing. This allows the crust to set properly and the flavors to develop further.
Extra Tips:
When working with semolina flour, be mindful that it absorbs water differently than all-purpose flour. It’s vital to monitor the dough’s consistency, adding small amounts of water or flour as needed to achieve the right texture.
Additionally, the high hydration of the dough contributes to the bread’s chewy interior, so don’t be tempted to add too much flour during kneading. Finally, using a baking stone or a preheated baking sheet guarantees a nice, even crust, mimicking the traditional wood-fired ovens used in Italy.
Enjoy your homemade Pane Di Altamura with a drizzle of olive oil or alongside a hearty soup for a true taste of Italy.
Delightful Grissini Breadsticks
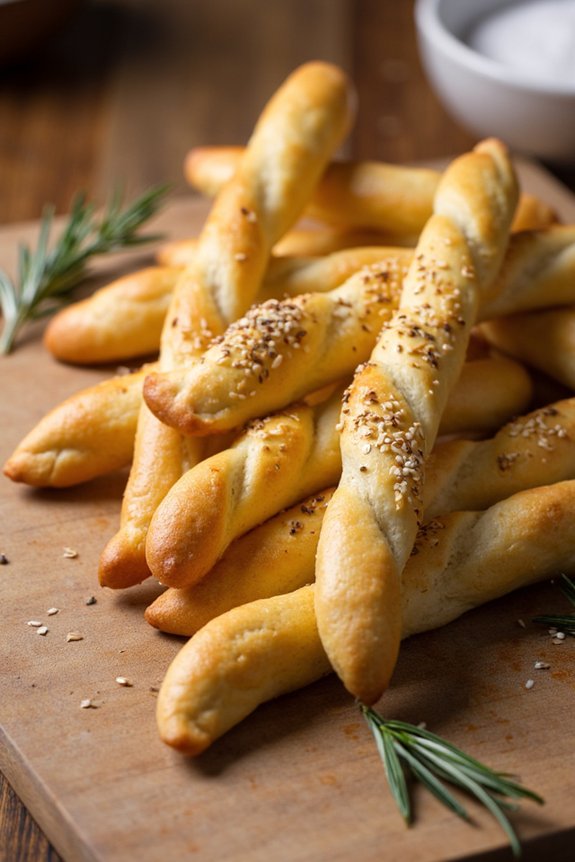
Delightful Grissini Breadsticks are the perfect accompaniment to any Italian meal or a delightful snack on their own. Originating from the Piedmont region of Italy, these thin, crunchy breadsticks are known for their rustic charm and simplicity. Traditionally served as an appetizer, Grissini can be infused with a variety of flavors such as rosemary, sesame seeds, or even wrapped in prosciutto for a more indulgent twist. The key to making perfect Grissini is to guarantee they’re rolled out evenly and baked to a golden crisp.
Creating these delectable breadsticks is a rewarding experience that fills your kitchen with the warm, inviting aroma of freshly baked bread. The dough for Grissini is quite simple, consisting primarily of flour, water, yeast, and olive oil. The dough is kneaded until smooth and then allowed to rise until doubled in size.
Once risen, the dough is divided into thin strips, coated with your choice of herbs or seeds, and baked until crisp. With just a bit of patience and attention to detail, you’ll have a batch of Grissini that rivals those found in any Italian restaurant.
Ingredients (serving size: 4-6 people):
- 500g all-purpose flour
- 1 packet (7g) active dry yeast
- 1 teaspoon sugar
- 1 teaspoon salt
- 300ml warm water
- 4 tablespoons olive oil
- Optional toppings: sesame seeds, poppy seeds, rosemary, or coarse sea salt
Cooking Instructions:
- Prepare the yeast mixture: In a small bowl, combine the warm water, sugar, and yeast. Stir gently and let it sit for about 5-10 minutes until it becomes frothy. This indicates that the yeast is active.
- Mix the dough: In a large mixing bowl, combine the flour and salt. Make a well in the center and pour in the yeast mixture and olive oil. Stir with a wooden spoon until the mixture comes together to form a dough.
- Knead the dough: Transfer the dough onto a lightly floured surface and knead for about 10 minutes until it becomes smooth and elastic. Add a little more flour if the dough is sticky.
- First rise: Place the dough in a lightly oiled bowl, cover it with a damp cloth, and let it rise in a warm place for about 1 hour or until it has doubled in size.
- Preheat the oven: While the dough is rising, preheat your oven to 200°C (400°F) and line two baking sheets with parchment paper.
- Shape the breadsticks: Once the dough has risen, punch it down and transfer it to a floured surface. Divide the dough into small portions and roll each piece into long, thin sticks, about the thickness of a pencil. Place them on the prepared baking sheets.
- Add toppings: Lightly brush the breadsticks with olive oil and sprinkle with your choice of toppings, pressing them gently to adhere.
- Bake the breadsticks: Place the baking sheets in the preheated oven and bake for 15-20 minutes, or until the breadsticks are golden brown and crispy.
- Cool and serve: Let the Grissini cool completely on a wire rack before serving.
Extra Tips:
For the crispiest Grissini, guarantee that the dough is rolled out evenly into thin strips, as thicker portions may not bake as well. Feel free to experiment with different flavor combinations for the toppings; herbs like thyme and oregano can add an aromatic touch, while cheese or chili flakes can provide extra zest.
If you prefer a softer breadstick, reduce the baking time slightly. Grissini can be stored in an airtight container for up to a week, making them a perfect make-ahead appetizer.
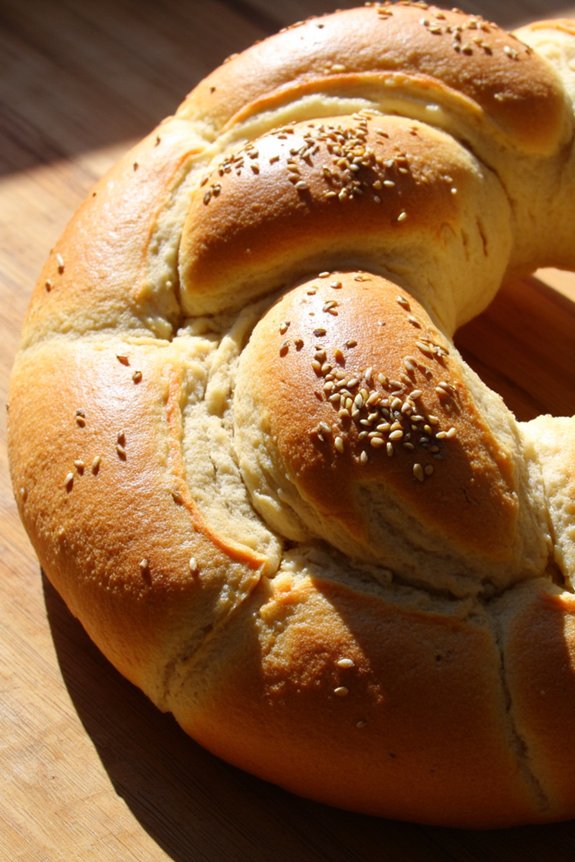
Sourdough Filone Bread
Sourdough Filone is a classic Italian bread known for its rustic appearance and chewy texture. This bread is characterized by its elongated shape, making it perfect for slicing and serving alongside hearty soups or stews. The sourdough starter gives the bread a unique tanginess and depth of flavor, while the long fermentation process contributes to its airy crumb and crusty exterior.
Making Sourdough Filone requires patience and practice, but the result is a delicious homemade bread that embodies the essence of traditional Italian baking.
To begin your Sourdough Filone journey, you’ll need an active sourdough starter that has been fed and is bubbly and ready to use. The process involves creating a dough that undergoes a series of stretches and folds, followed by a slow fermentation to develop flavor and texture. Once the dough has risen adequately, it’s shaped into the characteristic filone loaf and baked to perfection.
This recipe is designed to yield one large loaf, suitable for serving 4-6 people.
Ingredients (Serves 4-6):
- 500g bread flour
- 325g water
- 100g active sourdough starter
- 10g salt
- Semolina flour for dusting
Cooking Instructions:
- Mix the Dough: In a large mixing bowl, combine the bread flour and water. Stir until no dry flour remains. Cover the bowl and let it rest for 30 minutes to allow the flour to hydrate.
- Add the Starter and Salt: After the rest period, add the active sourdough starter and salt to the dough. Mix the ingredients thoroughly until well combined. You can use your hands or a dough hook attachment on a stand mixer.
- Stretch and Fold: Over the next 2-3 hours, perform a series of stretches and folds every 30 minutes. To do this, gently lift one side of the dough and fold it over itself. Rotate the bowl and repeat until all sides are folded. This technique helps develop gluten and structure in the dough.
- Bulk Fermentation: Once the stretches and folds are complete, cover the dough and let it rise at room temperature until it has doubled in size. This can take anywhere from 4-6 hours, depending on the ambient temperature.
- Shape the Loaf: Lightly dust your work surface with semolina flour. Gently turn the dough out onto the surface and shape it into an elongated oval or batard shape, characteristic of a filone loaf.
- Final Proofing: Place the shaped loaf on a parchment-lined baking sheet or in a banneton (proofing basket) dusted with semolina flour. Cover it with a damp cloth and let it proof for 1-2 hours until it has visibly puffed up.
- Preheat the Oven: About 30 minutes before baking, preheat your oven to 450°F (230°C) with a baking stone or steel inside, if you have one, to guarantee even heat distribution.
- Score and Bake: Once the loaf is ready, score it with a sharp knife or bread lame to allow for proper expansion during baking. Carefully transfer the loaf onto the preheated baking surface and bake for 35-40 minutes until the crust is deep golden brown.
- Cool: Remove the bread from the oven and let it cool on a wire rack for at least an hour before slicing. This resting period allows the crumb to set and the flavors to develop further.
Extra Tips:
For best results, confirm your sourdough starter is active and bubbly before incorporating it into the dough. Adjust the water content slightly if your dough feels too dry or too sticky, as flour absorption can vary.
Be patient during the fermentation stages, as longer proofing times result in better flavor and texture. If your kitchen is particularly cold, consider placing the dough in a warmer spot to encourage fermentation.
Finally, using a steam-injection method or placing a pan of hot water in the oven during the initial baking phase can help achieve a crispier crust.
Soft and Chewy Pane Pugliese
Pane Pugliese is a traditional Italian bread originating from the Puglia region, known for its soft and chewy texture with a rustic crust. This bread is perfect for accompanying a hearty meal or simply enjoyed with olive oil and balsamic vinegar. The distinctive characteristics of Pane Pugliese come from its high hydration and long fermentation process, which develop a rich, complex flavor and a delightful texture. With a few simple ingredients, you can bring a taste of Italy into your kitchen.
Making Pane Pugliese requires a bit of patience and attention to detail, but the results are well worth it. This recipe is designed for 4-6 servings and involves creating a pre-ferment (biga), which contributes to the bread’s depth of flavor. The dough will be quite sticky, so don’t be discouraged if it feels different from other bread doughs you’ve worked with. With careful handling and proper kneading, you’ll produce a loaf with a beautiful open crumb and a chewy crust.
Ingredients for 4-6 servings:
- 400 grams of bread flour
- 300 milliliters of water (room temperature)
- 1 gram of instant yeast
- 10 grams of salt
- 100 grams of biga (pre-ferment)
Cooking Instructions:
- Prepare the Biga: In a medium bowl, mix 100 grams of bread flour, 50 milliliters of water, and a pinch (approximately 0.5 gram) of instant yeast. Stir the ingredients until well combined, cover the bowl loosely, and let it sit at room temperature for at least 12 hours or overnight. This will allow the biga to develop its flavor and texture.
- Mix the Dough: In a large mixing bowl, combine the remaining 300 grams of bread flour, 250 milliliters of water, 0.5 gram of instant yeast, and the biga prepared earlier. Stir the mixture until it comes together as a shaggy dough. Let it rest for 20 minutes to allow the flour to absorb the water.
- Add Salt and Knead: Sprinkle 10 grams of salt over the dough and knead it by hand or with a stand mixer fitted with a dough hook for about 10 minutes. The dough should be smooth and elastic but still a bit sticky. If kneading by hand, use a wet hand to manage the stickiness.
- First Rise: Transfer the dough to a lightly oiled bowl, cover it with a damp cloth or plastic wrap, and let it rise in a warm place for 1.5 to 2 hours, or until doubled in size.
- Shape the Dough: Turn the risen dough onto a floured surface and gently shape it into a round loaf. Be careful to preserve the air bubbles within the dough. Place the shaped dough onto a floured proofing basket or a bowl lined with a floured cloth.
- Second Rise: Cover the dough again and let it rise for another 1 to 1.5 hours, or until it has doubled in size.
- Preheat the Oven: Preheat your oven to 230°C (450°F) and place a baking stone or an inverted baking sheet inside to heat. Place an empty pan or tray on the oven floor for steam.
- Bake the Bread: Gently transfer the risen loaf onto the preheated baking surface. Pour a cup of water into the empty pan to create steam, and quickly close the oven door. Bake for 25-30 minutes, or until the bread is golden brown and sounds hollow when tapped on the bottom.
- Cool the Bread: Remove the bread from the oven and let it cool on a wire rack for at least 30 minutes before slicing. This cooling period allows the interior to set properly.
Extra Tips:
For the best results, make sure to use bread flour, which has a higher protein content and helps in developing the gluten structure necessary for this bread’s chewy texture. If your dough feels too sticky during handling, resist the urge to add more flour, as this can affect the texture of the final loaf. Instead, work with wet hands or lightly flour the surface to manage the dough.
Also, if you have the time, an extended fermentation in the fridge after the first rise can enhance the flavor even more. Happy baking!
Fluffy Semolina Bread
Fluffy Semolina Bread is a delightful addition to any rustic Italian meal, bringing the hearty and aromatic essence of traditional hearth bread to your table. Known for its tender crumb and golden crust, this bread is perfect for mopping up sauces or simply enjoying with a slather of butter. The combination of semolina flour with all-purpose flour gives this bread its unique texture and flavor, reminiscent of the rustic loaves baked in wood-fired ovens across Italy.
The key to achieving that delightful fluffiness lies in the fermentation process, which allows the dough to develop its characteristic flavor and airy texture. This recipe will guide you through the steps to create a loaf that’s perfect for a family dinner or a gathering with friends, serving 4-6 people. With a little patience and attention to detail, you can bring the warmth of an Italian hearth into your home with this Fluffy Semolina Bread.
Ingredients (Serves 4-6):
- 2 cups semolina flour
- 1 cup all-purpose flour
- 1 and 1/4 cups warm water (about 110°F)
- 1 tablespoon honey
- 2 teaspoons active dry yeast
- 1 teaspoon salt
- 2 tablespoons olive oil
- Additional flour for dusting
Instructions:
- Activate the Yeast: In a small bowl, combine the warm water and honey, stirring until the honey dissolves. Sprinkle the active dry yeast over the top and allow it to sit for about 5-10 minutes until it becomes frothy. This indicates that the yeast is activated and ready to work its magic in the dough.
- Mix the Dough: In a large mixing bowl, combine the semolina flour, all-purpose flour, and salt. Create a well in the center and pour in the yeast mixture and olive oil. Stir with a wooden spoon until the dough begins to come together.
- Knead the Dough: Transfer the dough onto a lightly floured surface and knead it for about 8-10 minutes until it becomes smooth and elastic. If the dough is too sticky, sprinkle a little more flour, but avoid adding too much to prevent the bread from becoming dense.
- First Rise: Place the dough in a lightly oiled bowl, turning it so that all sides are coated with oil. Cover the bowl with a damp cloth and let it rise in a warm place for about 1-2 hours, or until it has doubled in size.
- Shape the Loaf: Once risen, punch down the dough to release the air, then shape it into a round or oval loaf. Place the shaped dough onto a parchment-lined baking sheet or a floured baking stone.
- Second Rise: Cover the loaf with a damp cloth and let it rise again for about 30-45 minutes, or until it has puffed up noticeably.
- Preheat the Oven: While the bread is undergoing its second rise, preheat your oven to 425°F (220°C). If using a baking stone, allow it to heat up in the oven as well.
- Score and Bake: Just before baking, use a sharp knife to make a few shallow slashes on the top of the loaf. This will allow the bread to expand properly in the oven. Bake the bread for 25-30 minutes, or until it’s golden brown and sounds hollow when tapped on the bottom.
- Cool and Serve: Remove the bread from the oven and let it cool on a wire rack for at least 15 minutes before slicing. Enjoy warm with your favorite toppings or alongside a hearty Italian meal.
Extra Tips:
To achieve the best texture and crust, be mindful of the dough’s hydration and consistency. The dough should be soft but not overly sticky. If your kitchen is particularly dry, you may need to adjust the water slightly.
For an even more rustic flavor, consider adding herbs like rosemary or thyme to the dough. Also, placing a shallow pan of water at the bottom of the oven during baking can create steam, resulting in a crisper crust. Enjoy your homemade Fluffy Semolina Bread with your favorite Italian dishes!
Herbed Schiacciata Bread
Herbed Schiacciata Bread is a delightful and fragrant addition to any Italian meal, offering a taste of rustic, artisanal baking. This Tuscan flatbread is similar to focaccia but is thinner and often infused with aromatic herbs, making it a perfect partner for soups, salads, or as a simple snack on its own. Its crispy exterior and soft, flavorful interior make it an irresistible treat for bread lovers.
The traditional schiacciata is a demonstration of the simplicity of Italian cooking, where a few quality ingredients come together to create something truly delicious.
This recipe for Herbed Schiacciata Bread serves 4-6 people and includes a medley of Mediterranean herbs like rosemary and thyme, which infuse the dough with their earthy aromas. The process involves a straightforward dough preparation, a rise, and a quick bake, making it an approachable bread recipe for both novice and experienced bakers.
The result is a golden-brown bread that’s crispy on the outside, soft on the inside, and bursting with the flavor of fresh herbs. Whether you serve it as an appetizer, a side, or a sandwich base, this bread is sure to be a crowd-pleaser at your dining table.
Ingredients (Serving Size: 4-6 people):
- 3 1/2 cups all-purpose flour
- 1 1/2 cups warm water (about 110°F/45°C)
- 2 teaspoons active dry yeast
- 1 teaspoon sugar
- 1/4 cup extra-virgin olive oil, plus more for drizzling
- 1 teaspoon salt
- 1 tablespoon fresh rosemary, chopped
- 1 tablespoon fresh thyme, chopped
- Coarse sea salt, for sprinkling
Cooking Instructions:
- Prepare the Yeast: In a small bowl, combine the warm water, active dry yeast, and sugar. Stir gently and let it sit for about 5-10 minutes until it becomes frothy. This indicates that the yeast is active and ready to use.
- Mix the Dough: In a large mixing bowl, combine the flour and salt. Make a well in the center and add the yeast mixture and 1/4 cup of olive oil. Mix until a dough forms.
- Knead the Dough: Transfer the dough to a floured surface and knead it for about 10 minutes until it becomes smooth and elastic.
- First Rise: Place the dough in a lightly oiled bowl, cover it with a damp cloth, and let it rise in a warm place for 1-2 hours, or until it has doubled in size.
- Shape the Bread: Once risen, punch down the dough to release the air. Transfer it to a parchment-lined baking sheet and gently stretch it into a rectangular shape, about 1/2 inch thick.
- Add the Herbs: Drizzle the surface of the dough with olive oil, then sprinkle the chopped rosemary, thyme, and a little coarse sea salt evenly over the top.
- Second Rise: Cover the dough loosely with a cloth and let it rise again for about 30 minutes.
- Bake the Bread: Preheat your oven to 425°F (220°C). Once preheated, bake the schiacciata for 20-25 minutes, or until it turns golden brown and the edges are crispy.
- Cool and Serve: Remove the bread from the oven and let it cool slightly on a wire rack. Slice and serve warm.
Extra Tips:
For an extra depth of flavor, consider adding a handful of sliced olives or sun-dried tomatoes to the dough before baking. If you prefer a more robust herb flavor, increase the amount of herbs according to your taste.
It’s also essential to verify your yeast is fresh and activated properly, as this will affect the bread’s rise and texture. Finally, always allow the dough to rest adequately during both rises to achieve that soft, airy interior characteristic of a perfect schiacciata.
Crunchy Pane Siciliano
Pane Siciliano is a classic Italian bread known for its crunchy crust and soft, airy interior. Its unique flavor is partly due to the semolina flour used in the dough, which gives the bread its distinctive golden color and subtle nuttiness. The process of making Pane Siciliano is a labor of love, requiring patience and attention to detail, but the results are certainly rewarding.
This bread is perfect for accompanying a hearty meal or simply enjoying with high-quality olive oil and a sprinkle of sea salt.
To achieve the signature crunch and flavor, Pane Siciliano undergoes a long fermentation process which enhances its texture and taste. The dough is shaped into the traditional spiral form, reminiscent of a snail shell or “chiocciola,” before being baked to perfection. This recipe yields enough bread to serve 4-6 people, making it an ideal choice for family gatherings or dinner parties.
Ingredients (Serves 4-6):
- 4 cups all-purpose flour
- 1 ½ cups semolina flour
- 2 ¼ teaspoons active dry yeast
- 2 teaspoons salt
- 1 tablespoon sugar
- 2 tablespoons olive oil
- 1 ¾ cups warm water (about 110°F)
- 3 tablespoons sesame seeds
Cooking Instructions:
- Prepare the Dough: In a large mixing bowl, combine the all-purpose flour, semolina flour, active dry yeast, salt, and sugar. Stir the dry ingredients together until well mixed.
- Add Wet Ingredients: Make a well in the center of the dry ingredients and add the olive oil and warm water. Mix the ingredients together using a wooden spoon or your hands until a rough dough forms.
- Knead the Dough: Transfer the dough to a lightly floured surface and knead for about 10 minutes, until it becomes smooth and elastic. If the dough is sticky, add a little more flour as needed.
- First Rise: Shape the dough into a ball and place it in a lightly oiled bowl. Cover the bowl with a damp cloth or plastic wrap and let it rise in a warm, draft-free area for about 2 hours, or until it has doubled in size.
- Shape the Bread: Once the dough has risen, gently deflate it and turn it out onto a floured surface. Roll the dough into a long rope, about 24 inches in length. Coil the rope into a spiral shape on a baking sheet lined with parchment paper.
- Second Rise: Cover the shaped dough with a cloth and let it rise for another hour until it puffs up slightly.
- Preheat the Oven: During the second rise, preheat your oven to 425°F (220°C).
- Add Sesame Seeds: Before baking, lightly brush the top of the dough with water and sprinkle generously with sesame seeds.
- Bake the Bread: Place the bread in the preheated oven and bake for 25-30 minutes, or until the crust is golden brown and the bread sounds hollow when tapped on the bottom.
- Cool the Bread: Allow the bread to cool on a wire rack for at least 20 minutes before slicing.
Extra Tips:
For an even more pronounced flavor, consider using a poolish (a type of pre-ferment) which can be prepared the night before. This involves mixing a small portion of flour, water, and yeast and letting it sit overnight. Incorporating this into your dough will deepen the flavor and improve the texture.
Additionally, be sure to allow the dough ample time to rise in a warm environment, as this is essential for achieving the perfect airy crumb and crust. Finally, using a baking stone or preheated baking sheet can help in developing that coveted crunchy crust.
Light and Airy Pane Di Matera
Pane Di Matera is a celebrated rustic Italian hearth bread known for its light and airy structure, with a distinct golden crust and a soft, chewy interior. This bread hails from the region of Basilicata in Southern Italy and is traditionally made with semolina flour, which gives it a unique flavor and texture.
The bread is often baked in wood-fired ovens, which impart a slightly smoky flavor and add to its authentic charm. While creating an exact replica of the traditional Pane Di Matera at home might be challenging without a wood-fired oven, this recipe will guide you to achieve the closest possible results using a conventional oven.
The beauty of Pane Di Matera lies in its simplicity and the use of high-quality ingredients. Patience is key, as the dough undergoes a slow fermentation process, allowing for the development of complex flavors. The end result is a bread that can be enjoyed on its own, with a drizzle of extra virgin olive oil, or as an accompaniment to soups and stews.
Whether you’re a seasoned baker or a novice, making Pane Di Matera is a rewarding experience that connects you to the rich culinary traditions of Italy.
Ingredients (for 4-6 servings):
- 500g semolina flour
- 10g active dry yeast
- 1 ½ teaspoons salt
- 300ml lukewarm water
- 1 tablespoon olive oil
- Extra semolina flour for dusting
Cooking Instructions:
- Activate the Yeast: Begin by dissolving the active dry yeast in 100ml of lukewarm water. Allow it to sit for about 5-10 minutes until it becomes frothy and activated.
- Prepare the Dough: In a large mixing bowl, combine the semolina flour and salt. Make a well in the center and add the activated yeast mixture, olive oil, and the remaining 200ml of lukewarm water. Mix the ingredients together until a rough dough forms.
- Knead the Dough: Transfer the dough onto a lightly floured surface and knead it for about 10-15 minutes until it becomes smooth and elastic. This step is essential for developing the gluten structure that will give the bread its airy texture.
- First Rise: Place the kneaded dough in a lightly oiled bowl, cover it with a damp cloth, and let it rise in a warm place for about 2 hours or until it has doubled in size.
- Shape the Dough: Once the dough has risen, gently punch it down to release the air. Turn it out onto a floured surface and shape it into a round loaf. Place it on a baking sheet lined with parchment paper.
- Second Rise: Cover the shaped loaf with a cloth and let it rise for another 30-45 minutes until it has almost doubled in size again.
- Preheat the Oven: While the dough is undergoing its second rise, preheat your oven to 220°C (430°F). Place a baking stone or an inverted baking sheet in the oven to heat up as well.
- Bake the Bread: Dust the top of the loaf with semolina flour and score it with a sharp knife to allow it to expand while baking. Transfer the loaf to the preheated baking stone or sheet and bake for 25-30 minutes until it’s golden brown and sounds hollow when tapped on the bottom.
- Cool the Bread: Remove the bread from the oven and let it cool on a wire rack for at least 30 minutes before slicing. This allows the crumb to set properly.
Extra Tips:
For the best results, use high-quality semolina flour, as it greatly influences the texture and flavor of the bread. If you don’t have a baking stone, an inverted baking sheet works well in mimicking the heat distribution.
Be patient with the rising times; rushing the process can result in a denser loaf. If you want to enhance the rustic look, try adding a small pan of water to the bottom of the oven during baking to create steam, which helps in developing a crusty exterior.
Enjoy your Pane Di Matera fresh, and store any leftovers in a paper bag to maintain its texture.
Sweet Pane Con Uvetta (Raisin Bread)
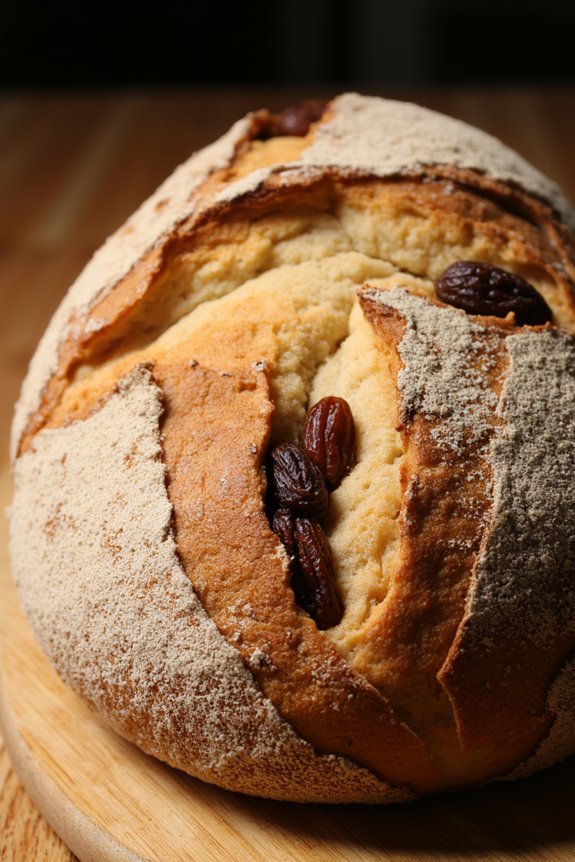
Pane Con Uvetta is made using a straightforward bread-making technique, which involves proofing the dough to achieve a light and airy interior. The key is to balance the sweetness of the raisins with the rustic flavor of the bread, creating a harmonious blend that appeals to both sweet and savory palates. This recipe is ideal for serving 4-6 people and allows for a delightful baking experience with a rewarding result.
Ingredients (Serving Size: 4-6 people):
- 3 1/2 cups all-purpose flour
- 1 cup warm water (about 110°F)
- 2 teaspoons active dry yeast
- 1 teaspoon salt
- 3 tablespoons sugar
- 2 tablespoons olive oil
- 1 cup raisins
- 1 teaspoon vanilla extract
- 1 teaspoon ground cinnamon (optional)
Cooking Instructions:
- Activate the Yeast: In a small bowl, combine the warm water, sugar, and active dry yeast. Stir gently and let it sit for about 5-10 minutes until it becomes frothy. This indicates that the yeast is active.
- Prepare the Dough: In a large mixing bowl, combine the all-purpose flour and salt. Create a well in the center and pour in the yeast mixture, olive oil, and vanilla extract. Mix until a rough dough begins to form.
- Add the Raisins: Incorporate the raisins into the dough, making certain they’re evenly distributed. If you like, you can also add the ground cinnamon at this stage for extra flavor.
- Knead the Dough: Transfer the dough onto a floured surface and knead it for about 8-10 minutes until it becomes smooth and elastic. The dough should be soft but not sticky.
- First Proofing: Place the dough in a lightly oiled bowl, cover it with a damp cloth, and let it rise in a warm place for about 1-2 hours or until it has doubled in size.
- Shape the Loaf: Once the dough has risen, punch it down to release the air. Shape it into a loaf or a round ball, depending on your preference.
- Second Proofing: Place the shaped dough onto a parchment-lined baking sheet. Cover it again with a damp cloth and let it rise for another 30-45 minutes.
- Preheat and Bake: Preheat your oven to 375°F (190°C). Once preheated, bake the bread for 25-30 minutes or until the crust is golden brown and it sounds hollow when tapped on the bottom.
- Cool and Serve: Allow the bread to cool on a wire rack before slicing. This will make certain the interior sets properly and retains moisture.
Extra Tips:
To guarantee the best results, use fresh yeast and check the expiration date before starting. If you prefer plumper raisins, soak them in warm water or rum for about 15 minutes before adding them to the dough. This won’t only enhance their texture but also add a subtle depth of flavor to the bread.
Additionally, for a crispy crust, you can place a small pan of water in the oven while baking to create steam. Always allow the bread to cool completely before slicing to avoid a gummy texture.