

As someone who adores exploring new flavors, I’m excited to share these 13 bold Italian garlic recipes with you. Picture the aroma of garlic-infused olive oil filling your kitchen as you whip up Spaghetti Aglio E Olio. Think about the savory delight of Roasted Garlic and Tomato Bruschetta as a perfect appetizer. Each dish celebrates garlic’s rich essence, offering a delightful culinary experience. Are you ready to embark on this aromatic journey?
Garlic-Infused Spaghetti Aglio E Olio
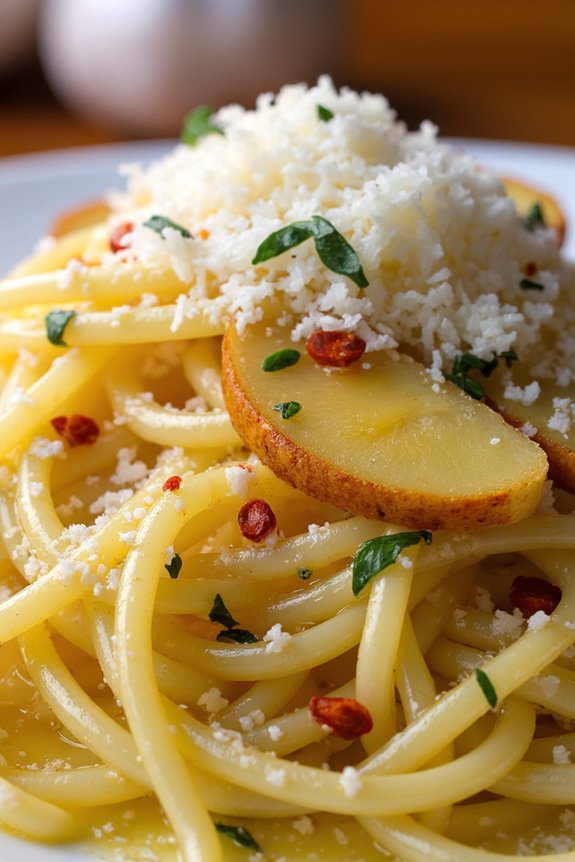
Garlic-Infused Spaghetti Aglio E Olio is a classic Italian dish that showcases the simplicity and depth of flavor that garlic can bring to a meal. This pasta dish is perfect for those who love the rich, aromatic taste of garlic paired with the subtle heat of red pepper flakes and the freshness of parsley.
The combination of these ingredients with high-quality olive oil creates a silky sauce that coats the spaghetti perfectly, making each bite a luscious experience. This recipe is ideal for a quick weeknight dinner, as it requires only a handful of ingredients and about 20 minutes to prepare.
The key to achieving the perfect Garlic-Infused Spaghetti Aglio E Olio lies in the quality of the ingredients and the technique used to infuse the oil with garlic. It’s a dish that allows garlic to truly shine, making it a favorite among garlic lovers and a staple in Italian cuisine.
Ingredients (for 4-6 servings):
- 1 pound (450g) spaghetti
- 1/2 cup extra virgin olive oil
- 8 large garlic cloves, thinly sliced
- 1 teaspoon red pepper flakes
- Salt, to taste
- 1/4 cup fresh parsley, chopped
- 1 cup reserved pasta water
- Freshly grated Parmesan cheese, for serving
Cooking Instructions:
- Cook the Pasta: Bring a large pot of salted water to a boil. Add the spaghetti and cook until al dente, according to package instructions. Reserve 1 cup of the pasta cooking water, then drain the pasta.
- Infuse the Oil: In a large, deep skillet or frying pan, heat the olive oil over medium heat. Add the sliced garlic and red pepper flakes. Cook, stirring frequently, until the garlic is golden brown and fragrant, about 2-3 minutes. Be careful not to burn the garlic, as it can become bitter.
- Combine Pasta and Sauce: Add the cooked spaghetti to the skillet. Toss the pasta with the garlic oil mixture, ensuring that the spaghetti is well coated. Gradually add the reserved pasta water, a little at a time, stirring constantly until the sauce reaches your desired consistency.
- Season and Serve: Remove the skillet from the heat. Stir in the chopped parsley and season with salt to taste. Serve the pasta immediately, topped with freshly grated Parmesan cheese.
Extra Tips: To enhance the flavor of this dish, use high-quality extra virgin olive oil and fresh garlic. Adjust the amount of red pepper flakes according to your heat preference.
If you like a bit more flavor complexity, consider adding a squeeze of fresh lemon juice or a sprinkle of lemon zest before serving. Always keep a close eye on the garlic while cooking to prevent it from burning, as this will affect the overall flavor of the dish.
Roasted Garlic and Tomato Bruschetta
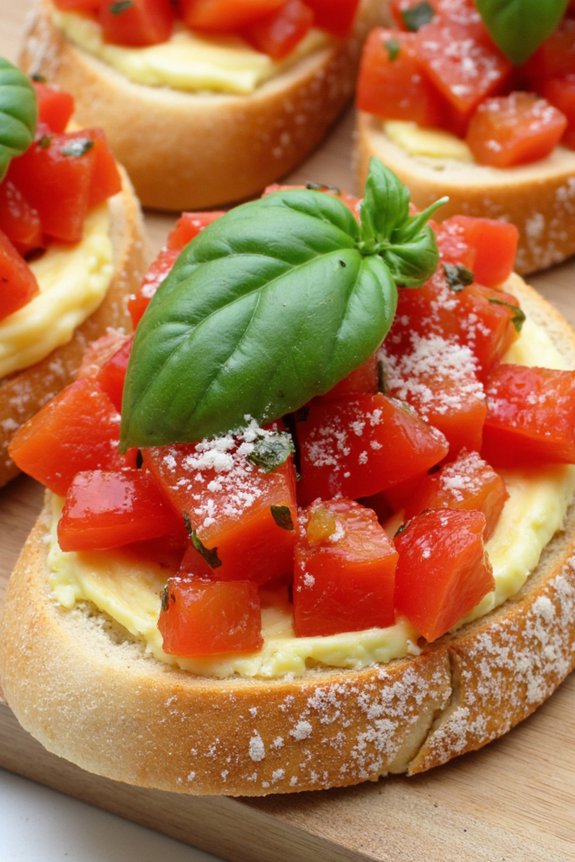
Roasted Garlic and Tomato Bruschetta is a delightful Italian appetizer that combines the rich, mellow flavors of roasted garlic with the fresh, vibrant taste of tomatoes. This dish is perfect for gatherings or a quick snack and brings together simple ingredients to create a burst of flavor with every bite.
The creamy roasted garlic, juicy tomatoes, and crunchy bread base make it an irresistible starter that sets the tone for a delicious meal. The beauty of bruschetta lies in its simplicity and versatility. By using high-quality ingredients, this dish can elevate any dining experience.
The key is to roast the garlic until it reaches a soft, caramelized state, allowing it to meld perfectly with the fresh tomatoes. This recipe serves 4-6 people, making it ideal for a small gathering or family dinner.
Ingredients:
- 1 loaf of crusty Italian bread, sliced
- 1 head of garlic
- 4 large ripe tomatoes, diced
- 1/4 cup fresh basil leaves, chopped
- 1/4 cup extra virgin olive oil
- 1 tablespoon balsamic vinegar
- Salt and freshly ground black pepper, to taste
- 1/2 cup grated Parmesan cheese (optional)
Cooking Instructions:
- Preheat the Oven: Start by preheating your oven to 400°F (200°C).
- Prepare the Garlic: Cut the top off the head of garlic to expose the cloves. Drizzle with a little olive oil, wrap it in aluminum foil, and place it in the oven. Roast for about 30-35 minutes until the garlic is soft and caramelized.
- Prepare the Bread: While the garlic is roasting, slice the loaf of bread into 1/2-inch thick slices. Arrange the slices on a baking sheet. Drizzle or brush them lightly with olive oil.
- Toast the Bread: Once the garlic is nearly done, place the bread slices in the oven and toast them for about 5-7 minutes, or until they’re golden and crisp.
- Mix the Tomato Topping: In a bowl, combine the diced tomatoes, chopped basil, olive oil, balsamic vinegar, salt, and pepper. Mix well and set aside to allow the flavors to blend.
- Assemble the Bruschetta: Once the garlic is roasted, squeeze the soft cloves out of their skins and spread a small amount over each slice of toasted bread. Top with the tomato mixture, ensuring each slice is generously covered.
- Garnish and Serve: For an optional touch, sprinkle freshly grated Parmesan cheese on top of the tomato mixture. Serve the bruschetta immediately while the bread is still warm.
Extra Tips:
When making Roasted Garlic and Tomato Bruschetta, choosing ripe, flavorful tomatoes is essential to achieving the best results. Consider using heirloom or vine-ripened tomatoes for their superior taste.
Additionally, guarantee the bread is sufficiently toasted to hold the toppings without becoming soggy. If you prefer a more robust garlic flavor, you can roast an additional head of garlic and add extra cloves to the bruschetta.
Creamy Garlic Parmesan Risotto
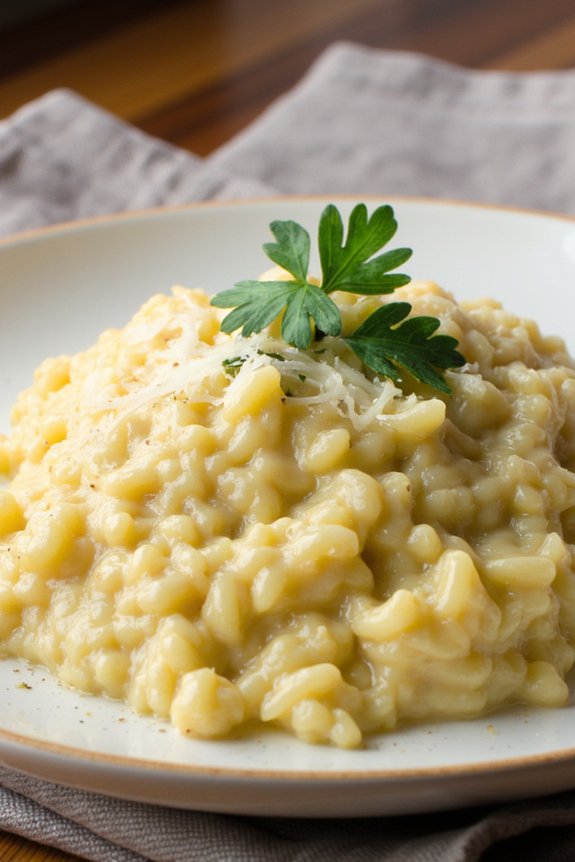
Creamy Garlic Parmesan Risotto is a luxurious Italian dish that combines the rich flavors of garlic and Parmesan cheese with the creamy texture of Arborio rice. This dish is perfect for a cozy family dinner or a special occasion, and it’s sure to impress your guests with its decadent taste and satisfying creaminess.
The slow cooking process allows the rice to absorb the flavors of the garlic-infused broth, creating a delightful harmony of tastes that will leave everyone asking for seconds.
Making this dish requires patience and attention, as the key to a perfect risotto is in the gradual addition of liquid and constant stirring. This process releases the starches from the rice, giving risotto its signature creamy consistency. With a handful of simple ingredients and a little time, you can create a restaurant-quality meal right in your own kitchen.
Gather your ingredients, and let’s get started on this comforting Italian classic.
Ingredients (Serves 4-6):
- 2 cups Arborio rice
- 6 cups chicken or vegetable broth
- 1 cup grated Parmesan cheese
- 1 cup dry white wine
- 1 medium onion, finely chopped
- 4 cloves garlic, minced
- 2 tablespoons olive oil
- 2 tablespoons unsalted butter
- Salt and pepper, to taste
- Fresh parsley, chopped (for garnish)
Instructions:
- Prepare the broth: In a medium saucepan, heat the chicken or vegetable broth over medium heat until it begins to simmer. Reduce the heat to low and keep it warm on the stove.
- Sauté the aromatics: In a large skillet or saucepan, heat the olive oil over medium heat. Add the chopped onion and sauté for about 5 minutes, or until the onion becomes translucent. Add the minced garlic and cook for an additional minute, being careful not to let it burn.
- Toast the rice: Add the Arborio rice to the pan with the onion and garlic, stirring well to coat the grains with the oil. Cook for about 2-3 minutes until the rice begins to look translucent around the edges.
- Deglaze with wine: Pour in the white wine and stir continuously until the wine is mostly absorbed by the rice. This step adds a depth of flavor to the risotto.
- Cook the risotto: Begin adding the warm broth to the rice, one ladleful at a time. Stir constantly until the liquid is nearly absorbed before adding more broth. Continue this process for about 18-20 minutes, or until the rice is creamy and tender with a slight bite.
- Finish with cheese and butter: Once the rice is cooked to your liking and most of the liquid has been absorbed, stir in the grated Parmesan cheese and unsalted butter. Mix well until the cheese is melted and the risotto is creamy. Season with salt and pepper to taste.
- Serve: Remove the risotto from the heat and let it sit for a few minutes before serving. Garnish with freshly chopped parsley and additional Parmesan cheese if desired.
Extra Tips:
To achieve the best results, use quality Parmesan cheese and freshly grate it yourself for maximum flavor. If you prefer a milder garlic flavor, you can roast the garlic beforehand or reduce the number of cloves.
Remember, the key to a perfect risotto is patience – keep stirring and adding the broth gradually. If you run out of broth and the risotto is still too firm, you can use a bit of warm water. Adjust the seasoning at the end, as the Parmesan cheese can be salty.
Enjoy your Creamy Garlic Parmesan Risotto with a side of crusty bread and a glass of white wine for a truly Italian dining experience.
Garlic and Herb Focaccia Bread
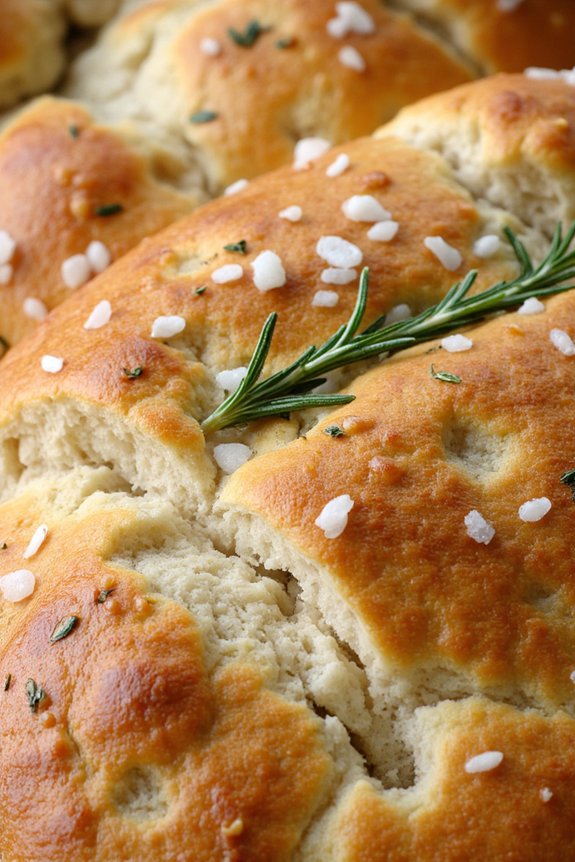
Garlic and Herb Focaccia Bread is a classic Italian dish that’s beloved for its fluffy interior and crispy, golden crust. Infused with the rich flavors of garlic and a blend of aromatic herbs, this bread is perfect for serving as an appetizer, side dish, or even as a base for sandwiches.
The beauty of focaccia lies in its simplicity and versatility, making it a delightful addition to any meal. Whether you’re hosting a dinner party or simply enjoying a cozy family meal, this Garlic and Herb Focaccia Bread is guaranteed to impress with its delicious taste and inviting aroma.
To make this Garlic and Herb Focaccia Bread for 4-6 people, you’ll start by creating a dough using basic ingredients like flour, yeast, and olive oil. What sets this bread apart is the infusion of garlic and herbs, which are incorporated into the dough and also sprinkled on top for an added burst of flavor.
The process is relatively straightforward, and with a little patience and attention to detail, you’ll be rewarded with a beautifully baked focaccia that’s both soft and flavorful. Pair it with a hearty soup or a vibrant salad for a complete Italian-inspired meal.
Ingredients:
- 4 cups all-purpose flour
- 1 packet (2 1/4 teaspoons) active dry yeast
- 1 1/2 cups warm water (about 110°F)
- 1/4 cup extra virgin olive oil, plus more for drizzling
- 2 teaspoons salt
- 3 cloves garlic, minced
- 1 tablespoon fresh rosemary, chopped
- 1 tablespoon fresh thyme, chopped
- 1 teaspoon dried oregano
- Coarse sea salt, for sprinkling
Cooking Instructions:
- Prepare the Yeast Mixture: In a large mixing bowl, combine the warm water and yeast. Stir gently and let it sit for about 5 minutes until the mixture becomes frothy. This indicates that the yeast is active.
- Mix the Dough: Add the flour, 1/4 cup of olive oil, and 2 teaspoons of salt into the yeast mixture. Stir with a wooden spoon until the ingredients are well combined and a shaggy dough forms.
- Knead the Dough: Transfer the dough onto a floured surface and knead for about 8-10 minutes until it becomes smooth and elastic. Alternatively, use a stand mixer with a dough hook attachment on medium speed for about 5 minutes.
- First Rise: Place the dough in a lightly oiled bowl, cover it with a damp cloth or plastic wrap, and let it rise in a warm, draft-free area for about 1 to 1.5 hours, or until it has doubled in size.
- Prepare the Baking Sheet: Once the dough has risen, preheat the oven to 400°F (200°C). Grease a large baking sheet (about 18×13 inches) with olive oil.
- Shape the Focaccia: Punch down the risen dough to release the air. Transfer it to the prepared baking sheet and use your fingertips to gently stretch and press the dough into a rectangle, about 1/2 inch thick.
- Add Toppings: In a small bowl, mix the minced garlic, rosemary, thyme, and oregano with a little olive oil. Spread this mixture evenly over the surface of the dough. Drizzle additional olive oil on top and sprinkle with coarse sea salt.
- Second Rise: Cover the dough loosely with a damp cloth and let it rise for another 20-30 minutes to allow it to puff up slightly.
- Bake the Focaccia: Bake in the preheated oven for 20-25 minutes, or until the focaccia is golden brown on the edges and the top. Remove from the oven and let it cool slightly on a wire rack before slicing.
Extra Tips:
For an even richer flavor, consider adding a sprinkle of grated Parmesan cheese or sun-dried tomatoes on top before baking. If you prefer a more pronounced garlic flavor, roast the garlic cloves before mincing and adding them to the dough.
To achieve the perfect texture, verify that your water is at the correct temperature for activating the yeast, and avoid over-kneading to keep the dough light and airy. Enjoy your focaccia warm or at room temperature for the best taste experience.
Classic Italian Garlic Bread

Indulge in the rich, savory flavors of Classic Italian Garlic Bread, a timeless side dish that perfectly complements any pasta meal or stands alone as a delicious snack. This recipe transforms a simple loaf of bread into a golden, crispy treat infused with the aromatic essence of garlic and a touch of parsley. The result is a fragrant and flavorful bread with a satisfying crunch on the outside and a soft, buttery inside. Perfect for entertaining or enhancing a family dinner, this garlic bread is sure to be a hit.
To achieve the perfect Classic Italian Garlic Bread, start with a fresh loaf of Italian or French bread. The key to this recipe is using high-quality ingredients: fresh garlic, unsalted butter, and a sprinkle of parsley to elevate the flavors. This recipe serves 4-6 people, making it an ideal choice for gatherings or family meals. With just a few simple steps, you’ll have a delicious side dish ready to enjoy.
Ingredients (serves 4-6):
- 1 loaf Italian or French bread
- 1/2 cup unsalted butter, softened
- 4-5 cloves garlic, minced
- 1 tablespoon fresh parsley, finely chopped
- 1/4 teaspoon salt
- 1/4 teaspoon black pepper
- Optional: 1/4 cup grated Parmesan cheese
Cooking Instructions:
- Preheat the Oven: Begin by preheating your oven to 375°F (190°C). This guarantees the bread bakes evenly and achieves the desired crispy texture.
- Prepare the Garlic Butter: In a small mixing bowl, combine the softened butter, minced garlic, chopped parsley, salt, and black pepper. Mix these ingredients thoroughly until well combined and the mixture is smooth.
- Prepare the Bread: Slice the loaf of Italian or French bread in half lengthwise, creating two open-faced halves. If desired, you can also cut the bread into thick slices for individual servings.
- Spread the Garlic Butter: Generously spread the garlic butter mixture over each half of the bread. Make sure the butter reaches the edges for a consistent flavor throughout. If using Parmesan cheese, sprinkle it evenly over the buttered bread.
- Bake the Bread: Place the prepared bread halves on a baking sheet, garlic butter side up. Bake in the preheated oven for 10-12 minutes, or until the edges are golden brown and the butter has melted into the bread.
- Broil for Extra Crispiness: For an extra crispy top, switch the oven to the broil setting for an additional 1-2 minutes. Keep a close eye on the bread to prevent burning.
- Serve Hot: Once the bread is golden and crispy, remove it from the oven. Let it cool slightly before slicing it into serving pieces. Serve hot alongside your favorite Italian dishes or as a standalone appetizer.
Extra Tips:
To guarantee the best flavor, use fresh garlic rather than pre-minced garlic from a jar. Fresh garlic enhances the dish with its strong, aromatic quality.
Additionally, if you prefer a cheesier garlic bread, feel free to add more Parmesan cheese or even a blend of Italian cheeses.
For those who enjoy a bit of heat, a pinch of red pepper flakes can be added to the garlic butter mixture.
Finally, be mindful of the broiling step, as this can quickly turn the bread from perfectly crisp to overly charred if not monitored closely.
Garlic and Lemon Shrimp Scampi
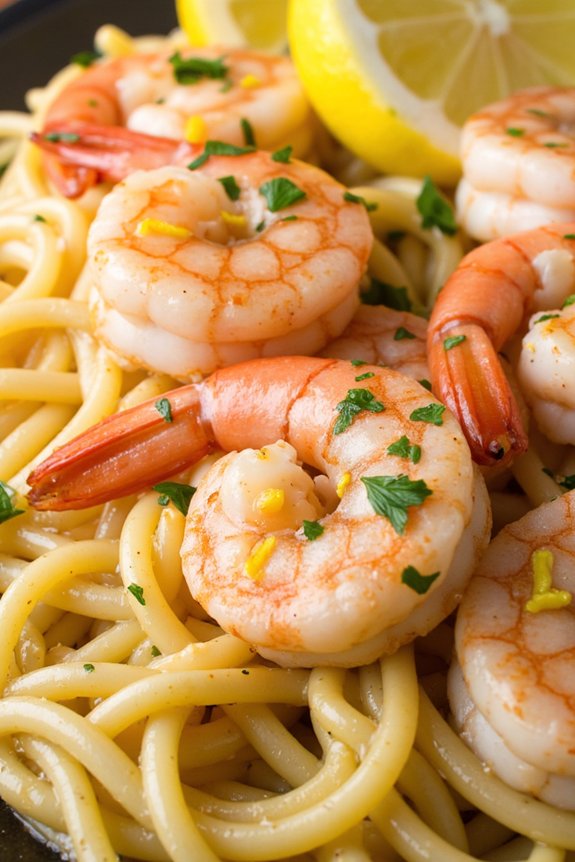
Garlic and Lemon Shrimp Scampi is a delightful Italian dish that combines the rich flavors of garlic, lemon, and shrimp into a savory masterpiece. This dish is perfect for a quick, yet elegant dinner that can be prepared in under 30 minutes, making it ideal for both weeknight meals and special occasions. The succulent shrimp are cooked to perfection in a buttery garlic sauce with a hint of lemon, and when tossed with pasta, it transforms into a comforting meal that will impress your family and friends.
The key to a successful Garlic and Lemon Shrimp Scampi lies in the quality of the ingredients. Fresh shrimp, ideally wild-caught, will provide the best flavor and texture. The garlic and lemon should be fresh, and the butter should be of high quality to achieve the rich taste that defines this dish. This recipe serves 4-6 people and can be easily adjusted for a larger or smaller crowd by altering the quantities of each ingredient.
Ingredients:
- 1 pound large shrimp, peeled and deveined
- 8 oz linguine or spaghetti
- 4 tablespoons unsalted butter
- 3 tablespoons olive oil
- 5 cloves garlic, minced
- 1/4 teaspoon red pepper flakes
- 1/2 cup dry white wine
- Juice of 1 large lemon
- Zest of 1 lemon
- Salt and pepper to taste
- 1/4 cup fresh parsley, chopped
- Lemon wedges for serving
Instructions:
- Cook the Pasta: Start by bringing a large pot of salted water to a boil. Add the linguine or spaghetti and cook according to the package instructions until al dente. Once cooked, drain the pasta and set aside, reserving about 1/2 cup of the pasta water.
- Prepare the Shrimp: Pat the shrimp dry with paper towels. Season them lightly with salt and pepper to enhance their natural flavors.
- Sauté Garlic and Red Pepper Flakes: In a large skillet, heat the olive oil and 2 tablespoons of butter over medium heat. Once the butter has melted, add the minced garlic and red pepper flakes. Sauté for about 1-2 minutes until the garlic is fragrant, being careful not to burn it.
- Cook the Shrimp: Increase the heat to medium-high and add the shrimp to the skillet. Cook for 2-3 minutes on each side, or until the shrimp turn pink and opaque. Remove the shrimp from the skillet and set aside.
- Deglaze the Pan: Pour in the white wine and lemon juice, using a spatula to scrape up any browned bits from the bottom of the pan. Allow the mixture to simmer for about 2 minutes to reduce slightly.
- Combine Ingredients: Return the shrimp to the skillet along with the cooked pasta. Add the remaining 2 tablespoons of butter and lemon zest. Toss everything together to coat the pasta and shrimp evenly with the sauce. If the sauce appears too thick, add a bit of the reserved pasta water to achieve the desired consistency.
- Finish with Parsley: Remove the skillet from heat and stir in the chopped parsley. Adjust the seasoning with additional salt and pepper if necessary.
- Serve: Transfer the Garlic and Lemon Shrimp Scampi to a serving dish. Garnish with lemon wedges and extra parsley if desired.
Extra Tips:
To prevent the pasta from sticking together, make certain it’s well-drained and tossed with a little olive oil before adding it to the skillet. For a more pronounced lemon flavor, consider adding extra lemon zest or a splash of lemon juice just before serving. If you prefer a milder dish, reduce the amount of red pepper flakes.
Tuscan Garlic Chicken
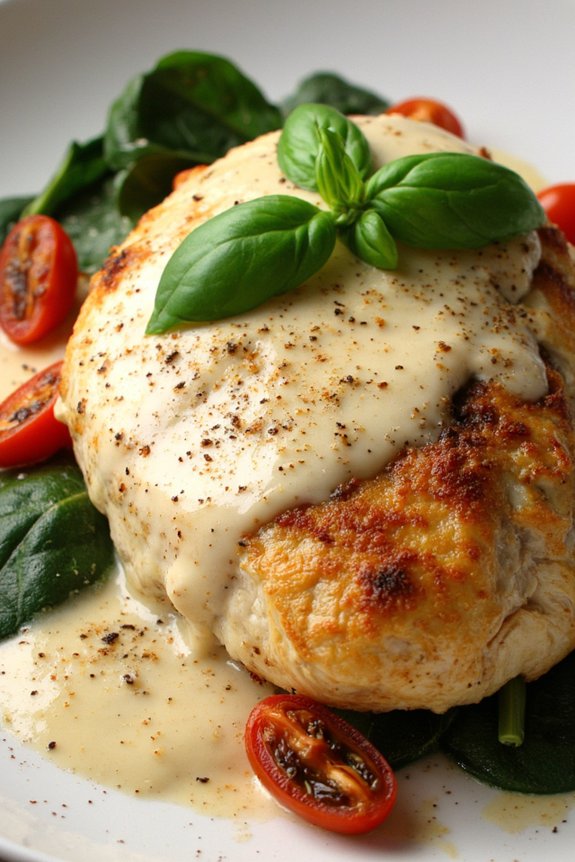
Tuscan Garlic Chicken is a delightful Italian dish that combines the robust flavors of garlic, sun-dried tomatoes, and creamy parmesan sauce with tender chicken breasts. This recipe brings the taste of Tuscany to your kitchen, offering a rich and savory experience that’s perfect for a family dinner or a special occasion.
The creamy garlic sauce envelops the chicken, creating a mouthwatering dish that’s both comforting and elegant. This recipe serves 4-6 people and highlights the use of fresh ingredients, which are key to achieving the authentic flavors of Tuscan cuisine.
The dish pairs beautifully with a side of pasta or a fresh green salad, adding a touch of vibrancy and balance to the meal. Whether you’re an experienced home cook or a beginner looking to impress, this recipe will guide you through creating a delicious meal that captures the essence of Italian cooking.
Ingredients (Serves 4-6)
- 4 boneless, skinless chicken breasts
- Salt and freshly ground black pepper, to taste
- 1/2 cup all-purpose flour
- 2 tablespoons olive oil
- 4 cloves garlic, minced
- 1 cup chicken broth
- 1 cup heavy cream
- 1/2 cup grated Parmesan cheese
- 1 teaspoon Italian seasoning
- 1 cup spinach leaves
- 1/2 cup sun-dried tomatoes, chopped
- Fresh basil leaves, for garnish
Cooking Instructions
- Prepare the Chicken: Season the chicken breasts with salt and pepper. Dredge each breast in flour, shaking off excess.
- Cook the Chicken: In a large skillet, heat olive oil over medium-high heat. Add chicken breasts and cook for 5-7 minutes on each side until golden brown and cooked through. Remove from the skillet and set aside.
- Make the Sauce: In the same skillet, add minced garlic and sauté for about 1 minute until fragrant. Pour in the chicken broth and bring to a simmer, scraping up any browned bits from the bottom of the pan.
- Add Cream and Cheese: Reduce the heat to medium-low. Stir in heavy cream, Parmesan cheese, and Italian seasoning. Mix well and simmer for about 3-5 minutes until the sauce slightly thickens.
- Combine Ingredients: Add spinach and sun-dried tomatoes to the sauce. Return the chicken to the skillet, spooning the sauce over the top. Let it simmer for an additional 5 minutes, allowing the flavors to meld together.
- Garnish and Serve: Remove the skillet from heat. Garnish with fresh basil leaves before serving. Serve the Tuscan Garlic Chicken with your choice of pasta or salad.
Extra Tips
For the best results, use freshly grated Parmesan cheese, as it melts more smoothly into the sauce compared to pre-grated versions. If the sauce is too thick, add a little more chicken broth until you reach your desired consistency.
Additionally, you can substitute half-and-half for heavy cream if you prefer a lighter sauce. Remember to adjust the seasoning as needed, and for a little extra kick, you can add a pinch of red pepper flakes. Enjoy your culinary journey to Tuscany with this delightful dish!
Spinach and Garlic Stuffed Shells
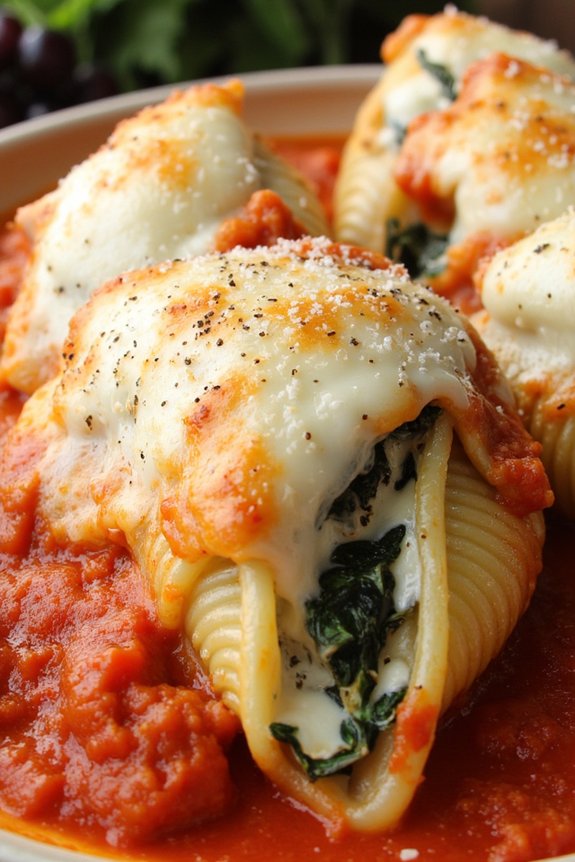
Spinach and Garlic Stuffed Shells are a delightful Italian dish that brings together the creamy texture of ricotta and the robust flavors of garlic and spinach, all nestled within tender pasta shells. This dish is perfect for family gatherings or a cozy dinner night, offering a satisfying and comforting experience. The combination of spinach and garlic not only adds depth to the flavor profile but also provides a nutritious element to the meal.
The shells are baked to perfection, with a bubbling layer of cheese on top that makes every bite absolutely irresistible. This recipe is designed to serve 4-6 people, making it ideal for a small dinner party or a family meal. The preparation involves a harmonious blend of ingredients that are common in Italian cuisine, such as ricotta cheese, marinara sauce, and Parmesan, along with the essential garlic.
The use of jumbo pasta shells allows for generous portions of filling, guaranteeing each piece is a delightful explosion of taste. With a few simple steps, you can create a dish that not only tastes delicious but also looks impressive when served.
Ingredients:
- 20 jumbo pasta shells
- 2 cups ricotta cheese
- 2 cups fresh spinach, chopped
- 4 cloves garlic, minced
- 1 egg
- 1 cup grated Parmesan cheese
- 2 cups shredded mozzarella cheese
- 2 cups marinara sauce
- 1 tablespoon olive oil
- 1 teaspoon salt
- 1/2 teaspoon black pepper
- 1 teaspoon Italian seasoning
Cooking Instructions:
- Preheat the Oven: Start by preheating your oven to 375°F (190°C). This guarantees that the oven is at the right temperature when you’re ready to bake the shells.
- Cook the Pasta Shells: Bring a large pot of salted water to a boil. Add the jumbo pasta shells and cook for about 10 minutes, or until al dente. Drain the shells and set them aside to cool slightly.
- Prepare the Filling: In a large mixing bowl, combine the ricotta cheese, chopped spinach, minced garlic, egg, 1/2 cup of Parmesan cheese, salt, and pepper. Mix until all ingredients are well incorporated.
- Stuff the Shells: Carefully fill each cooked pasta shell with the spinach and ricotta mixture. Be generous with the filling, but avoid overstuffing to prevent the shells from tearing.
- Assemble the Dish: Spread 1 cup of marinara sauce evenly on the bottom of a baking dish. Arrange the stuffed shells in a single layer over the sauce.
- Add More Sauce and Cheese: Pour the remaining marinara sauce over the shells and sprinkle the rest of the Parmesan and mozzarella cheese on top. Finish with a sprinkle of Italian seasoning.
- Bake the Shells: Cover the baking dish with aluminum foil and bake in the preheated oven for 25 minutes. Remove the foil and bake for an additional 10 minutes, or until the cheese is golden and bubbly.
- Serve: Let the dish cool slightly before serving. Garnish with fresh basil or parsley, if desired.
Extra Tips:
When preparing Spinach and Garlic Stuffed Shells, consider using fresh spinach for the best flavor and texture, though frozen spinach can be a convenient alternative. If using frozen spinach, be sure to thaw and drain it thoroughly to prevent excess moisture in your filling.
Additionally, feel free to experiment with different types of cheese, such as adding a bit of gorgonzola for a stronger flavor. When stuffing the shells, using a small spoon or a piping bag can make the process easier and less messy. Enjoy your meal with a side of garlic bread or a fresh green salad to complement the rich flavors of the dish.
Garlic and Olive Oil Pizza Bianca
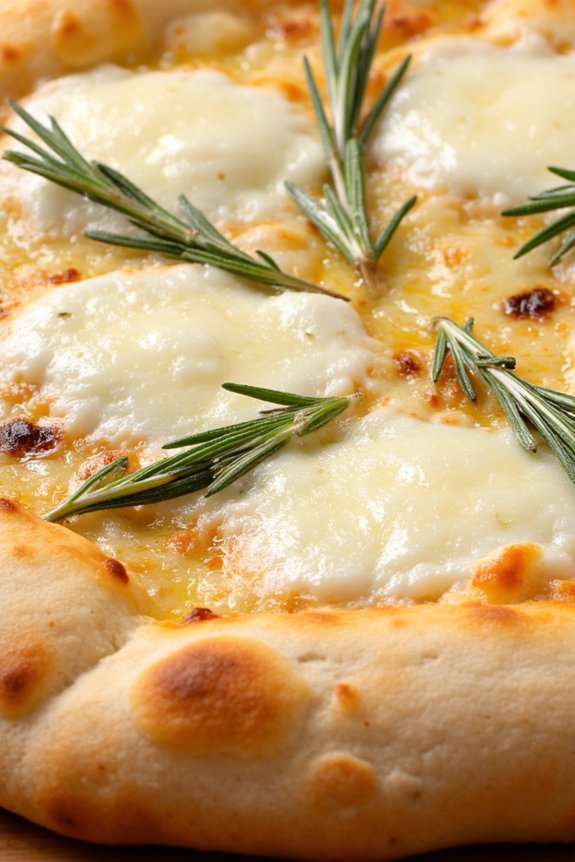
This recipe is ideal for a serving size of 4-6 people, making it perfect for a small gathering or family meal. The key to a perfect Pizza Bianca is to use high-quality ingredients, especially when it comes to the olive oil and garlic.
The dough should be soft and airy, and the combination of mozzarella and Parmesan cheese adds a creamy yet slightly nutty flavor, enhancing the overall experience of this dish.
Ingredients (serving size: 4-6 people):
- 1 pound pizza dough
- 1/4 cup extra virgin olive oil
- 4 cloves garlic, minced
- 1 teaspoon sea salt
- 1 teaspoon freshly ground black pepper
- 1 1/2 cups shredded mozzarella cheese
- 1/2 cup grated Parmesan cheese
- 1 tablespoon fresh rosemary, chopped
- 1 tablespoon fresh thyme leaves
- Cornmeal, for dusting
Cooking Instructions:
- Preheat the Oven: Preheat your oven to 475°F (245°C). Place a pizza stone or an inverted baking sheet in the oven to heat.
- Prepare the Dough: On a floured surface, stretch and roll out the pizza dough to a 12-inch circle. Transfer the dough onto a pizza peel dusted with cornmeal to prevent sticking.
- Infuse the Olive Oil: In a small saucepan, heat the olive oil over low heat. Add the minced garlic, sea salt, and black pepper. Stir gently until the garlic is fragrant but not browned, about 2-3 minutes. Remove from heat.
- Assemble the Pizza: Brush the garlic-infused olive oil evenly over the surface of the pizza dough. Sprinkle the shredded mozzarella and grated Parmesan cheese over the top. Scatter the chopped rosemary and thyme evenly across the pizza.
- Bake the Pizza: Carefully slide the pizza onto the preheated pizza stone or baking sheet in the oven. Bake for 10-12 minutes or until the crust is golden brown and the cheese is bubbly and slightly browned.
- Cool and Serve: Once baked, remove the pizza from the oven. Allow it to cool for a few minutes. Slice and serve warm.
Extra Tips: For an even crispier crust, consider using a pizza stone as it retains heat better and distributes it evenly.
If you prefer a stronger garlic flavor, you can increase the amount of garlic cloves or allow the minced garlic to sit in the olive oil for longer before brushing it on the dough.
Be mindful of the time when infusing the oil, as burnt garlic can impart a bitter taste to the pizza. Finally, feel free to experiment with other herbs like basil or oregano if you want to add more flavor variations.
Sautéed Garlic Broccoli Rabe
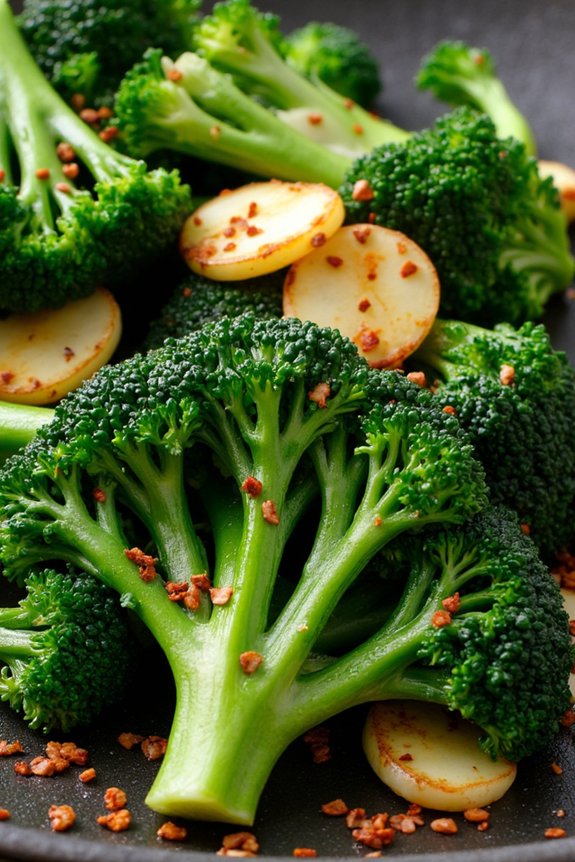
Broccoli rabe, also known as rapini, is a delightful leafy green vegetable with a slightly bitter flavor that pairs beautifully with the rich aroma of garlic. This Italian-inspired dish, Sautéed Garlic Broccoli Rabe, is a quick and delicious way to incorporate more greens into your diet. Perfect as a side dish, it complements a variety of main courses with its robust taste.
The gentle sautéing process allows the garlic to infuse its essence into the broccoli rabe, creating a savory and aromatic flavor profile that’s certain to please your palate. This recipe serves 4-6 people, making it an ideal choice for family dinners or small gatherings.
The combination of fresh ingredients and simple preparation methods guarantees that the dish retains its nutritional benefits while delivering a burst of flavor. With just a handful of ingredients and a few easy steps, you can create a nutritious and flavorful dish that celebrates the essence of Italian garlic cuisine.
Ingredients:
- 2 bunches of broccoli rabe (about 1.5 pounds), trimmed
- 4 tablespoons extra-virgin olive oil
- 6 cloves of garlic, thinly sliced
- 1/2 teaspoon red pepper flakes
- Salt to taste
- Freshly ground black pepper to taste
- Juice of 1 lemon
Cooking Instructions:
- Prepare the Broccoli Rabe: Begin by trimming the ends of the broccoli rabe and washing it thoroughly under cold water. Drain and set aside.
- Blanch the Broccoli Rabe: Bring a large pot of salted water to a boil. Add the broccoli rabe and blanch for about 2-3 minutes until it’s bright green and just tender. Immediately transfer it to a bowl of ice water to stop the cooking process. Once cooled, drain and pat dry with a clean kitchen towel.
- Sauté the Garlic: In a large skillet, heat the olive oil over medium heat. Add the sliced garlic and sauté for about 1-2 minutes until it becomes fragrant and golden but not burnt.
- Cook the Broccoli Rabe: Add the blanched broccoli rabe to the skillet with the garlic. Sprinkle in the red pepper flakes, salt, and pepper. Toss everything together and sauté for about 5-7 minutes until the broccoli rabe is tender and well-coated with the garlic oil.
- Finish with Lemon Juice: Remove the skillet from heat and squeeze the juice of one lemon over the broccoli rabe. Toss to combine, confirming the lemon juice is evenly distributed.
- Serve: Transfer the sautéed garlic broccoli rabe to a serving platter and enjoy it warm as a side dish.
Extra Tips:
For the best flavor, make sure not to overcook the broccoli rabe during the blanching process; it should remain vibrant and slightly crisp. If you prefer a less bitter taste, you can increase the blanching time by a minute.
Adjust the amount of red pepper flakes based on your spice preference. Additionally, the freshness of the ingredients greatly influences the dish’s quality, so try to use the freshest broccoli rabe and garlic available.
If you want to add a bit of extra richness, consider topping the dish with freshly grated Parmesan cheese before serving.
Garlic and Mushroom Risotto
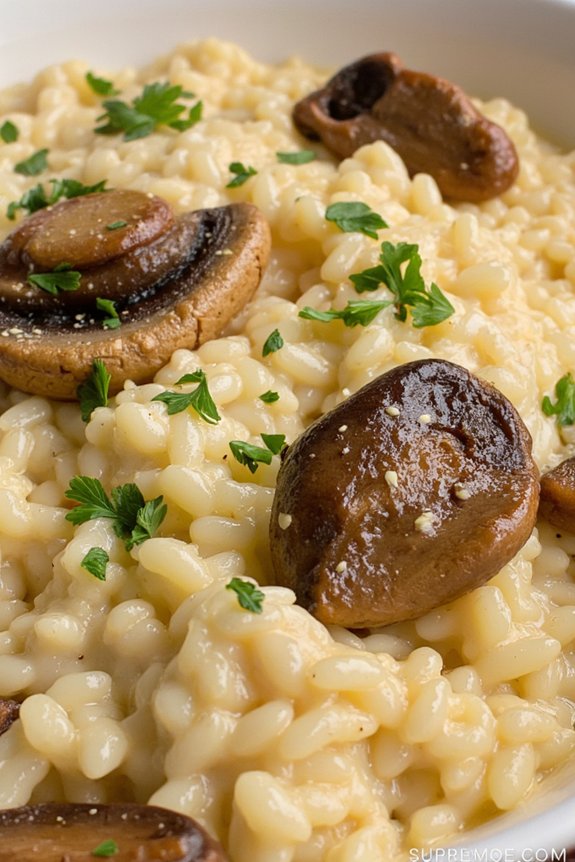
Garlic and Mushroom Risotto is a creamy, comforting Italian dish that combines the rich flavors of garlic and earthy mushrooms with the velvety texture of Arborio rice. This dish is perfect for a cozy family dinner, offering a satisfying blend of flavors that will please even the pickiest of eaters.
The key to an exceptional risotto lies in the gradual addition of broth, allowing the rice to release its starches and achieve that signature creaminess. With the aromatic allure of garlic complementing the umami of fresh mushrooms, this risotto is a delightful treat for the senses.
This recipe serves 4-6 people, making it ideal for a small gathering or a generous family meal. The use of high-quality ingredients is vital to enhance the distinct tastes of this dish. Choosing fresh, seasonal mushrooms can add depth and complexity to the risotto, while the garlic infuses each bite with a robust, savory essence.
Whether you’re a risotto novice or a seasoned chef, this Garlic and Mushroom Risotto is a must-try for anyone who appreciates the simple pleasure of a well-cooked Italian meal.
Ingredients:
- 2 tablespoons olive oil
- 1 medium onion, finely chopped
- 4 cloves garlic, minced
- 1 pound mushrooms, sliced
- 1 ½ cups Arborio rice
- ½ cup dry white wine
- 5 cups vegetable or chicken broth
- ½ cup grated Parmesan cheese
- 2 tablespoons butter
- Salt and pepper to taste
- Fresh parsley, chopped (for garnish)
Instructions:
- Prepare the Broth: Begin by heating the vegetable or chicken broth in a saucepan over low heat. Keep it warm throughout the cooking process, as this will help the risotto cook evenly.
- Sauté the Aromatics: In a large pan, heat the olive oil over medium heat. Add the chopped onion and sauté until translucent, about 5 minutes. Stir in the minced garlic and cook for an additional 1-2 minutes, until fragrant.
- Cook the Mushrooms: Add the sliced mushrooms to the pan and cook until they release their juices and begin to brown, approximately 7-10 minutes.
- Toast the Rice: Stir in the Arborio rice, ensuring that each grain is coated with the oil and slightly toasted, about 2 minutes. This step is essential for achieving the perfect texture in your risotto.
- Deglaze with Wine: Pour in the white wine and stir until it has been fully absorbed by the rice. This adds a lovely depth of flavor to the dish.
- Add Broth Gradually: Begin adding the warm broth, one ladleful at a time, stirring frequently. Allow each addition to be absorbed before adding more. This process should take about 18-20 minutes.
- Finish with Butter and Cheese: Once the rice is tender and creamy, remove the pan from the heat. Stir in the butter and grated Parmesan cheese until melted and well combined. Season with salt and pepper to taste.
- Serve and Garnish: Scoop the risotto onto plates and garnish with freshly chopped parsley. Serve immediately for the best texture and flavor.
Extra Tips:
To achieve the best results, always use Arborio rice as its high starch content is key to the dish’s creaminess. Stirring constantly while adding the broth helps release the starches from the rice, contributing to the risotto’s signature texture.
If you prefer a richer flavor, you can substitute some of the mushrooms with porcini mushrooms. For added depth, consider using homemade broth. Finally, risotto is best enjoyed fresh, so aim to serve it immediately after cooking for the best taste and texture.
Garlic Basil Pesto Pasta
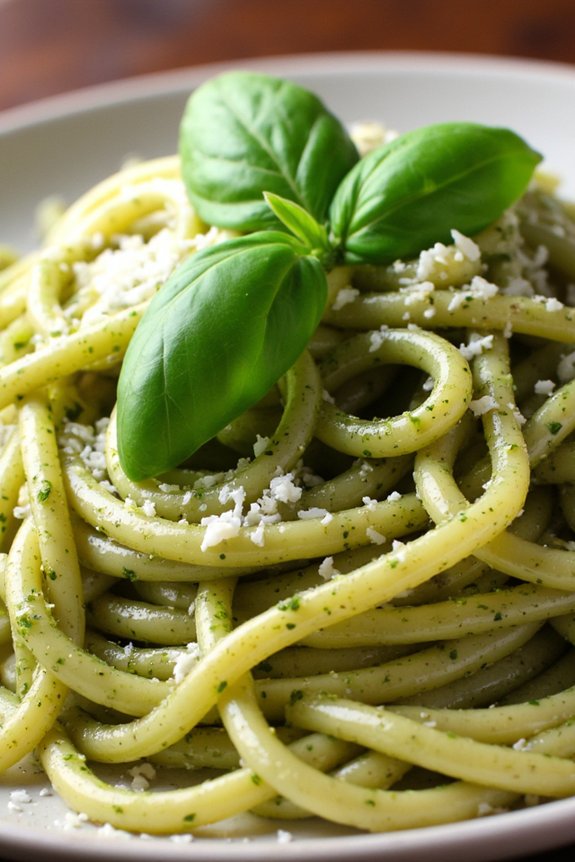
Garlic Basil Pesto Pasta is a delightful Italian dish that combines the aromatic flavors of garlic and basil with the comforting texture of pasta. This recipe is perfect for a family dinner or a gathering with friends, as it’s both simple to prepare and packed with flavor.
The pesto sauce is made from fresh basil leaves, garlic, pine nuts, Parmesan cheese, and olive oil, creating a rich and creamy sauce that coats the pasta beautifully. The key to a successful Garlic Basil Pesto Pasta is using the freshest ingredients available, ensuring that each bite is bursting with flavor.
To start, you’ll prepare the pesto sauce by blending fresh basil leaves with garlic, pine nuts, and Parmesan cheese, then gradually incorporating olive oil until a smooth consistency is achieved.
Once your pesto sauce is ready, you’ll cook your pasta to al dente perfection, ensuring it retains a slight bite. The warm pasta is then tossed with the homemade pesto, allowing the heat to gently release the aromas of the basil and garlic.
The final dish isn’t only a feast for the taste buds but also a visual delight with its vibrant green color and fragrant appeal. Serve it with a simple side salad or some crusty bread for a complete meal that will transport you straight to Italy.
Ingredients for 4-6 servings:
- 2 cups fresh basil leaves
- 3 cloves garlic
- 1/2 cup pine nuts
- 1/2 cup grated Parmesan cheese
- 1/2 cup extra virgin olive oil
- Salt and pepper to taste
- 1 lb (450 g) pasta of choice (like spaghetti or fettuccine)
- 1/4 cup reserved pasta water
Cooking Instructions:
- Prepare the Pesto: In a food processor, combine the basil leaves, garlic, pine nuts, and Parmesan cheese. Pulse until the mixture is finely chopped.
- Add the Olive Oil: With the food processor running, slowly add the olive oil in a steady stream. Blend until the pesto reaches a smooth consistency. Season with salt and pepper to taste.
- Cook the Pasta: Bring a large pot of salted water to a boil. Add the pasta and cook according to package instructions until al dente. Reserve 1/4 cup of the pasta water, then drain the pasta.
- Combine Pasta and Pesto: Return the drained pasta to the pot. Add the pesto sauce and the reserved pasta water. Toss until the pasta is evenly coated with the pesto.
- Serve: Divide the pasta among serving plates. Garnish with additional Parmesan cheese and a few fresh basil leaves if desired.
For the best results, use high-quality olive oil and freshly grated Parmesan cheese, as these ingredients notably enhance the flavor of the dish.
If you prefer a nuttier taste, lightly toast the pine nuts before blending them into the pesto. Additionally, you can experiment with different types of pasta for varied textures and flavors.
Remember not to overcook the pasta; it should be al dente to hold the sauce well. Enjoy your Garlic Basil Pesto Pasta with a glass of white wine for a truly authentic Italian experience.
Garlic Butter Baked Cod
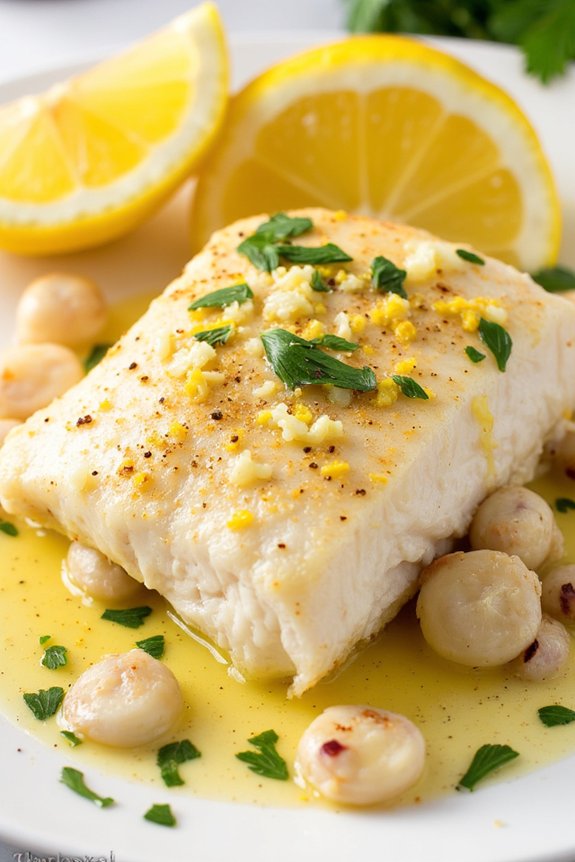
Garlic Butter Baked Cod is a delightful Italian-inspired dish that combines the rich flavors of garlic, butter, and fresh herbs with the mild, flaky texture of cod. This recipe is a perfect choice for a family dinner or a special occasion, as it’s both simple to prepare and impressively delicious.
The fragrant garlic butter sauce infuses the cod with savory notes, while a squeeze of lemon juice adds a revitalizing tang. Best served with a side of roasted vegetables or a simple salad, this dish is a demonstration of the beauty of uncomplicated, yet flavorful cooking.
Cod, a versatile and lean white fish, is an excellent source of protein and omega-3 fatty acids. When baked, it becomes tender and moist, making it an ideal canvas for the buttery, garlicky sauce. This recipe is designed for a serving size of 4-6 people, making it perfect for a small gathering or a family meal.
Whether you’re a seasoned cook or a beginner, this Garlic Butter Baked Cod recipe is sure to become a favorite in your culinary repertoire.
Ingredients (serving size: 4-6 people):
- 4-6 cod fillets (about 6 oz each)
- 4 tablespoons unsalted butter, melted
- 4 garlic cloves, minced
- 1 tablespoon lemon juice
- 1 teaspoon lemon zest
- 1 tablespoon fresh parsley, chopped
- Salt, to taste
- Black pepper, to taste
- Lemon wedges, for serving
Cooking Instructions:
- Preheat the Oven: Begin by preheating your oven to 400°F (200°C). This guarantees that the oven is hot enough to bake the cod evenly and achieve a tender texture.
- Prepare the Baking Dish: Lightly grease a baking dish with a small amount of butter or cooking spray. Arrange the cod fillets in a single layer within the dish, ensuring they fit comfortably without overlapping.
- Make the Garlic Butter Sauce: In a small bowl, combine the melted butter, minced garlic, lemon juice, and lemon zest. Stir well to create a cohesive sauce that will coat the fish.
- Season and Coat the Cod: Pour the garlic butter sauce evenly over the cod fillets. Use a brush or spoon to guarantee that each fillet is well coated. Sprinkle the fillets with salt and black pepper to taste.
- Bake the Cod: Place the baking dish in the preheated oven and bake for 12-15 minutes, or until the cod is opaque and flakes easily with a fork. The cooking time may vary slightly depending on the thickness of the fillets.
- Garnish and Serve: Once baked, remove the dish from the oven and sprinkle the chopped parsley over the top for a fresh, vibrant finish. Serve the cod immediately with lemon wedges on the side for an extra burst of citrus flavor.
Extra Tips:
When selecting cod fillets, make sure they’re fresh and have a mild, clean smell. Freshness is key to achieving the best flavor and texture.
If fresh cod is unavailable, high-quality frozen cod can be a good alternative; just make sure it’s fully thawed before baking. Additionally, feel free to experiment by adding other herbs or spices to the garlic butter sauce, such as thyme or paprika, to customize the dish to your taste preferences.