

Hey there, fellow food lovers! If you’re as obsessed with Italian cooking as I am, you know that the magic is often in the herbs. From the zesty brightness of basil in a homemade pesto to the comforting aroma of rosemary on a warm focaccia, herbs are the star of the show. Each recipe in this article brings a unique twist with dill, oregano, and sage, taking your meals to the next level. Ready to sprinkle some Italian charm on your dishes? Let’s explore these aromatic herb recipes together!
Classic Basil Pesto
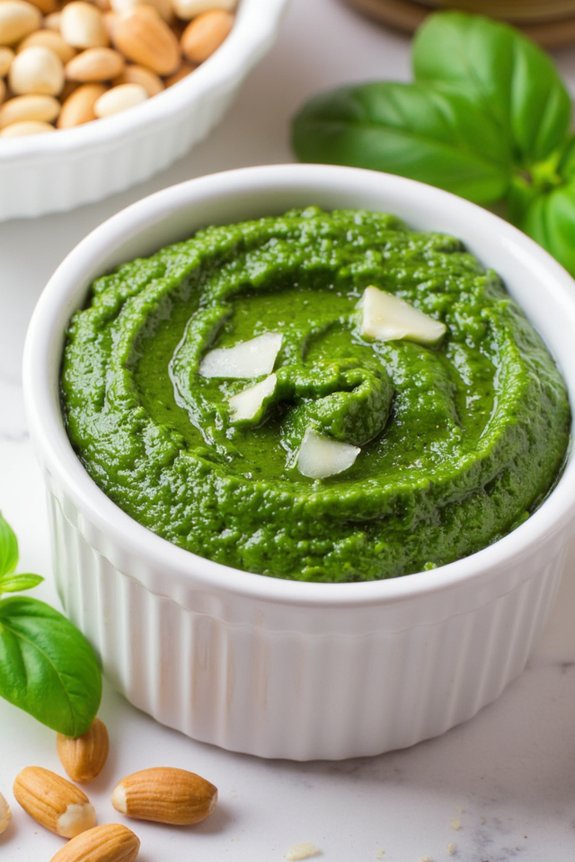
Classic Basil Pesto is a quintessential Italian sauce that adds a burst of fresh, aromatic flavor to a variety of dishes. Originating from Genoa in the Liguria region, this vibrant green sauce is a celebration of simple, high-quality ingredients. The word “pesto” comes from the Italian verb “pestare,” meaning “to pound” or “to crush,” which refers to the traditional method of preparing this sauce using a mortar and pestle.
While modern kitchens often utilize food processors for convenience, the essence of this classic recipe remains the same, focusing on the harmonious blend of basil, garlic, pine nuts, Parmesan cheese, and olive oil.
Perfect for tossing with pasta, spreading on sandwiches, or drizzling over grilled vegetables, Classic Basil Pesto is incredibly versatile. It brings a bright, herby taste that can elevate any meal. Whether you’re making it for a casual family dinner or a special gathering, this recipe for 4-6 servings will guide you to create a delicious, fresh pesto that embodies the essence of Italian culinary tradition.
Ingredients:
- 2 cups fresh basil leaves, packed
- 1/2 cup freshly grated Parmesan cheese
- 1/2 cup extra-virgin olive oil
- 1/3 cup pine nuts
- 2 cloves garlic, minced
- Salt to taste
- Freshly ground black pepper to taste
- Optional: 2 tablespoons unsalted butter, softened
Instructions:
- Prepare Ingredients: Start by washing and drying the fresh basil leaves thoroughly to remove any dirt. This helps preserve the vibrant green color of the pesto.
- Toast Pine Nuts: In a small skillet over medium heat, lightly toast the pine nuts until they’re golden brown, stirring frequently to prevent burning. This should take about 3-4 minutes. Once toasted, remove from heat and let them cool.
- Combine Ingredients: In a food processor, combine the basil leaves, cooled pine nuts, minced garlic, and Parmesan cheese. Pulse the ingredients until they form a coarse mixture.
- Add Olive Oil: With the processor running on low speed, slowly stream in the olive oil until the mixture becomes smooth and creamy. Scrape down the sides of the processor as needed to guarantee all ingredients are well incorporated.
- Season: Taste the pesto and season with salt and freshly ground black pepper to your preference. If you like a creamier texture, add the optional unsalted butter and pulse until fully blended.
- Serve or Store: Use the pesto immediately with your choice of pasta or as a topping for other dishes. Alternatively, transfer it to an airtight container, cover the surface with a thin layer of olive oil to prevent oxidation, and refrigerate for up to a week.
Extra Tips:
To maintain the vibrant green color of your Classic Basil Pesto, try blanching the basil leaves briefly in boiling water, then immediately plunging them into ice water before processing. This helps lock in the color and can enhance the sauce’s visual appeal.
Additionally, if pine nuts are unavailable or costly, walnuts or almonds can be used as a substitute for a slightly different flavor profile. Remember, the key to an outstanding pesto is using the freshest ingredients available, particularly the basil, which should be aromatic and bright green.
Rosemary and Garlic Focaccia

Rosemary and Garlic Focaccia is a delightful Italian bread that combines the warm, woodsy aroma of rosemary with the pungent savoriness of garlic. This bread is perfect for serving as an appetizer or alongside a main course, offering a fragrant and flavorful experience that enhances any meal. The focaccia is known for its characteristic dimpled surface, which allows the olive oil and herbs to seep into the bread, creating a rich and robust flavor profile.
Originating from the Ligurian region of Italy, this bread has become beloved worldwide for its simplicity and versatility.
Preparing Rosemary and Garlic Focaccia is a gratifying culinary endeavor that brings together basic baking skills with the art of seasoning. The process involves creating a dough that’s infused with olive oil, guaranteeing a tender and moist crumb. The addition of fresh rosemary and garlic not only adds flavor but also fills your kitchen with a tantalizing aroma that’s hard to resist.
With just a few simple ingredients and steps, you can create a homemade focaccia that will impress your family and friends.
Ingredients (Serves 4-6):
- 500g bread flour
- 10g salt
- 7g instant yeast
- 325ml warm water
- 60ml extra-virgin olive oil (plus extra for drizzling)
- 3 cloves garlic, minced
- 2 tablespoons fresh rosemary leaves, roughly chopped
- Coarse sea salt for sprinkling
Cooking Instructions:
- Prepare the Dough: In a large mixing bowl, combine the bread flour and salt. Make a well in the center and add the yeast. Pour in the warm water and 2 tablespoons of olive oil. Mix until a rough dough forms.
- Knead the Dough: Turn the dough out onto a floured surface and knead for about 10 minutes until it becomes smooth and elastic. If the dough is sticky, add a little more flour as needed.
- First Rise: Lightly oil a clean bowl and place the dough inside, turning it to coat with oil. Cover with a damp cloth and let it rise in a warm place for about 1 hour or until it has doubled in size.
- Prepare the Topping: While the dough is rising, mix the minced garlic and rosemary with 60ml of olive oil in a small bowl. Set aside to infuse.
- Shape the Dough: Once risen, punch down the dough to release the air. Transfer it to a lightly oiled baking tray and press it out to fit the tray, approximately 2cm thick.
- Second Rise: Cover the dough again with a damp cloth and leave it to rise for another 30 minutes.
- Preheat the Oven: Preheat your oven to 220°C (430°F).
- Create the Dimples: Using your fingers, press into the dough to create dimples all over the surface. Drizzle the garlic and rosemary olive oil mixture evenly over the dough, allowing it to pool in the dimples.
- Final Touches: Sprinkle coarse sea salt over the top for a crunchy finish.
- Bake the Focaccia: Place the tray in the preheated oven and bake for 20-25 minutes until the focaccia is golden brown and crisp on the edges.
- Cool and Serve: Remove from the oven and allow to cool slightly on a wire rack before cutting into squares and serving.
Extra Tips:
For the best results, make sure your water is warm—not hot—when activating the yeast, as hot water can kill the yeast and prevent the dough from rising.
Fresh rosemary is recommended for its vibrant flavor, but dried rosemary can be used in a pinch, though you may need to adjust the quantity. If you prefer a more intense garlic flavor, consider roasting the garlic beforehand for a sweet, mellow taste.
Finally, verify your oven is fully preheated before baking to achieve the perfect crust. Enjoy your homemade Rosemary and Garlic Focaccia with a drizzle of extra-virgin olive oil for an authentic Italian touch.
Sage-Infused Butter Sauce
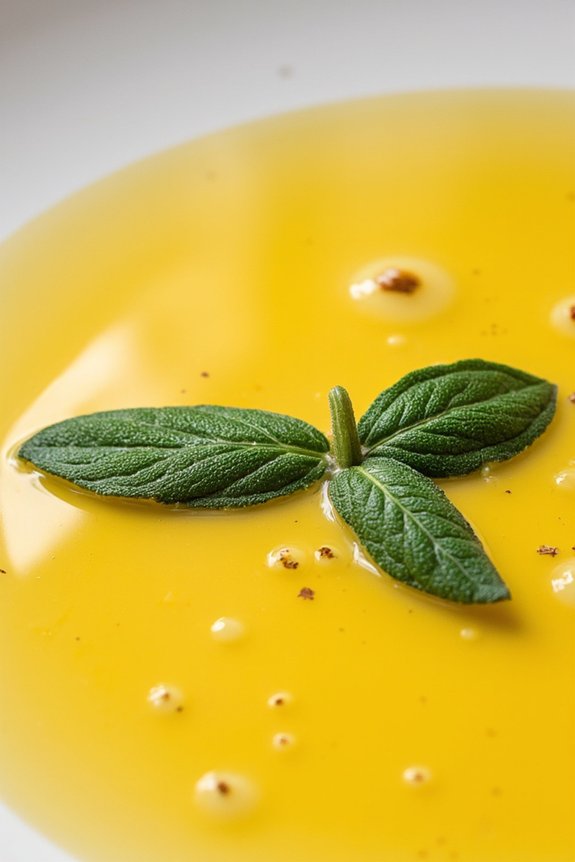
Sage-infused butter sauce is a delightful and aromatic addition to any Italian-inspired meal. This rich and flavorful sauce combines the earthy aroma of fresh sage with the creamy decadence of butter, creating a perfect complement to pasta, grilled meats, or roasted vegetables. The simplicity of this sauce allows the sage to shine, providing a fragrant depth that enhances the overall taste of the dish.
Whether you’re preparing a family dinner or hosting a dinner party, this sauce is bound to impress with its luscious texture and savory elegance.
Gathering the freshest ingredients is key to achieving the best flavor in your sage-infused butter sauce. Fresh sage leaves are preferred over dried ones, as they impart a more vibrant and aromatic essence. The butter, ideally unsalted, serves as the base of the sauce, allowing the sage to infuse its distinct flavor.
With just a handful of ingredients and a few simple steps, you can create a sauce that elevates your meal from ordinary to extraordinary.
Ingredients (Serves 4-6):
- 1 cup unsalted butter
- 15-20 fresh sage leaves
- Salt to taste
- Freshly ground black pepper to taste
- Optional: 1 garlic clove, minced
Cooking Instructions:
- Prepare the Ingredients: Begin by washing the fresh sage leaves thoroughly under cold water and pat them dry with a paper towel. If using garlic, peel and mince it finely.
- Melt the Butter: In a medium-sized saucepan, melt the unsalted butter over low heat. Stir occasionally to guarantee it melts evenly and doesn’t burn.
- Infuse the Butter: Once the butter is completely melted, add the fresh sage leaves to the saucepan. If using garlic, add it at this stage as well. Allow the sage leaves to cook in the butter for about 5 to 7 minutes, stirring occasionally. The leaves should become crispy, and the butter will take on a slight golden hue.
- Season the Sauce: After the sage leaves have infused the butter, add salt and freshly ground black pepper to taste. Stir well to combine the flavors.
- Serve the Sauce: Remove the saucepan from the heat and let the sauce cool slightly. Strain the sauce if you prefer a smoother consistency, or leave the crispy sage leaves in for added texture. Serve immediately over your dish of choice.
Extra Tips:
To optimize the flavor of your sage-infused butter sauce, always use fresh, high-quality ingredients. If you want a nuttier flavor, allow the butter to brown slightly before adding the sage leaves, being careful to keep the heat low to prevent burning.
For those who enjoy a hint of garlic, adding a minced clove can deepen the sauce’s complexity. Leftover sauce can be stored in an airtight container in the refrigerator for up to a week and reheated gently before use.
Thyme and Lemon Risotto
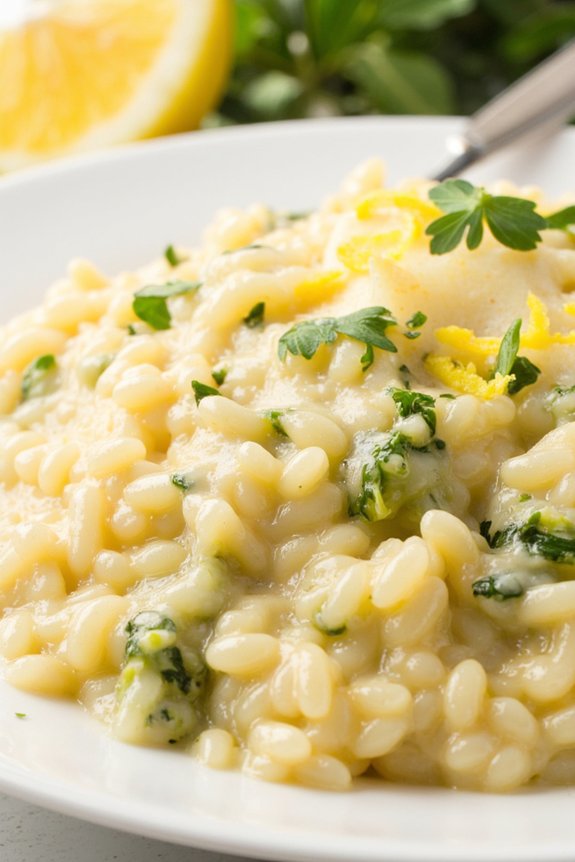
Thyme and Lemon Risotto is a fragrant and creamy dish that combines the citrusy zest of lemon with the earthy flavor of thyme, creating a perfect harmony of taste. This Italian classic is elevated with the addition of fresh herbs and bright lemon, making it a delightful dish that can be served as a main course or a side.
The creamy texture of the risotto rice, known for its ability to absorb flavors while maintaining a distinct al dente bite, complements the aromatic herbs beautifully. Perfect for a cozy dinner or a sophisticated gathering, this dish is sure to impress.
To make this dish, you’ll need a few simple ingredients that allow the flavors to shine. The key to a successful risotto is in the preparation and patience. Cooking risotto is an art that requires constant stirring and gradual addition of broth, allowing the rice to release its starches slowly, resulting in a creamy consistency.
The inclusion of thyme and lemon adds a revitalizing and unique twist to this classic dish, bringing both warmth and brightness to your table.
Ingredients for 4-6 servings:
- 2 cups Arborio rice
- 6 cups chicken or vegetable broth
- 1 cup dry white wine
- 1 medium onion, finely chopped
- 2 cloves garlic, minced
- 2 tablespoons olive oil
- 1 tablespoon unsalted butter
- 1/2 cup grated Parmesan cheese
- 2 tablespoons fresh thyme leaves
- Zest and juice of 1 lemon
- Salt and pepper to taste
Cooking Instructions:
- Prepare the broth: In a saucepan, bring the chicken or vegetable broth to a simmer. Keep it warm over low heat throughout the cooking process.
- Sauté the aromatics: In a large, heavy-bottomed pan, heat the olive oil and butter over medium heat. Add the chopped onion and garlic, and sauté until the onion becomes translucent, about 3-4 minutes.
- Toast the rice: Add the Arborio rice to the pan and stir it well, ensuring each grain is coated with the oil and butter. Cook for about 2 minutes until the rice is lightly toasted.
- Deglaze with wine: Pour in the white wine and stir continuously until it’s fully absorbed by the rice.
- Add the broth gradually: Begin adding the warm broth, one ladleful at a time, stirring frequently. Allow each addition to be absorbed before adding the next. Continue this process for about 18-20 minutes or until the rice is tender but still has a slight bite.
- Incorporate the flavors: Once the rice is cooked, remove the pan from the heat. Stir in the Parmesan cheese, fresh thyme leaves, lemon zest, and lemon juice. Season with salt and pepper to taste.
- Serve: Allow the risotto to sit for a minute before serving. This will enhance its creamy texture. Garnish with additional thyme leaves and a sprinkle of Parmesan cheese if desired.
Extra Tips:
When making risotto, it’s vital to use warm broth, as adding cold liquid can interrupt the cooking process and result in unevenly cooked rice. Constant stirring is fundamental for releasing the rice’s starch, creating the creamy consistency that risotto is known for.
If you prefer a more intense lemon flavor, you can adjust the amount of lemon juice and zest according to your taste. Additionally, make sure to taste the risotto throughout cooking to adjust seasonings as needed. Enjoy this aromatic dish with a glass of the same wine used in the recipe for a harmonious pairing.
Oregano Marinated Grilled Chicken

Aromatic Italian herbs have a magical way of transforming any dish into a fragrant, flavorful delight. Among them, oregano stands out with its pungent, slightly peppery taste that adds depth to a variety of recipes. In this Oregano Marinated Grilled Chicken recipe, the herb is at the forefront, infusing the chicken with an irresistible aroma and taste. The combination of oregano, garlic, lemon, and olive oil creates a marinade that not only tenderizes the chicken but also imparts a rich Italian flavor profile.
Whether you’re planning a summer barbecue or a cozy family dinner, this dish is sure to be a hit.
Grilling is a fantastic method to cook marinated chicken as it locks in moisture while providing a delicious charred finish. The simplicity of the marinade allows the natural flavors of the chicken to shine, enhanced by the earthy, herbal notes of oregano. This dish pairs wonderfully with a fresh green salad or a side of roasted vegetables, making it a versatile choice for any occasion.
Follow the recipe below to create an unforgettable meal that will have everyone at the table asking for seconds.
Ingredients for 4-6 servings:
- 4 boneless, skinless chicken breasts
- 1/4 cup fresh oregano leaves, chopped
- 2 cloves garlic, minced
- 1/4 cup olive oil
- Juice of 1 lemon
- Zest of 1 lemon
- 1 teaspoon salt
- 1/2 teaspoon black pepper
Cooking Instructions:
- Prepare the Marinade: In a medium-sized mixing bowl, combine the chopped oregano, minced garlic, olive oil, lemon juice, lemon zest, salt, and pepper. Stir the ingredients together until well combined.
- Marinate the Chicken: Place the chicken breasts into a large resealable plastic bag or a shallow dish. Pour the marinade over the chicken, making sure each piece is well coated. Seal the bag or cover the dish with plastic wrap. Refrigerate for at least 2 hours, or overnight for maximum flavor infusion.
- Preheat the Grill: About 20 minutes before you plan to cook, preheat your grill to medium-high heat. This will make certain the grill is hot enough to sear the chicken and lock in the juices.
- Grill the Chicken: Remove the chicken from the marinade and shake off any excess. Place the chicken breasts on the grill and cook for about 6-7 minutes on each side, or until the internal temperature reaches 165°F (75°C). Be sure to flip the chicken only once to get those beautiful grill marks.
- Rest and Serve: Once cooked, remove the chicken from the grill and let it rest for about 5 minutes. This allows the juices to redistribute throughout the meat, making sure each bite is juicy and flavorful. Slice and serve with your choice of sides.
Extra Tips:
For the best results, use fresh oregano leaves as they provide a more vibrant flavor compared to dried ones. If you don’t have a grill, you can also cook the chicken on a stovetop grill pan or bake it in the oven at 400°F (200°C) for 20-25 minutes.
Make sure to adjust cooking times if the chicken breasts are particularly thick or thin. Additionally, if you’re looking for more zest, consider adding a sprinkle of red pepper flakes to the marinade for a subtle kick. Always use a meat thermometer to check for doneness to avoid overcooking, which can dry out the chicken.
Parsley and Parmesan Gremolata
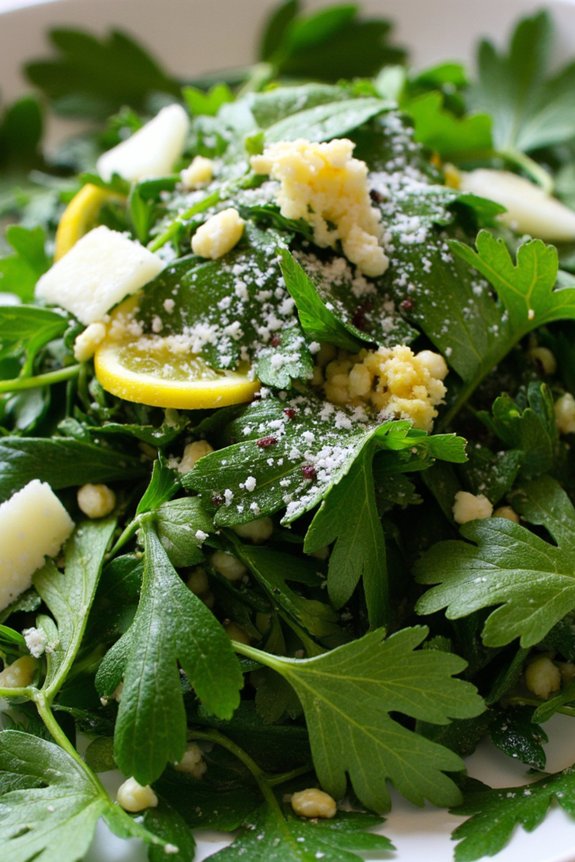
Gremolata is a classic Italian condiment typically made with parsley, garlic, and lemon zest. This version elevates the traditional mixture by incorporating the rich, nutty flavors of freshly grated Parmesan cheese.
Often used as a finishing touch for dishes like osso buco, this Parsley and Parmesan Gremolata adds a burst of freshness and complexity to any meal. Its aromatic blend isn’t only visually appealing but also enhances the overall flavor profile of the dish it accompanies.
Perfect for serving 4-6 people, this recipe is a quick and simple way to add a touch of elegance to your meal. The gremolata can be sprinkled over grilled meats, roasted vegetables, or even stirred into pasta. Its versatility and ease of preparation make it a must-have in any Italian-inspired culinary repertoire.
Whether you’re hosting a dinner party or enjoying a quiet meal at home, this Parsley and Parmesan Gremolata will surely impress.
Ingredients (serving size: 4-6 people):
- 1 cup fresh Italian parsley leaves, finely chopped
- 2 cloves garlic, minced
- Zest of 2 lemons
- 1/2 cup freshly grated Parmesan cheese
- 1 tablespoon olive oil
- Salt and freshly ground black pepper to taste
Cooking Instructions:
- Prepare the Ingredients: Begin by finely chopping the fresh Italian parsley leaves. Confirm that they’re thoroughly washed and dried before chopping to prevent any excess moisture.
- Combine Flavors: In a medium-sized bowl, add the chopped parsley, minced garlic, and lemon zest. These ingredients serve as the aromatic base for your gremolata.
- Incorporate Parmesan: Gently fold in the freshly grated Parmesan cheese. Make sure the cheese is evenly distributed throughout the parsley mixture for a balanced flavor.
- Add Olive Oil: Drizzle the olive oil over the mixture. The olive oil will help bind the ingredients and add a subtle richness to the gremolata.
- Season to Taste: Finally, season the gremolata with salt and freshly ground black pepper. Adjust the seasoning according to your preference.
- Serve: Transfer the gremolata to a small serving bowl or sprinkle directly over your chosen dish. Enjoy the vibrant flavors and aroma it brings.
Extra Tips:
For the freshest flavor, it’s best to prepare the Parsley and Parmesan Gremolata just before serving. If you need to make it in advance, store it in an airtight container in the refrigerator for up to one day.
Make sure to bring it to room temperature and give it a good stir before using. Additionally, for a more intense lemon flavor, you can add a splash of freshly squeezed lemon juice. When zesting the lemons, avoid the white pith, as it can impart a bitter taste to the gremolata.
Mint and Ricotta Stuffed Shells
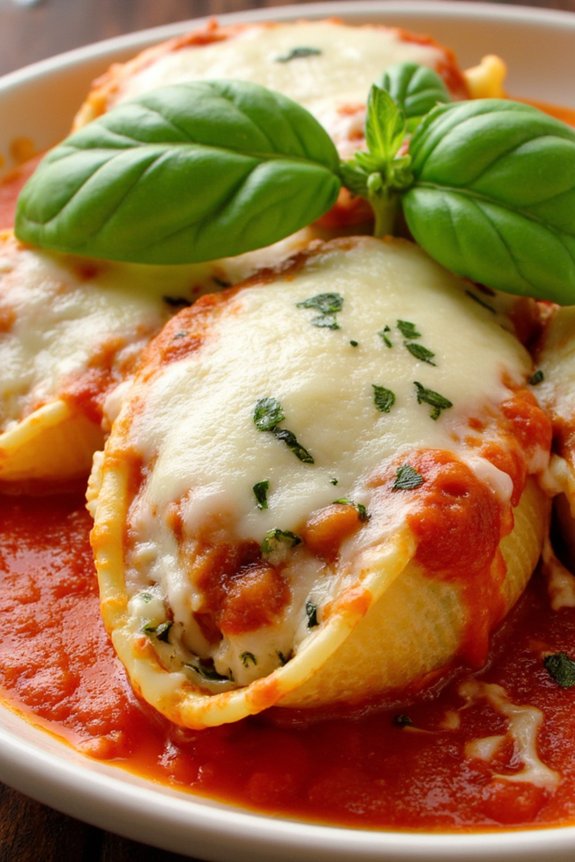
Mint and Ricotta Stuffed Shells is a delightful Italian dish that combines the creamy richness of ricotta cheese with the invigorating zest of mint. It’s a comforting meal that’s perfect for family dinners or special occasions. The large pasta shells are stuffed with a savory filling, then baked to perfection in a vibrant tomato sauce, creating a harmonious blend of flavors and textures that’s sure to impress your guests.
This recipe is designed to serve 4-6 people, making it ideal for a cozy family gathering or a small dinner party. The preparation involves a few simple steps, and with the right ingredients, you’ll have an aromatic and delicious meal ready in no time. The combination of mint and ricotta isn’t only tasty but also adds a unique twist to the traditional stuffed shells, making this dish a standout on your dining table.
Ingredients:
- 20 large pasta shells
- 1 ½ cups ricotta cheese
- 1 cup shredded mozzarella cheese
- ½ cup grated Parmesan cheese
- ¼ cup fresh mint leaves, finely chopped
- 2 cups marinara sauce
- 1 egg
- 1 teaspoon salt
- ½ teaspoon black pepper
- 2 tablespoons olive oil
- 2 cloves garlic, minced
- Fresh basil leaves for garnish
Cooking Instructions:
- Preheat and Prepare: Preheat your oven to 375°F (190°C). Lightly grease a baking dish with olive oil and set aside.
- Cook the Pasta: Bring a large pot of salted water to a boil. Add the pasta shells and cook until al dente, about 8-10 minutes. Drain and rinse under cold water to stop the cooking process. Set the shells aside on a clean towel to dry.
- Make the Filling: In a large bowl, combine the ricotta cheese, ½ cup mozzarella cheese, ¼ cup Parmesan cheese, egg, chopped mint leaves, salt, and black pepper. Mix well until all ingredients are evenly combined.
- Stuff the Shells: Using a spoon, fill each pasta shell with the ricotta mixture. Be generous with the filling, ensuring that each shell is well-stuffed.
- Assemble the Dish: Spread half of the marinara sauce evenly in the bottom of the prepared baking dish. Arrange the stuffed shells in a single layer over the sauce. Pour the remaining marinara sauce over the top of the shells.
- Add Cheese and Bake: Sprinkle the remaining mozzarella cheese and Parmesan cheese over the top of the shells. Cover the dish with aluminum foil and bake in the preheated oven for 25 minutes.
- Final Touches: Remove the foil and bake for an additional 10 minutes, or until the cheese is golden and bubbly. Let the dish cool for a few minutes before serving.
- Garnish and Serve: Garnish with fresh basil leaves before serving. Enjoy your Mint and Ricotta Stuffed Shells with a side salad or garlic bread.
Extra Tips:
For a more robust flavor, consider adding a pinch of nutmeg to the ricotta mixture. You can also substitute spinach for mint for a different flavor profile. If you prefer a spicier dish, add red pepper flakes to the marinara sauce. Be sure to taste and adjust the seasoning in the ricotta mixture before filling the shells, and make sure not to overcook the pasta shells to prevent them from tearing during the stuffing process.
Marjoram Tomato Bruschetta
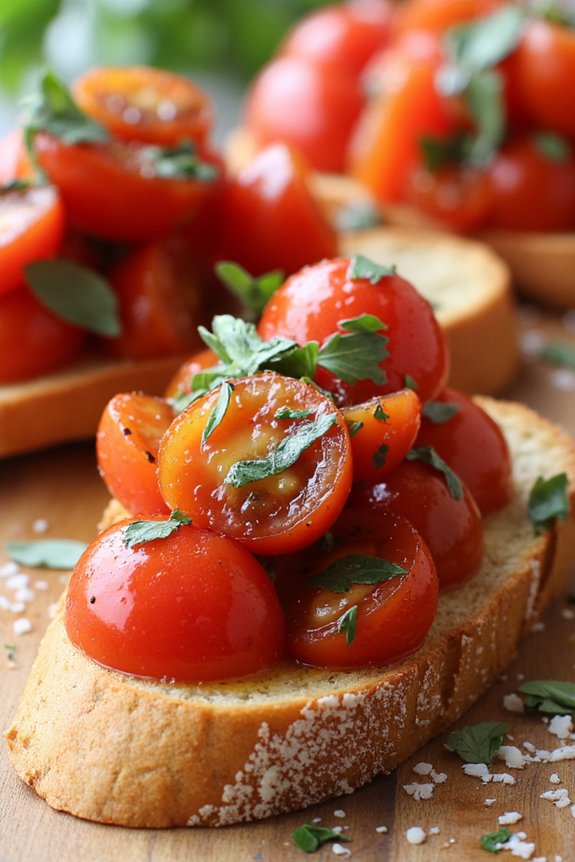
Marjoram Tomato Bruschetta is a delightful and aromatic appetizer that combines the fresh flavors of ripe tomatoes and fragrant marjoram. This Italian-inspired dish is perfect for any gathering, offering a burst of freshness in every bite. The sweetness of the tomatoes is beautifully complemented by the earthy notes of marjoram, making it an irresistible treat for the senses.
Whether you’re hosting a dinner party or simply looking for a delicious snack, this bruschetta is bound to impress.
The key to a perfect Marjoram Tomato Bruschetta lies in the quality of the ingredients. Use ripe, juicy tomatoes and fresh marjoram to guarantee the best flavors. The bruschetta is traditionally served on toasted slices of baguette, providing a satisfying crunch that pairs wonderfully with the tender tomato topping.
With just a few simple steps, you can create a dish that’s both elegant and easy to prepare.
Ingredients (Serves 4-6):
- 6 ripe tomatoes, diced
- 1/4 cup fresh marjoram leaves, chopped
- 2 cloves garlic, minced
- 1/4 cup extra-virgin olive oil
- 1 tablespoon balsamic vinegar
- Salt and freshly ground black pepper, to taste
- 1 baguette, sliced into 1/2 inch thick pieces
- 1/4 cup grated Parmesan cheese (optional)
Cooking Instructions:
- Prepare the Tomato Mixture: In a medium bowl, combine the diced tomatoes, chopped marjoram, and minced garlic. Drizzle with the olive oil and balsamic vinegar, then season with salt and pepper to taste. Gently mix until all ingredients are well combined. Let the mixture sit for at least 10 minutes to allow the flavors to meld together.
- Toast the Baguette Slices: Preheat your oven to 400°F (200°C). Arrange the baguette slices on a baking sheet in a single layer. Bake for about 5-7 minutes, or until the slices are golden brown and crisp. Remove from the oven and set aside to cool slightly.
- Assemble the Bruschetta: Once the baguette slices have cooled slightly, spoon the tomato mixture generously onto each slice. If desired, sprinkle a little grated Parmesan cheese on top for an added layer of flavor.
- Serve: Arrange the bruschetta on a serving platter. Serve immediately while the bread is still crisp and the tomato mixture is fresh.
Extra Tips:
For an added depth of flavor, consider rubbing the toasted baguette slices with a cut clove of garlic before topping with the tomato mixture. This will infuse the bread with a subtle garlic aroma that enhances the overall taste of the bruschetta.
Additionally, if fresh marjoram isn’t available, you can substitute it with fresh oregano, which will provide a similar flavor profile. Finally, for a touch of heat, add a pinch of red pepper flakes to the tomato mixture.
Enjoy your Marjoram Tomato Bruschetta with a glass of your favorite Italian wine for a complete culinary experience.
Tarragon Creamy Mushroom Pasta
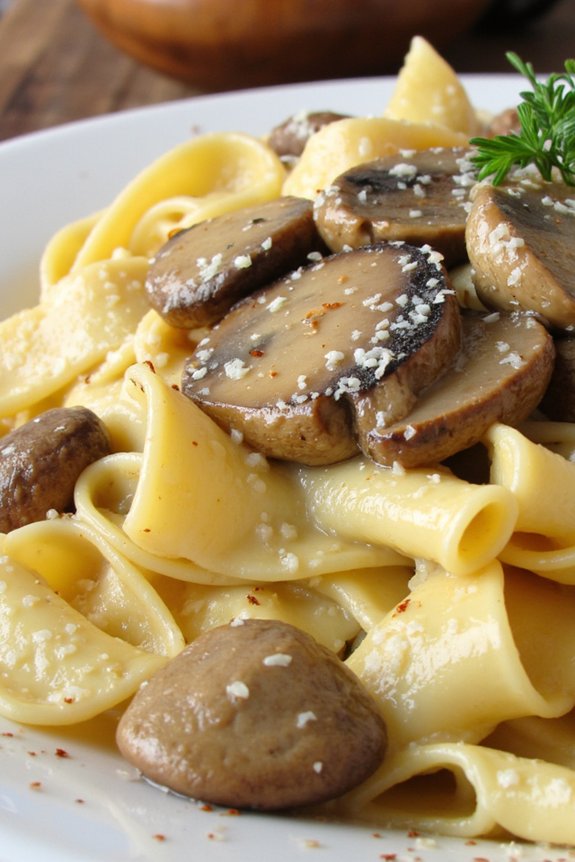
Indulge in the rich and savory flavors of Tarragon Creamy Mushroom Pasta, a delightful dish that brings the aromatic allure of Italian herbs to your dining table. This recipe combines the earthy tones of mushrooms with the distinctive taste of tarragon, creating a harmonious blend that’s both comforting and elegant.
Perfect for a family dinner or a small gathering, this pasta dish is easy to prepare and guarantees to be a crowd-pleaser. The creamy sauce, infused with fresh tarragon, envelops tender pasta and sautéed mushrooms, creating a luscious texture that coats each bite. The use of garlic and shallots enhances the depth of flavor, while Parmesan cheese adds a rich, nutty finish.
This recipe serves 4-6 people, making it an ideal choice for sharing with loved ones over a cozy meal.
Ingredients:
- 500g pasta of your choice (fettuccine or linguine recommended)
- 2 tablespoons olive oil
- 1 tablespoon butter
- 4 cloves garlic, minced
- 2 shallots, finely chopped
- 500g mixed mushrooms (such as cremini and shiitake), sliced
- 1 cup heavy cream
- 1/2 cup chicken or vegetable broth
- 2 tablespoons fresh tarragon, chopped
- 1 cup grated Parmesan cheese
- Salt and pepper to taste
- Fresh parsley, chopped (for garnish)
- Optional: Red pepper flakes for a hint of spice
Instructions:
- Prepare the Pasta: Bring a large pot of salted water to a boil. Add the pasta and cook according to package instructions until al dente. Drain the pasta, reserving 1 cup of pasta water, and set aside.
- Sauté the Aromatics: In a large skillet, heat olive oil and butter over medium heat. Once the butter has melted, add the minced garlic and chopped shallots. Sauté for 2-3 minutes until they become fragrant and translucent.
- Cook the Mushrooms: Add the sliced mushrooms to the skillet. Sauté for about 5-7 minutes, stirring occasionally, until the mushrooms are golden brown and have released their moisture.
- Make the Cream Sauce: Pour in the heavy cream and broth, stirring to combine. Let the mixture come to a gentle simmer. Add the chopped tarragon, and continue to simmer for another 3-4 minutes until the sauce slightly thickens.
- Combine with Pasta: Add the cooked pasta to the skillet with the sauce. Toss to coat the pasta evenly, adding reserved pasta water as needed to reach the desired sauce consistency.
- Finish with Cheese: Stir in the grated Parmesan cheese until fully melted and integrated into the sauce. Season with salt and pepper to taste. If desired, add a pinch of red pepper flakes for a spicy kick.
- Serve: Divide the pasta into servings, garnishing with fresh parsley for a pop of color and freshness. Serve immediately and enjoy the aromatic flavors.
Extra Tips:
To enhance the flavor, consider using a mix of different mushroom varieties for added depth. If fresh tarragon is unavailable, dried tarragon can be used, but use it sparingly as it’s more potent.
For a vegetarian version, use vegetable broth instead of chicken broth. If you prefer a lighter dish, substitute half of the heavy cream with milk. Always taste and adjust the seasoning before serving to ascertain the perfect balance of flavors.
Fennel and Orange Salad With Dill

Fennel and Orange Salad With Dill is a revitalizing and aromatic Italian-inspired dish that perfectly balances sweet, tangy, and herbal flavors. This salad is ideal for a light lunch or as a vibrant side dish to accompany any meal. The combination of crunchy fennel, juicy oranges, and fresh dill creates a delightful texture and a burst of flavors that will leave your taste buds craving more.
The dish is simple to prepare and showcases the essence of Italian cuisine by using fresh, high-quality ingredients that speak for themselves. This salad isn’t only delicious but also visually appealing, with its vibrant colors and enticing aroma. The licorice-like flavor of fennel pairs beautifully with the sweet and tart oranges, while the dill adds a touch of earthiness that brings the entire dish together.
Tossed with a light vinaigrette, this salad is both healthy and satisfying. Perfect for serving 4-6 people, the Fennel and Orange Salad With Dill is a tribute to the beauty of simplicity in cooking, where minimal ingredients create maximum impact.
Ingredients (serving size: 4-6 people):
- 2 large fennel bulbs
- 3 large oranges
- 1 small red onion
- 1/4 cup fresh dill, finely chopped
- 3 tablespoons extra-virgin olive oil
- 1 tablespoon white wine vinegar
- Salt and freshly ground black pepper to taste
Cooking Instructions:
- Prepare the Fennel: Begin by trimming the stalks and fronds from the fennel bulbs, setting aside some fronds for garnish. Cut the bulbs in half lengthwise and remove the tough core. Thinly slice the fennel using a sharp knife or mandoline for even, paper-thin slices.
- Slice the Oranges: Peel the oranges, making sure to remove as much of the white pith as possible. Cut the oranges into rounds or segments, depending on your preference, and remove any seeds.
- Slice the Onion: Peel and thinly slice the red onion. If you prefer a milder flavor, soak the onion slices in cold water for a few minutes, then drain and pat dry.
- Combine Ingredients: In a large mixing bowl, combine the sliced fennel, oranges, and red onion. Add the chopped dill and gently toss to combine.
- Make the Vinaigrette: In a small bowl, whisk together the olive oil and white wine vinegar. Season with salt and freshly ground black pepper to taste.
- Dress the Salad: Pour the vinaigrette over the salad and gently toss until all the ingredients are well coated. Adjust seasoning if necessary.
- Garnish and Serve: Transfer the salad to a serving platter or individual plates. Garnish with reserved fennel fronds and additional dill, if desired. Serve immediately to enjoy the fresh flavors.
Extra Tips:
For an added layer of flavor, consider toasting some pine nuts or almonds and sprinkling them over the salad just before serving. This will add a delightful crunch and a nutty depth to the dish.
Additionally, if you want to make the salad ahead of time, prepare all the components but keep them separate until just before serving to maintain the crispness of the fennel and the freshness of the oranges. Adjust the amount of dill to your liking, as its strong flavor can easily overpower the other ingredients if used excessively.
Enjoy this salad as a revitalizing start to a meal or a palate-cleansing side dish.
Bay Leaf Braised Short Ribs
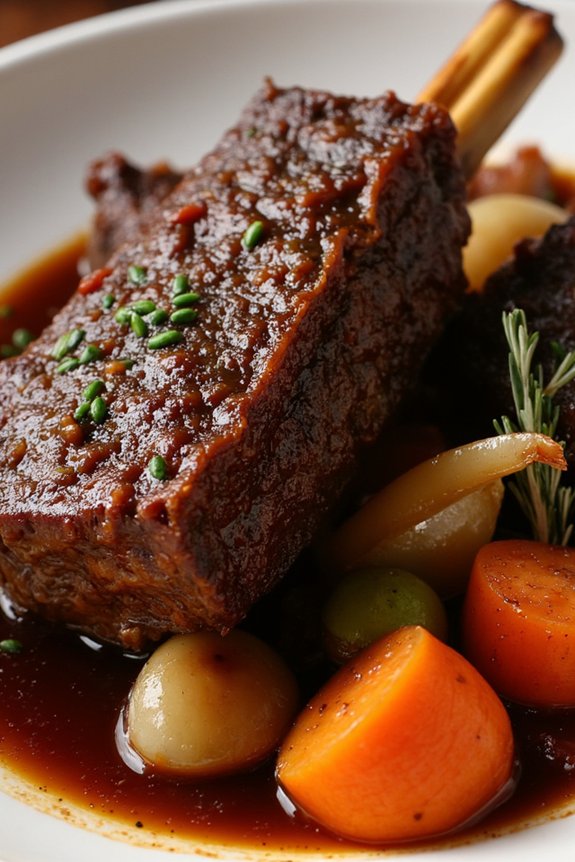
Indulge in the rich, comforting flavors of Bay Leaf Braised Short Ribs, a dish that melds tender, slow-cooked beef with the aromatic depth of bay leaves and other classic Italian herbs. This recipe is perfect for a cozy family dinner or a special gathering, offering a luxurious taste without requiring a Michelin-starred chef’s skill set.
The secret to this dish lies in the slow braising process, which allows the flavors of the herbs and spices to fully infuse the meat, resulting in ribs that are fall-off-the-bone tender and bursting with flavor.
To achieve the perfect Bay Leaf Braised Short Ribs, you’ll start by searing the ribs to lock in the juices and build a deep, savory base. Then, the ribs are simmered slowly in a rich broth with a bouquet of herbs, including the star ingredient, bay leaves. This method not only tenderizes the meat but also enhances the complexity of the dish, making it a memorable centerpiece for your dining table.
Here’s how to make this delightful dish for 4-6 people.
Ingredients:
- 4-5 pounds beef short ribs
- Salt and pepper to taste
- 2 tablespoons olive oil
- 1 large onion, chopped
- 2 carrots, chopped
- 3 cloves garlic, minced
- 2 cups beef broth
- 1 cup red wine
- 2 tablespoons tomato paste
- 3 bay leaves
- 1 teaspoon dried thyme
- 1 teaspoon dried oregano
- 1 teaspoon dried rosemary
- 1 tablespoon balsamic vinegar
Instructions:
- Prepare the Ribs: Season the beef short ribs generously with salt and pepper on all sides. Let them sit at room temperature while you prepare the other ingredients.
- Sear the Ribs: In a large Dutch oven or heavy pot, heat olive oil over medium-high heat. Add the short ribs in batches, searing them on all sides until they’re browned. This should take about 2-3 minutes per side. Once browned, remove the ribs and set them aside.
- Cook the Vegetables: In the same pot, add the chopped onion and carrots. Cook until the onion is translucent, about 5 minutes. Add the minced garlic and cook for an additional minute until fragrant.
- Deglaze the Pot: Pour in the red wine to deglaze the pot, scraping up any browned bits from the bottom with a wooden spoon. Allow the wine to simmer for about 3 minutes, reducing slightly.
- Add Remaining Ingredients: Stir in the tomato paste, beef broth, bay leaves, thyme, oregano, rosemary, and balsamic vinegar. Mix well to combine all ingredients.
- Braise the Ribs: Return the seared short ribs to the pot, ensuring they’re submerged in the liquid. Bring the mixture to a simmer, then cover the pot and transfer it to a preheated oven set at 325°F (165°C). Allow the ribs to braise for about 2.5 to 3 hours, or until they’re fork-tender.
- Finish and Serve: Once cooked, remove the bay leaves and discard. Adjust the seasoning with additional salt and pepper if needed. Serve the ribs hot, with a generous ladle of the braising liquid over them.
Extra Tips:
For an even deeper flavor, prepare this dish a day in advance and allow the ribs to rest in the braising liquid in the refrigerator overnight. Reheat gently before serving.
If you prefer a thicker sauce, you can remove the ribs once cooked and reduce the sauce on the stovetop over medium heat until it reaches your desired consistency. Pair this dish with creamy mashed potatoes or a rustic loaf of bread to soak up the delicious sauce.
Chive and Herb Crusted Salmon
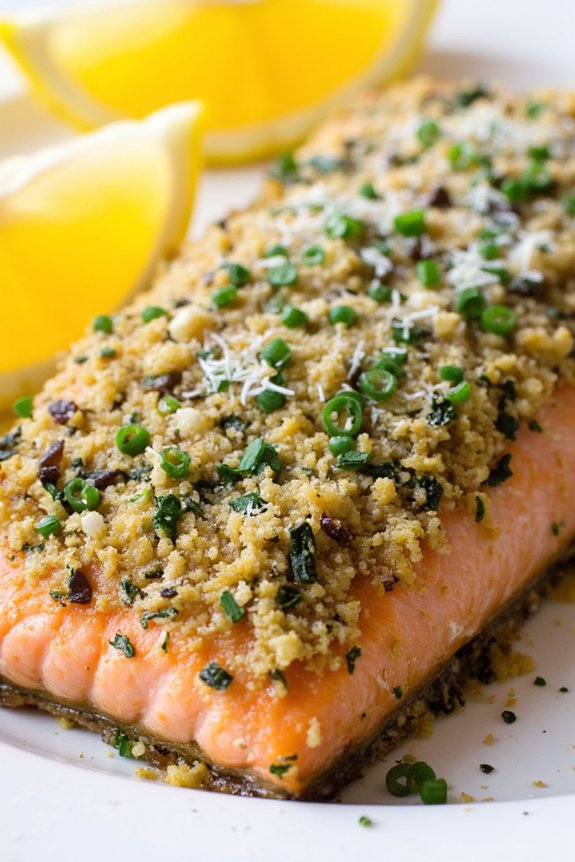
Indulge in a delightful dish that brings the flavors of the Mediterranean to your dinner table with this Chive and Herb Crusted Salmon. This aromatic recipe combines the fresh, vibrant taste of chives with a medley of Italian herbs to create a crispy, flavorful crust that perfectly complements the rich, buttery texture of salmon.
Ideal for a family dinner or a special occasion, this dish isn’t only delicious but also packed with nutrients, making it a wholesome choice for any meal.
Preparing Chive and Herb Crusted Salmon is relatively simple, yet it results in a dish that looks and tastes gourmet. The blend of herbs, including parsley, basil, and oregano, adds depth and aroma, while breadcrumbs provide a satisfying crunch.
This recipe serves 4-6 people, making it perfect for gatherings or a weeknight dinner with leftovers for lunch. Pair it with a side of roasted vegetables or a fresh salad to complete your meal.
Ingredients (Serves 4-6):
- 4-6 salmon fillets (about 6 ounces each)
- 1 cup fresh chives, finely chopped
- 1/2 cup fresh parsley, finely chopped
- 1/4 cup fresh basil, finely chopped
- 2 tablespoons fresh oregano, finely chopped
- 1 cup breadcrumbs
- 1/2 cup grated Parmesan cheese
- 1/4 cup olive oil
- Salt and pepper to taste
- Lemon wedges (for serving)
Cooking Instructions:
- Preheat the Oven: Preheat your oven to 400°F (200°C). Line a baking sheet with parchment paper or lightly grease it with olive oil to prevent sticking.
- Prepare the Herb Mixture: In a large bowl, mix together the chives, parsley, basil, oregano, breadcrumbs, and grated Parmesan cheese. Add salt and pepper to taste. Drizzle in the olive oil and mix until the ingredients are well combined and the mixture is slightly moist.
- Season the Salmon: Pat the salmon fillets dry with paper towels. Season both sides with salt and pepper.
- Crust the Salmon: Place the salmon fillets on the prepared baking sheet. Spoon the herb mixture over each fillet, pressing it lightly to confirm it adheres to the fish. Confirm the top of each fillet is generously covered with the herb crust.
- Bake the Salmon: Place the baking sheet in the preheated oven and bake for 15-20 minutes, or until the salmon is cooked through and flakes easily with a fork. The herb crust should be golden brown and crispy.
- Serve: Remove the salmon from the oven and let it rest for a few minutes. Serve with lemon wedges on the side to add a fresh citrus note.
Extra Tips: When choosing salmon, opt for fillets that have even thickness to confirm they cook uniformly. If you prefer a spicier kick, consider adding a pinch of red pepper flakes to the herb mixture.
To make the dish gluten-free, substitute regular breadcrumbs with gluten-free breadcrumbs. Additionally, you can prepare the herb mixture in advance and store it in an airtight container in the refrigerator for up to a day before using it. This can help save time when preparing the meal.