

Summer meals should be as vibrant and carefree as the season itself.
Picture a Caprese salad with juicy peaches or a bowl of chilled zucchini soup brimming with fresh herbs.
These Italian recipes offer a refreshing change on a hot day, simple yet enchanting.
Each dish tells its own story, promising a flavorful journey ahead.
Let’s explore these treasures together!
Caprese Salad With a Twist
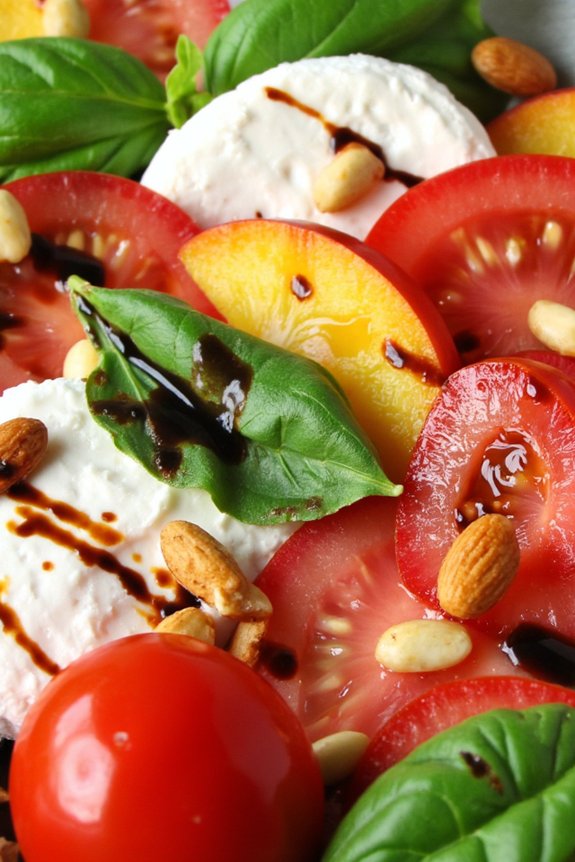
Experience the fresh flavors of summer with a unique take on a classic Italian dish: Caprese Salad With a Twist. This version of the beloved Caprese salad combines traditional ingredients with a few unexpected additions to elevate the taste and presentation. Perfect for a warm Italian summer evening, this dish is sure to impress both family and guests alike with its vibrant colors and revitalizing flavors.
Caprese Salad With a Twist takes the core elements of mozzarella, tomatoes, and basil, and introduces a hint of sweetness and crunch with the addition of ripe peaches and toasted pine nuts. The salad is then drizzled with a balsamic glaze for a touch of tangy sweetness. This delightful combination not only looks stunning on the plate but also offers a symphony of flavors that highlight the essence of summer.
Ingredients (for 4-6 people):
- 4 large ripe tomatoes
- 2 large ripe peaches
- 12 ounces fresh mozzarella cheese
- 1/2 cup fresh basil leaves
- 1/4 cup pine nuts
- 2 tablespoons extra-virgin olive oil
- 2 tablespoons balsamic glaze
- Salt to taste
- Freshly ground black pepper to taste
Cooking Instructions:
- Prepare the Ingredients: Begin by washing the tomatoes, peaches, and basil leaves thoroughly under cold water. Pat them dry with a clean kitchen towel or paper towels.
- Slice the Main Ingredients: Slice the tomatoes and peaches into 1/4-inch thick rounds. For the mozzarella, slice it into similar thickness rounds so that all elements have a uniform look and cook evenly.
- Toast the Pine Nuts: In a small dry skillet over medium heat, toast the pine nuts for about 2-3 minutes, stirring frequently until they’re golden brown and fragrant. Be cautious not to burn them. Once toasted, set them aside to cool.
- Assemble the Salad: On a large serving platter, arrange the tomato, peach, and mozzarella slices in an overlapping pattern, alternating between each slice. Tuck whole basil leaves between the slices to provide a pop of green and freshness.
- Season the Salad: Drizzle the extra-virgin olive oil over the arranged slices. Follow with a drizzle of balsamic glaze for added flavor. Season the salad with a sprinkle of salt and freshly ground black pepper.
- Add the Finishing Touches: Finally, scatter the toasted pine nuts over the top of the salad for a crunchy texture contrast. Serve immediately for the best flavor and freshness.
Extra Tips:
To further enhance the flavor profile of your Caprese Salad With a Twist, consider using heirloom tomatoes and peaches when they’re in season, as they offer unique flavors and colors.
If you prefer a more robust flavor, experiment with different types of mozzarella, such as buffalo mozzarella.
Additionally, if you don’t have balsamic glaze on hand, you can make your own by reducing balsamic vinegar over low heat until it thickens to your desired consistency.
Chilled Zucchini Soup
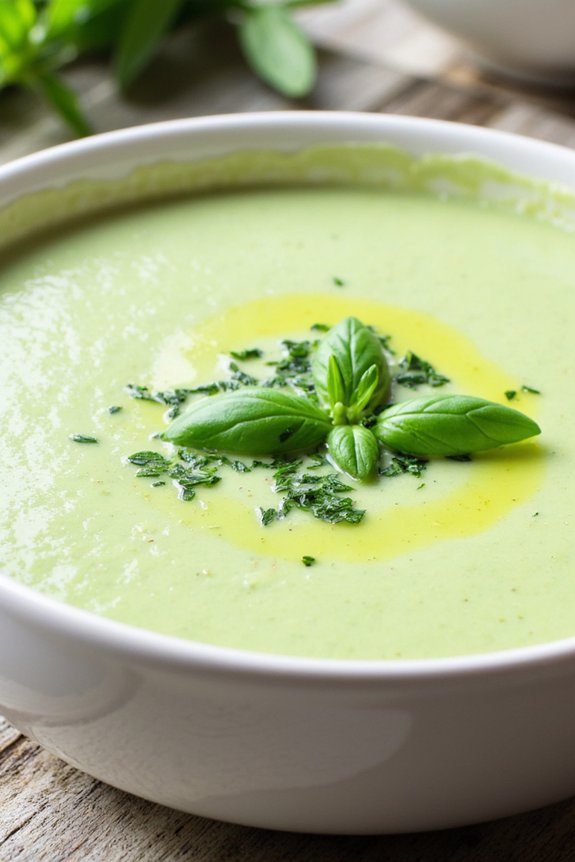
Chilled Zucchini Soup is a rejuvenating and light dish perfect for enjoying during the warm Italian summer months. This soup isn’t only delicious but also a great way to incorporate fresh seasonal produce into your diet. The combination of zucchini with other fresh herbs and ingredients results in a creamy yet healthy soup that can be enjoyed as a starter or a light meal.
This recipe for Chilled Zucchini Soup serves 4-6 people and is ideal for preparing in advance, allowing the flavors to meld together as it chills in the refrigerator. The soup is easy to make and doesn’t require much time or effort, making it a perfect choice for a casual summer gathering or a quick family meal.
Ingredients:
- 4 medium zucchinis, chopped
- 1 medium onion, chopped
- 2 cloves garlic, minced
- 4 cups vegetable broth
- 1 cup Greek yogurt
- 1 tablespoon olive oil
- 1 teaspoon salt
- 1/2 teaspoon black pepper
- 1/4 cup fresh basil leaves, chopped
- 1/4 cup fresh mint leaves, chopped
- Lemon juice from half a lemon
Instructions:
1. Prepare the Ingredients:
Begin by washing and chopping the zucchinis into small pieces. Chop the onion and mince the garlic. Set these ingredients aside.
2. Cook the Vegetables:
In a large pot, heat the olive oil over medium heat. Add the chopped onion and minced garlic, sautéing them until they become soft and translucent, about 5 minutes.
3. Add Zucchini and Broth:
Once the onion and garlic are ready, add the chopped zucchini to the pot, stirring to combine. Pour in the vegetable broth and bring the mixture to a boil.
4. Simmer the Soup:
Reduce the heat to low and let the soup simmer for about 15-20 minutes, or until the zucchini is tender.
5. Blend the Soup:
Remove the pot from the heat. Use an immersion blender to puree the soup until smooth. Alternatively, you can transfer the soup in batches to a countertop blender.
6. Season and Chill:
Stir in the Greek yogurt, salt, pepper, chopped basil, and mint. Add lemon juice to enhance the flavor. Mix well and let the soup cool to room temperature before transferring it to the refrigerator to chill for at least 2 hours.
7. Serve:
Once the soup is thoroughly chilled, serve it in bowls. Garnish with additional basil or mint leaves if desired.
Extra Tips:
For best results, choose zucchinis that are firm and bright green, as they’ll provide the best flavor and texture for the soup. If you prefer a slightly thicker consistency, reduce the amount of broth or add more yogurt.
For a more vibrant flavor, consider adding a pinch of cayenne pepper or a splash of white wine vinegar. This soup is versatile and can be adjusted to suit your taste preferences, so feel free to experiment with different herbs or spices.
Classic Bruschetta Al Pomodoro

Bruschetta Al Pomodoro is a quintessential Italian appetizer that captures the essence of summer with its fresh, vibrant flavors. This classic dish is simple yet delicious, making it a perfect starter for any meal or a delightful snack on a warm day. The combination of ripe tomatoes, fragrant basil, and a touch of garlic atop crispy bread creates a harmony of taste and texture that’s both satisfying and invigorating.
Originating from central Italy, bruschetta has become popular worldwide for its versatility and ease of preparation. The key to making an authentic Bruschetta Al Pomodoro lies in using high-quality, fresh ingredients, which are the hallmark of Italian cuisine. To serve 4-6 people, the following ingredients and instructions will guide you in crafting this delightful dish.
Ingredients:
- 6 ripe tomatoes
- 1 baguette or rustic Italian bread
- 2 cloves of garlic
- 1/4 cup fresh basil leaves
- 1/4 cup extra-virgin olive oil
- Salt to taste
- Black pepper to taste
- Balsamic vinegar (optional)
Cooking Instructions:
- Prepare the Tomatoes: Start by washing the tomatoes thoroughly, then dice them into small, even pieces. Transfer the diced tomatoes to a bowl.
- Season the Tomatoes: Add salt and black pepper to taste, then drizzle with extra-virgin olive oil. Mix gently to coat the tomatoes evenly. If desired, add a splash of balsamic vinegar for a hint of tanginess.
- Prepare the Basil: Wash the basil leaves and gently pat them dry. Stack the leaves, roll them tightly, and slice them into thin strips. Add the basil to the tomato mixture and stir to combine.
- Prepare the Bread: Preheat your oven to 400°F (200°C). Slice the baguette or rustic bread into 1/2-inch thick slices. Arrange the slices on a baking sheet and toast them in the oven for about 5-7 minutes or until they’re golden and crispy.
- Garlic Infusion: Once the bread is toasted, remove it from the oven. Peel the garlic cloves and slice them in half. Rub the cut side of the garlic over the surface of each bread slice to infuse it with garlic flavor.
- Assemble the Bruschetta: Spoon the tomato and basil mixture onto each slice of garlic-rubbed bread. Make sure that the topping is evenly distributed over the slices.
- Final Touches: Drizzle a little more olive oil over the assembled bruschetta for added richness. Serve immediately to enjoy the fresh flavors.
Extra Tips:
When making Bruschetta Al Pomodoro, it’s important to use vine-ripened tomatoes for the best flavor. If possible, make the tomato mixture a little ahead of time to allow the flavors to meld together.
However, only assemble the bruschetta just before serving to keep the bread crisp. Feel free to experiment with additional toppings, like mozzarella or a sprinkle of Parmesan cheese, to create your own variation of this classic dish.
Enjoy this Italian favorite with a chilled glass of white wine for a perfect summer experience.
Amalfi Lemon Spaghetti

Amalfi Lemon Spaghetti is a classic Italian dish that encapsulates the vibrant flavors of the Amalfi Coast. This dish highlights the zesty and aromatic qualities of fresh lemons, perfectly complementing the simplicity of spaghetti. The aroma of freshly grated lemon zest combined with the savory notes of Parmesan cheese creates a delightful balance that’s both invigorating and satisfying.
Ideal for warm summer evenings, this dish is light yet indulgent, providing a burst of Mediterranean sunshine in every bite. Perfect for gatherings or a special family meal, Amalfi Lemon Spaghetti is both easy to prepare and impressive to serve. The key to its success lies in using high-quality ingredients, especially the lemons, which should be fresh and fragrant to guarantee the best flavor.
With a few simple steps, you can create a meal that transports your taste buds to the sun-drenched coastline of southern Italy, where the dish originated. Follow the recipe below to create a sumptuous serving for 4-6 people.
Ingredients:
- 1 lb (450g) spaghetti
- 2 large ripe lemons (preferably Amalfi lemons)
- 1/2 cup (120ml) extra virgin olive oil
- 1 cup (100g) freshly grated Parmesan cheese
- Salt to taste
- Freshly ground black pepper to taste
- 1/4 cup (60ml) pasta cooking water
- Fresh basil leaves for garnish
Instructions:
- Cook the Spaghetti: Bring a large pot of salted water to a boil. Add the spaghetti and cook according to package instructions until al dente. Reserve 1/4 cup of the pasta cooking water, then drain the spaghetti.
- Prepare the Lemon Sauce: While the pasta is cooking, zest the lemons and juice them. In a large mixing bowl, combine the lemon zest, lemon juice, and olive oil. Season with salt and freshly ground black pepper.
- Combine Pasta and Sauce: Add the cooked spaghetti to the lemon sauce in the bowl. Toss the pasta to coat it thoroughly with the sauce. Gradually add the reserved pasta cooking water to help the sauce adhere to the spaghetti.
- Add Cheese and Adjust Seasoning: Sprinkle the grated Parmesan cheese over the pasta and continue tossing until the cheese melts and forms a creamy coating on the spaghetti. Taste and adjust seasoning with more salt and pepper, if necessary.
- Serve: Transfer the Amalfi Lemon Spaghetti to a serving platter or individual plates. Garnish with fresh basil leaves for an added touch of aroma and color.
For the best results, always use fresh lemons when making Amalfi Lemon Spaghetti, as the freshness of the lemons is essential to the dish’s vibrant flavor. When zesting the lemons, avoid the white pith, as it can add bitterness to the sauce.
If you don’t have access to Amalfi lemons, any high-quality, aromatic lemons will suffice. Finally, remember that the starchy pasta cooking water is key to creating a creamy sauce, so don’t forget to reserve it before draining the spaghetti. Enjoy your culinary journey to the Amalfi Coast with this invigorating and delightful dish!
Prosciutto and Melon Skewers

Prosciutto and Melon Skewers are a delightful Italian summer dish that brings together the sweet juiciness of ripe melon with the salty, savory taste of prosciutto. This appetizer isn’t only easy to prepare but also visually appealing, making it a perfect choice for summer gatherings and picnics. The combination of flavors is both invigorating and satisfying, offering a taste of Italy in each bite.
Whether you’re hosting a casual get-together or a more formal dinner, these skewers are sure to impress your guests with their simplicity and elegance.
The key to making perfect Prosciutto and Melon Skewers lies in selecting the right ingredients. Choosing a ripe melon, such as cantaloupe or honeydew, guarantees the natural sweetness complements the prosciutto. The quality of the prosciutto also matters; opt for a thinly sliced, high-quality variety to guarantee the best flavor.
Additionally, adding fresh basil and a drizzle of balsamic glaze can elevate the dish, adding layers of complexity to the flavor profile. With minimal preparation time, this dish allows you to spend more time enjoying the company of your friends and family.
Ingredients (Serves 4-6):
- 1 ripe cantaloupe or honeydew melon
- 12 slices of prosciutto
- Fresh basil leaves
- Balsamic glaze
- 12 wooden skewers
Cooking Instructions:
- Prepare the Melon: Start by cutting the melon in half and removing the seeds. Using a melon baller or a sharp knife, scoop out or cut the melon into bite-sized cubes or spheres.
- Assemble the Skewers: Take each wooden skewer and thread a piece of melon onto it. Follow with a slice of prosciutto, folding or wrapping it around the melon piece. Add a fresh basil leaf, and repeat the process until each skewer has about three pieces of melon and prosciutto, finishing with a basil leaf.
- Add the Finishing Touches: Once all the skewers are assembled, arrange them on a serving platter. Drizzle balsamic glaze over the top of the skewers for an added burst of flavor.
- Chill Before Serving: If possible, chill the skewers in the refrigerator for about 15-30 minutes before serving. This will enhance the flavors and make them more invigorating.
Extra Tips:
When preparing Prosciutto and Melon Skewers, consider slicing the prosciutto as thinly as possible to make wrapping easier and guarantee the flavors meld seamlessly with the melon.
If using wooden skewers, soaking them in water for 10-15 minutes beforehand can prevent them from splitting. For an extra twist, try adding mozzarella balls to the skewers for added creaminess.
Also, if balsamic glaze isn’t available, a reduction of balsamic vinegar with a bit of sugar can be a great substitute. Enjoy your skewers as a stand-alone appetizer or pair them with a crisp white wine for a truly Italian experience.
Panzanella Tuscan Bread Salad

Panzanella is a classic Italian summer salad that hails from the beautiful region of Tuscany. This rustic dish is a perfect way to showcase ripe summer tomatoes, fresh basil, and stale bread that has been brought back to life with a drizzle of olive oil and vinegar. The salad is traditionally served as a starter or side dish and is known for its fresh, vibrant flavors and satisfying texture.
It’s a great example of Italian cucina povera, which turns simple, humble ingredients into something delicious. The beauty of Panzanella lies in its simplicity and the quality of the ingredients. All you need are a few ripe tomatoes, a loaf of crusty bread, and some fresh herbs to create a revitalizing dish that captures the essence of summer.
The bread absorbs the juices of the tomatoes and the dressing, creating a rich, flavorful bite. Serve this salad at your next gathering or enjoy it as a light lunch on a warm day.
Ingredients (serves 4-6):
- 4 cups of stale country-style bread, cut into 1-inch cubes
- 4 large ripe tomatoes, coarsely chopped
- 1 small red onion, thinly sliced
- 1 cucumber, peeled, halved lengthwise, seeded, and sliced
- 1/4 cup extra-virgin olive oil
- 3 tablespoons red wine vinegar
- Salt and freshly ground black pepper, to taste
- 1/2 cup fresh basil leaves, torn into pieces
- Optional: 1/4 cup capers and/or 1/4 cup black olives, pitted and halved
Instructions:
- Prepare the Bread: Start by preheating your oven to 350°F (175°C). Spread the bread cubes on a baking sheet and toast them in the oven for about 10 minutes or until they’re dry and lightly golden. This step guarantees the bread will hold its shape once it absorbs the dressing.
- Prepare the Vegetables: While the bread is toasting, prepare the vegetables. Chop the tomatoes into large chunks, slice the cucumber, and thinly slice the red onion. If you’re using capers or olives, prepare them as well.
- Mix the Salad: In a large salad bowl, combine the tomatoes, cucumber, red onion, and toasted bread cubes. If using, add the capers and olives at this stage.
- Dress the Salad: In a small bowl, whisk together the olive oil and red wine vinegar. Season the mixture with salt and freshly ground black pepper to taste. Pour the dressing over the salad and toss everything to combine well, making sure the bread is thoroughly coated.
- Let the Flavors Marry: Allow the salad to sit at room temperature for about 30 minutes before serving. This resting time allows the bread to soak up the flavors of the dressing and the juices from the tomatoes.
- Finish with Basil: Just before serving, tear the basil leaves into pieces and scatter them over the salad. Give the salad a gentle toss to distribute the basil evenly.
Extra Tips:
When making Panzanella, it’s essential to use high-quality, ripe tomatoes since they’re the star of the dish. If your bread is very fresh, you can let it stale overnight or toast it a bit longer in the oven.
Feel free to adjust the amount of vinegar and olive oil to suit your taste. For a more robust flavor, allow the salad to sit for an hour or more, but add the basil just before serving to keep it fresh and fragrant. Enjoy your Panzanella with a glass of chilled white wine to complete the Tuscan experience.
Burrata With Heirloom Tomatoes
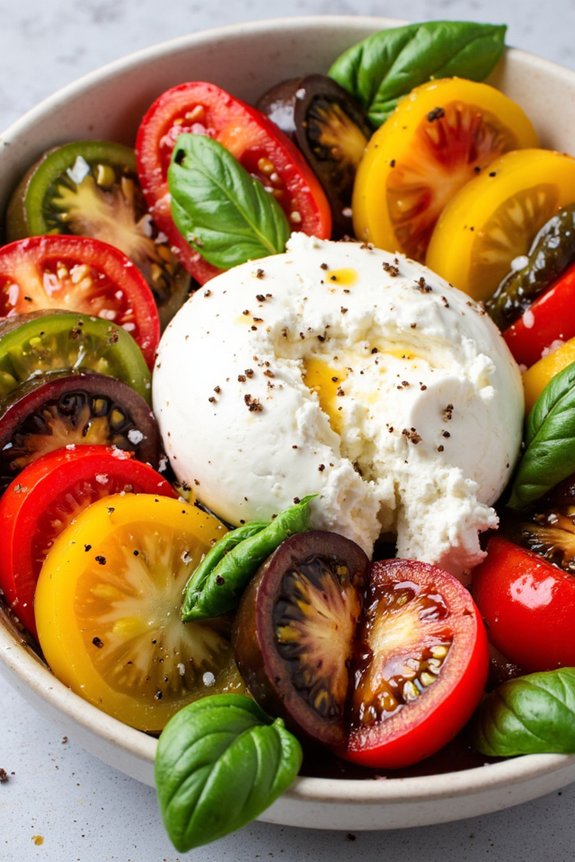
Indulge in the fresh and vibrant flavors of Italy with this simple yet luxurious dish, Burrata with Heirloom Tomatoes. Perfect for a summer gathering or a light lunch, this recipe combines creamy burrata cheese with the rich, sweet, and tangy notes of heirloom tomatoes. The dish is elevated with a drizzle of high-quality olive oil, a sprinkle of fresh basil, and a hint of sea salt, making it a true celebration of summer’s bounty.
This recipe is designed to serve 4-6 people, making it ideal for sharing with family and friends. The beauty of burrata lies in its simplicity and the ability to highlight the natural flavors of its accompanying ingredients. Heirloom tomatoes, with their varied colors and complex flavors, provide a stunning contrast to the creamy texture of the burrata. This dish is a demonstration of the Italian philosophy of letting high-quality ingredients shine with minimal interference.
Ingredients:
- 4-6 medium-sized heirloom tomatoes
- 2 balls of fresh burrata cheese (about 8 ounces each)
- 1/4 cup extra-virgin olive oil
- Sea salt, to taste
- Freshly ground black pepper, to taste
- Fresh basil leaves, for garnish
- Balsamic glaze (optional)
Instructions:
- Prepare the Tomatoes: Start by washing the heirloom tomatoes under cold running water. Use a sharp knife to cut them into thick slices or wedges, depending on your preference. Arrange these slices on a large serving platter, ensuring they’re spread out to create a colorful base.
- Prepare the Burrata: Gently tear or cut the burrata balls into halves and place them strategically among the tomato slices. This allows each serving to have a generous portion of the creamy cheese.
- Drizzle and Season: Drizzle the extra-virgin olive oil evenly over the tomatoes and burrata. Follow with a sprinkle of sea salt and freshly ground black pepper to enhance the flavors of the tomatoes and cheese.
- Garnish: Tear fresh basil leaves by hand and scatter them over the dish. The basil should be fresh to add a fragrant aroma and vibrant green color to the plate.
- Add Balsamic Glaze (Optional): If using, drizzle a small amount of balsamic glaze over the dish for an added layer of sweetness and acidity, which complements the creaminess of the burrata and the sweetness of the tomatoes.
Extra Tips:
For the best results, use tomatoes that are at their peak ripeness, as this will greatly impact the flavor of the dish. When choosing olive oil, opt for a high-quality extra-virgin variety, as it will impart a rich, fruity flavor that complements the other ingredients.
If burrata is unavailable, fresh mozzarella can be used as a substitute, though it will lack the creamy center that burrata offers. Serve this dish immediately after preparation to enjoy the full freshness and texture of the ingredients.
Grilled Eggplant and Ricotta Rolls

Grilled Eggplant and Ricotta Rolls are a delightful Italian summer dish that combines the smoky flavor of grilled eggplant with the creamy, rich texture of ricotta cheese. Perfect as an appetizer or a light main course, these rolls aren’t only delicious but also visually appealing, making them an excellent choice for entertaining guests.
The dish is relatively simple to prepare and showcases the fresh, vibrant flavors of summer produce, making it a must-try for anyone looking to explore Italian cuisine. This recipe highlights the natural umami of eggplant, enhanced by grilling, which adds a subtle charred flavor. The ricotta filling is seasoned with fresh herbs and lemon zest, providing a bright, tangy contrast to the earthiness of the eggplant.
The rolls are then finished with a drizzle of olive oil and a sprinkle of Parmesan cheese, creating a harmonious balance of flavors and textures. The following recipe serves 4-6 people, making it perfect for a family meal or a small gathering.
Ingredients (for 4-6 people):
- 2 large eggplants
- 1 cup ricotta cheese
- 1/2 cup grated Parmesan cheese
- 2 tablespoons olive oil
- 1 tablespoon lemon zest
- 2 tablespoons fresh basil, chopped
- 1 tablespoon fresh parsley, chopped
- Salt and pepper to taste
- 1/2 cup marinara sauce (optional, for serving)
Cooking Instructions:
- Prepare the Eggplants: Begin by washing the eggplants and slicing them lengthwise into 1/4-inch thick slices. Sprinkle both sides of the slices with salt and let them sit for about 20 minutes to draw out excess moisture.
- Grill the Eggplants: Preheat your grill to medium-high heat. Rinse the eggplant slices to remove the salt and pat them dry with a paper towel. Brush each slice with olive oil and place them on the grill. Grill each side for 3-4 minutes, or until they’re tender and have nice grill marks. Remove them from the grill and let them cool slightly.
- Prepare the Ricotta Filling: In a bowl, combine the ricotta cheese, half of the Parmesan cheese, lemon zest, chopped basil, and parsley. Season with salt and pepper to taste. Mix until well combined.
- Assemble the Rolls: Lay a grilled eggplant slice flat and spread a tablespoon of the ricotta mixture onto one end. Carefully roll up the slice and place it seam-side down in a baking dish. Repeat with the remaining eggplant slices.
- Finish and Serve: Preheat your oven to 350°F (175°C). Sprinkle the remaining Parmesan cheese over the rolls and drizzle with a bit of olive oil. Bake in the oven for 10-15 minutes, or until the cheese is melted and bubbly. If desired, serve with a side of warm marinara sauce.
Extra Tips: When selecting eggplants, choose ones that are firm and glossy, as they’ll hold up better during grilling. If you prefer a smokier flavor, consider using a charcoal grill instead of a gas grill. For an added kick, you can incorporate a pinch of red pepper flakes into the ricotta mixture.
Finally, these rolls can be made ahead of time and reheated in the oven before serving, making them a convenient option for hosting.
Insalata Di Riso (Italian Rice Salad)
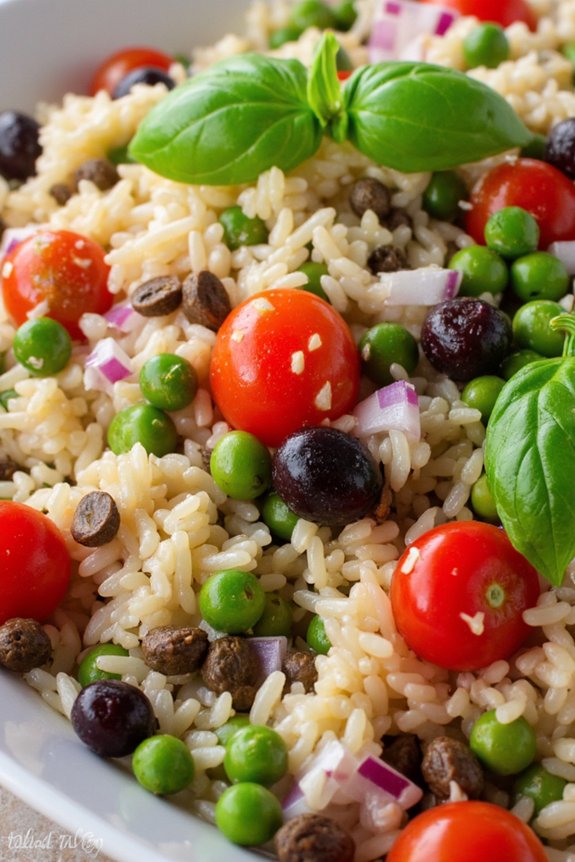
Insalata Di Riso is a revitalizing and versatile Italian rice salad perfect for a summer meal. This dish is a staple in Italian households during the warmer months, offering a delightful blend of flavors and textures. The salad is typically served cold or at room temperature, making it an ideal choice for picnics, barbecues, or as a light lunch.
It’s a colorful and vibrant dish that combines rice with a variety of fresh vegetables, herbs, and often proteins, creating a balanced and satisfying meal. This salad is incredibly adaptable to personal tastes and available ingredients, allowing you to get creative with the mix-ins.
Traditionally, it includes ingredients like tuna, olives, capers, and a medley of seasonal vegetables, all tossed in a light vinaigrette. The Insalata Di Riso isn’t only delicious but also a fantastic way to use up leftover rice or vegetables, making it both economical and sustainable. Whether you’re hosting a gathering or simply preparing a quick and easy family meal, this Italian rice salad is sure to please.
Ingredients (Serving Size: 4-6 People):
- 2 cups of arborio or long-grain white rice
- 1 can (5 oz) of tuna, drained
- 1 cup of cherry tomatoes, halved
- 1 cup of cooked peas
- 1/2 cup of black or green olives, pitted and sliced
- 1/4 cup of capers, rinsed
- 1 red bell pepper, diced
- 1/4 cup of red onion, finely chopped
- 1/4 cup of fresh basil leaves, chopped
- 1/4 cup of extra virgin olive oil
- 2 tablespoons of red wine vinegar
- Salt and pepper to taste
- Optional: hard-boiled eggs, quartered
Cooking Instructions:
- Cook the Rice: Start by boiling a pot of salted water. Add the rice and cook according to the package instructions until al dente. Once cooked, drain and rinse the rice under cold water to cool it down quickly and stop the cooking process.
- Prepare the Dressing: In a small bowl, whisk together the extra virgin olive oil, red wine vinegar, salt, and pepper. Adjust the seasoning to taste.
- Combine Ingredients: In a large mixing bowl, combine the cooled rice with the tuna, cherry tomatoes, peas, olives, capers, red bell pepper, and red onion. Gently mix until all ingredients are evenly distributed.
- Add Dressing and Herbs: Pour the dressing over the rice mixture and toss until the salad is thoroughly coated. Add the fresh basil leaves and gently fold them into the salad.
- Chill and Serve: For best flavor, cover the salad and chill it in the refrigerator for at least 1 hour before serving. Garnish with quartered hard-boiled eggs if desired.
- Final Touches: Before serving, taste the salad and adjust seasoning if needed. Serve cold or at room temperature.
Extra Tips:
For the best results, use a rice variety like arborio or another short-grained rice that holds up well when mixed with other ingredients. This salad is highly customizable, so feel free to experiment with other vegetables or proteins like diced ham or mozzarella cubes.
If you have leftover salad, store it in an airtight container in the refrigerator for up to 2 days. Just be sure to give it a good stir before serving again to redistribute the flavors.
Lemon Ricotta Pasta
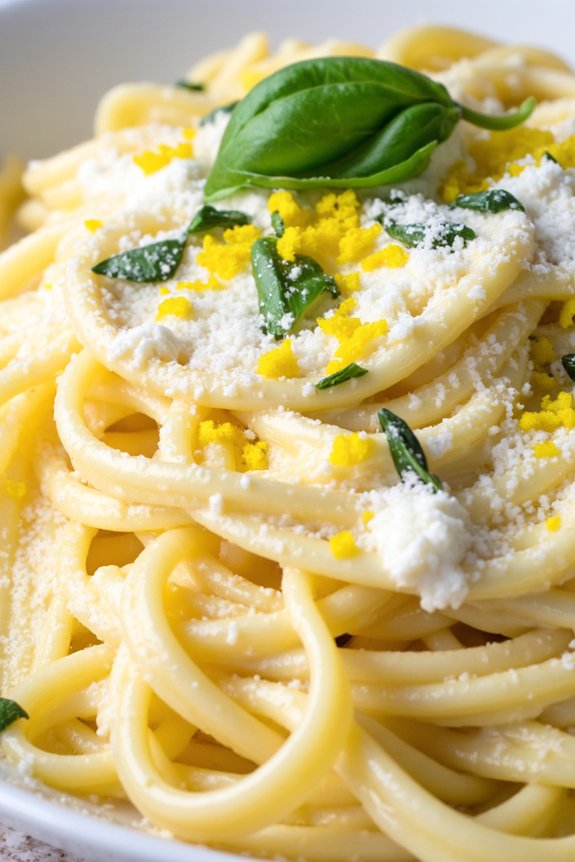
Lemon Ricotta Pasta is a delightful Italian dish perfect for a summer meal. The combination of creamy ricotta cheese, zesty lemon, and fresh herbs creates a light yet satisfying dish that embodies the flavors of Italy.
This pasta isn’t only delicious but also quick and easy to prepare, making it an ideal choice for a weeknight dinner or a special gathering with family and friends. With its vibrant flavors and simple preparation, Lemon Ricotta Pasta is sure to become a favorite in your summer recipe collection.
This dish is best served with a side of fresh salad or a slice of crusty Italian bread to soak up the delicious sauce. The creamy texture of the ricotta is perfectly balanced by the tanginess of the lemon and the freshness of the basil, creating a harmonious blend of flavors.
Whether you’re an experienced cook or just getting started in the kitchen, this recipe is approachable and rewarding, offering a taste of summer in every bite.
Ingredients (serves 4-6 people):
- 1 pound (450g) of pasta (such as spaghetti or fettuccine)
- 1 cup (250g) of ricotta cheese
- Zest and juice of 2 lemons
- 1/2 cup (120ml) of pasta cooking water
- 1/4 cup (60ml) of extra virgin olive oil
- 1/2 cup (60g) of grated Parmesan cheese
- Salt and freshly ground black pepper to taste
- 1/4 cup (15g) of fresh basil leaves, chopped
- Optional: Red pepper flakes for a hint of spice
Cooking Instructions:
- Cook the Pasta: Begin by bringing a large pot of salted water to a boil. Add the pasta and cook according to package instructions until al dente.
- Reserve 1/2 cup of the pasta cooking water, then drain the pasta and…
Refreshing Limoncello Sorbet

Limoncello Sorbet is the perfect treat to cool down during the warm Italian summer months. This invigorating and vibrant dessert captures the essence of Italy in every spoonful, combining the tangy taste of fresh lemons with a hint of sweetness from Limoncello, a classic Italian lemon liqueur.
The sorbet is light, zesty, and incredibly easy to make, offering the perfect balance between sweet and tart flavors. Impress your friends and family with this delightful homemade dessert that brings a taste of the Mediterranean sunshine to your table.
Making Limoncello Sorbet requires minimal ingredients and effort, making it an excellent choice for a quick yet sophisticated dessert. The sorbet is best enjoyed immediately after freezing to maintain its smooth and creamy texture.
Whether served in bowls or scooped into decorative glasses, this sorbet is sure to be a hit at any gathering. The following recipe yields enough sorbet to serve 4-6 people, guaranteeing everyone gets a generous taste of this delightful summer treat.
Ingredients for 4-6 servings:
- 1 cup Limoncello
- 1 cup fresh lemon juice (approximately 4-5 lemons)
- 1 cup water
- 1 cup granulated sugar
- Zest of 2 lemons
- Fresh mint leaves for garnish (optional)
Instructions:
- Prepare the Lemon Syrup: Combine the water and granulated sugar in a medium saucepan over medium heat. Stir until the sugar has completely dissolved, and the mixture comes to a gentle simmer. Remove from heat and allow it to cool slightly.
- Mix the Ingredients: In a large mixing bowl, combine the freshly squeezed lemon juice, lemon zest, and Limoncello. Gradually add the cooled sugar syrup, stirring continuously until all the ingredients are well combined.
- Chill the Mixture: Transfer the mixture to a refrigerator-safe container and chill in the refrigerator for at least 2 hours. This step will make certain the mixture is thoroughly cold before freezing, which is essential for achieving a smooth sorbet texture.
- Freeze the Sorbet: Pour the chilled mixture into an ice cream maker and churn according to the manufacturer’s instructions. This usually takes about 20-25 minutes or until the sorbet reaches a soft-serve consistency.
- Final Freezing: Transfer the churned sorbet into an airtight container and place it in the freezer for an additional 2-3 hours to allow it to firm up to a scoopable consistency.
- Serve: Once ready, scoop the Limoncello Sorbet into bowls or glasses. Garnish with fresh mint leaves for an extra pop of color and flavor, if desired, and serve immediately.
Extra Tips:
For best results, use freshly squeezed lemon juice as it provides a more vibrant and natural flavor compared to bottled juice.
If you don’t own an ice cream maker, you can still make this sorbet by placing the mixture in the freezer and stirring it every 30 minutes until it reaches the desired consistency. This manual method may take longer but will still yield a delicious result.
Adjust the sweetness by adding more or less sugar according to your taste preference. Additionally, freezing the serving bowls or glasses ahead of time can help keep the sorbet from melting too quickly when served.
Peach and Mascarpone Tart

The Peach and Mascarpone Tart is a delightful summer dessert that captures the essence of Italian cuisine with its fresh and vibrant flavors. This tart combines the juicy sweetness of ripe peaches with the creamy richness of mascarpone cheese, all nestled in a buttery, flaky crust.
It’s the perfect dessert for al fresco dining, offering a satisfying blend of textures and flavors that make every bite a celebration of summer. Whether you’re hosting a dinner party or simply enjoying a quiet evening with family, this tart is an ideal choice.
The preparation is straightforward, allowing the natural flavors of the ingredients to shine through. Serve it slightly chilled or at room temperature for a revitalizing end to your meal. The luscious combination of peaches and mascarpone will captivate your taste buds and leave your guests asking for seconds.
Ingredients (serves 4-6):
- 1 ready-made pie crust (or homemade if preferred)
- 3-4 ripe peaches, thinly sliced
- 1 cup mascarpone cheese
- 1/4 cup granulated sugar
- 1 teaspoon vanilla extract
- 1 tablespoon lemon juice
- 2 tablespoons apricot jam (optional)
- 1 tablespoon water
- Fresh mint leaves for garnish (optional)
Cooking Instructions:
- Prepare the Crust: Preheat your oven to 375°F (190°C). Roll out the pie crust and carefully line it in a tart pan. Press the crust into the edges and trim any excess. Prick the bottom with a fork to prevent bubbling.
- Blind Bake the Crust: Place a sheet of parchment paper over the crust and fill it with pie weights or dried beans. Bake in the preheated oven for about 15 minutes or until the edges start to turn golden. Remove the weights and parchment paper, and bake for an additional 5 minutes. Allow it to cool completely.
- Prepare the Mascarpone Filling: In a mixing bowl, combine the mascarpone cheese, granulated sugar, and vanilla extract. Beat until smooth and creamy. Spread the mascarpone mixture evenly over the cooled crust.
- Arrange the Peaches: Toss the peach slices in a bowl with lemon juice to prevent browning. Arrange the slices over the mascarpone filling in a circular pattern, starting from the outside edge and working your way in.
- Add a Glaze (Optional): In a small saucepan, heat the apricot jam and water over low heat until the jam is melted and smooth. Brush this glaze lightly over the peaches to add shine and enhance the flavor.
- Chill and Serve: Refrigerate the tart for at least an hour before serving to allow the flavors to meld together. Garnish with fresh mint leaves if desired.
Extra Tips:
For the best flavor, use ripe, in-season peaches as they offer the sweetest taste and juiciest texture. If mascarpone is unavailable, cream cheese can be used as a substitute, though the taste will slightly differ.
To make it even more indulgent, consider adding a splash of almond extract to the mascarpone mixture for a subtle nutty aroma. Remember to taste the peaches before arranging them on the tart to verify they’re sweet and flavorful, as the sweetness can vary.
Watermelon and Feta Salad

As the temperatures rise and the days grow longer, there’s nothing quite like a revitalizing salad to cool you down. The Watermelon and Feta Salad is the perfect blend of sweet and savory, offering a delightful contrast of flavors and textures. This dish is ideal for a summer picnic, a light lunch, or as an appetizer at your next barbecue. The juicy watermelon provides a burst of sweetness, while the creamy feta adds a tangy richness. Fresh mint and a drizzle of balsamic glaze bring the salad together, creating a symphony of flavors that dance on your palate.
This salad isn’t only delicious but also incredibly easy to prepare, requiring minimal ingredients and effort. It’s a wonderful way to celebrate the bounty of summer produce. The vibrant colors and revitalizing taste are sure to make it a crowd favorite. Whether you’re a seasoned chef or a cooking novice, this Watermelon and Feta Salad is a foolproof recipe that promises to impress your guests and leave them craving more.
Ingredients (Serves 4-6):
- 1 small seedless watermelon, cubed
- 1 cup feta cheese, crumbled
- 1/4 cup fresh mint leaves, chopped
- 1/4 cup red onion, thinly sliced
- 1/4 cup balsamic glaze
- 1/4 teaspoon salt
- 1/4 teaspoon black pepper
Instructions:
- Prepare the Watermelon: Start by cutting the watermelon into bite-sized cubes. Verify that the cubes are roughly the same size for even distribution and presentation. Place the cubes into a large salad bowl.
- Add the Feta Cheese: Crumble the feta cheese over the watermelon. Make sure it’s evenly spread so that each bite has a good balance of sweet and savory.
- Incorporate the Mint: Chop the fresh mint leaves finely and sprinkle them over the watermelon and feta. The mint adds a revitalizing and aromatic touch to the salad.
- Add Red Onions: Thinly slice the red onion and add it to the mix. The onion provides a bit of sharpness that complements the other flavors well.
- Season the Salad: Sprinkle salt and black pepper over the ingredients. Use your hands or a salad spoon to gently toss the salad, ensuring the seasoning is evenly distributed.
- Drizzle with Balsamic Glaze: Finally, drizzle the balsamic glaze over the top of the salad. The glaze adds a sweet-tart flavor that ties all the ingredients together beautifully.
- Serve the Salad: Once everything is combined, serve the salad immediately. This dish is best enjoyed fresh to savor the crispness of the ingredients.
Extra Tips:
For the best flavor, choose a ripe and sweet watermelon. You can tell a watermelon is ripe if it has a uniform shape, a creamy yellow spot on its underside, and sounds hollow when tapped.
If you prefer a bit more crunch, consider adding some toasted pine nuts or walnuts for texture. Feel free to adjust the amount of balsamic glaze to your taste preference.
If it’s a particularly hot day, you might want to chill the watermelon cubes in the fridge for a couple of hours before assembling the salad, verifying every bite is revitalizing cool.
Seafood Pasta With White Wine Sauce
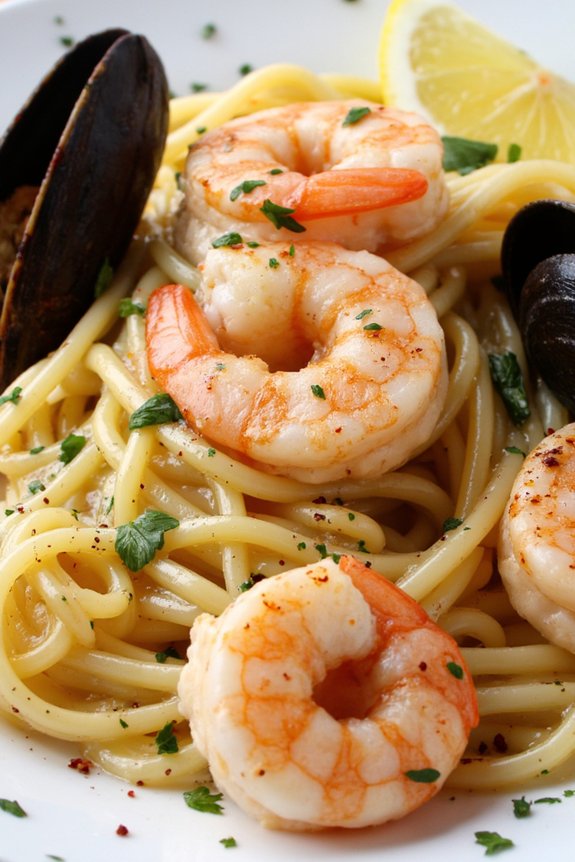
Indulge in the flavors of the Italian coast with this delightful Seafood Pasta with White Wine Sauce, a perfect dish to embody the essence of a sun-soaked Italian summer. Bursting with the freshness of the sea, this dish combines succulent seafood with a delicate white wine sauce, all tossed together with perfectly al dente pasta.
Whether you’re hosting a summer dinner party or simply craving a taste of Italy, this dish promises to transport you to a seaside trattoria.
Ideal for serving 4-6 people, this recipe combines an assortment of seafood such as shrimp, mussels, and calamari, with a sauce that balances the acidity of white wine with the richness of garlic and olive oil. As you enjoy this dish, the subtle aroma of fresh herbs will enhance the overall experience, making it a memorable culinary journey.
Ingredients (Serves 4-6):
- 400g spaghetti or linguine
- 250g shrimp, peeled and deveined
- 250g mussels, cleaned and debearded
- 200g squid or calamari, cleaned and sliced into rings
- 4 cloves garlic, minced
- 1 shallot, finely chopped
- 1 cup dry white wine
- 1/2 cup fish or vegetable stock
- 1/4 cup extra virgin olive oil
- 1 tablespoon unsalted butter
- 1 teaspoon red pepper flakes
- Salt and freshly ground black pepper, to taste
- 1/4 cup fresh parsley, chopped
- Lemon wedges, for serving
Cooking Instructions:
- Prepare the Pasta: Bring a large pot of salted water to a boil. Add the spaghetti or linguine and cook according to package instructions until al dente. Reserve 1 cup of pasta water, then drain the pasta and set aside.
- Sauté the Aromatics: In a large, deep skillet or sauté pan, heat the olive oil over medium heat. Add the minced garlic and chopped shallot, cooking until fragrant and translucent, about 2-3 minutes.
- Cook the Seafood: Increase the heat to medium-high and add the shrimp, mussels, and calamari to the pan. Season with salt, pepper, and red pepper flakes. Cook, stirring occasionally, until the shrimp turn pink and the mussels open, about 4-5 minutes. Discard any mussels that don’t open.
- Make the Sauce: Pour in the white wine and fish or vegetable stock, stirring to deglaze the pan. Allow the mixture to simmer for about 3-4 minutes, reducing slightly.
- Combine and Serve: Reduce heat to low and add the cooked pasta to the skillet, tossing everything together gently. Add the unsalted butter and a bit of reserved pasta water as needed to create a silky sauce. Toss in the fresh parsley and adjust seasoning with more salt, pepper, or red pepper flakes to taste.
- Plate and Garnish: Serve the seafood pasta hot, garnished with additional parsley and lemon wedges on the side for squeezing over the top.
Extra Tips:
- To ascertain the mussels are fresh, they should be tightly closed before cooking. If a mussel is open, gently tap it on the counter; if it closes, it’s safe to use. Discard any that remain open.
- Use good quality white wine, as its flavor will be prominent in the sauce. Choose a dry variety like Pinot Grigio or Sauvignon Blanc.
- If you prefer a creamier sauce, a splash of heavy cream can be added during the sauce-making step.
- Be careful not to overcook the seafood, as it can become rubbery. Cooking times may vary slightly based on the size and type of seafood used.