

When it comes to Italian potluck recipes, there’s something truly irresistible about them. Think vibrant, colorful dishes and the enticing aroma of fresh herbs filling the air. From Caprese skewers with balsamic glaze to a generous platter of Italian antipasto, these dishes are more than just meals—they’re shared experiences around the table. Each bite tells a story, and they’re always a hit at gatherings. Ready to discover more crowd-pleasers?
Caprese Skewers With Balsamic Glaze
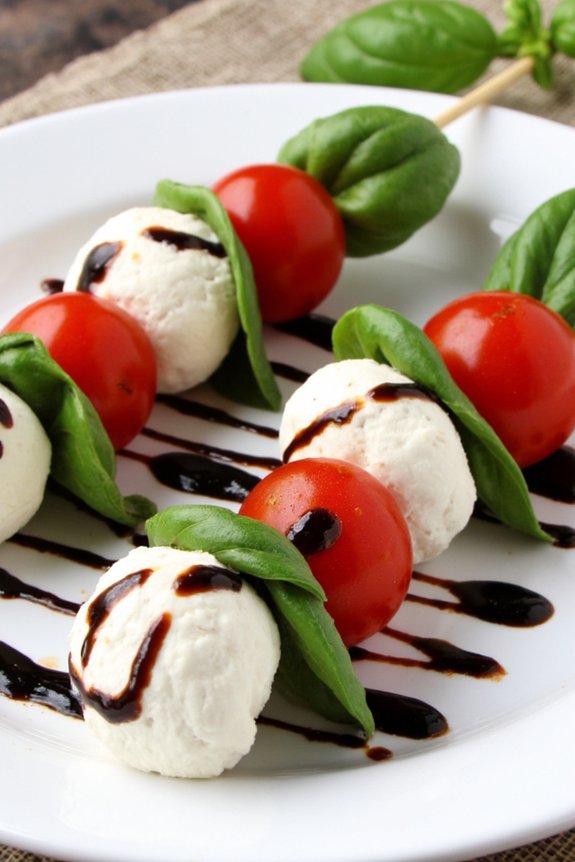
Caprese Skewers With Balsamic Glaze are a delightful appetizer that brings together the classic flavors of Italy in a convenient, bite-sized form. These skewers aren’t only visually appealing but also pack a punch of flavor with the combination of fresh mozzarella, ripe cherry tomatoes, and aromatic basil leaves. The dish is then elevated with a sweet and tangy balsamic glaze, making it a perfect addition to any Italian potluck or gathering.
The simplicity of the ingredients allows the fresh flavors to shine, making this dish a crowd-pleaser. Ideal for gatherings, Caprese Skewers are easy to prepare and can be assembled in advance. This makes them a hassle-free choice for entertaining, especially when you need to serve a large number of guests.
The skewers can be served cold or at room temperature, making them flexible to suit any setting. The balsamic glaze not only enhances the flavor but also adds an elegant touch, making the skewers look gourmet with minimal effort. Here’s how you can prepare this dish for 4-6 people.
Ingredients:
- 24 cherry tomatoes
- 24 fresh basil leaves
- 24 mozzarella balls (bocconcini or ciliegine)
- 2 tablespoons olive oil
- Salt and freshly ground black pepper to taste
- ½ cup balsamic vinegar
- 2 tablespoons brown sugar
- 24 wooden skewers or cocktail picks
Cooking Instructions:
- Prepare the Balsamic Glaze: In a small saucepan, combine the balsamic vinegar and brown sugar. Stir the mixture over medium heat until the sugar dissolves. Bring it to a gentle simmer and let it reduce until it thickens into a glaze, approximately 8-10 minutes. Remove from heat and let it cool.
- Assemble the Skewers: On each wooden skewer, thread one cherry tomato, followed by one basil leaf and one mozzarella ball. Repeat the sequence until all ingredients are used up, making certain each skewer has an even distribution of tomato, basil, and mozzarella.
- Season the Skewers: Once assembled, place the skewers on a serving platter. Drizzle them with olive oil and sprinkle with a pinch of salt and freshly ground black pepper to enhance the flavors.
- Apply the Balsamic Glaze: Drizzle the cooled balsamic glaze over the skewers. Be generous with the glaze to guarantee each skewer is coated with the sweet and tangy flavor.
- Serve: These skewers can be served immediately, or you can refrigerate them for up to an hour before serving. If refrigerated, allow them to reach room temperature for the best flavor experience.
Extra Tips:
For the freshest taste, make sure to select ripe cherry tomatoes and quality mozzarella. If you prefer a more intense flavor, you can marinate the mozzarella balls in olive oil, garlic, and herbs a few hours before assembling the skewers.
Additionally, if you want to save time, a store-bought balsamic glaze can be used. However, making your own allows you to control the sweetness and thickness of the glaze. Finally, if you’re using wooden skewers, soaking them in water for 10 minutes can prevent them from splitting when threading the ingredients.
Classic Bruschetta With Fresh Tomatoes

Classic Bruschetta With Fresh Tomatoes is a timeless Italian appetizer that brings together the vibrant flavors of ripe tomatoes, fragrant basil, and a hint of garlic on crispy slices of toasted bread.
This dish is perfect for a potluck, offering a burst of freshness and a delightful crunch that complements any spread. Whether you’re serving it as an appetizer or a side dish, bruschetta is a crowd-pleaser that showcases the beauty of simple, quality ingredients.
Making Classic Bruschetta With Fresh Tomatoes is a straightforward process that emphasizes the natural essence of each component.
The key to a great bruschetta lies in using fresh, ripe tomatoes and a good quality bread that can hold the topping without becoming soggy. With a few easy steps, you can create a dish that not only tastes delicious but also looks stunning on the table, making it a perfect addition to any Italian-themed potluck.
Ingredients for 4-6 servings:
- 6 ripe tomatoes
- 1 baguette or other crusty bread
- 3 cloves of garlic
- 1/4 cup extra virgin olive oil
- Salt to taste
- Freshly ground black pepper to taste
- 1/2 cup fresh basil leaves
- Balsamic glaze (optional)
Cooking Instructions:
1. Prepare the Tomatoes: Begin by washing the tomatoes and removing the cores. Dice them into small cubes and place them in a mixing bowl. Add a pinch of salt and freshly ground black pepper. Allow the tomatoes to sit for about 10 minutes to release their juices.
2. Toast the Bread: Slice the baguette into 1/2-inch thick slices. You can either grill or toast the slices. If using a grill, lightly brush each slice with olive oil and grill until golden brown on both sides.
Alternatively, preheat your oven to 400°F (200°C), brush the slices with olive oil, and bake on a baking sheet for about 5-7 minutes or until they’re crispy and golden.
3. Prepare the Garlic: Peel the garlic cloves and cut them in half. Once the bread is toasted, gently rub the cut side of the garlic on each slice. This will impart a subtle garlic flavor to the bread.
4. Assemble the Bruschetta: Drizzle a small amount of olive oil over the diced tomatoes and gently toss. Stack a generous spoonful of the tomato mixture onto each slice of bread. Tear the basil leaves and sprinkle them over the tomatoes.
5. Finish and Serve: If desired, drizzle a small amount of balsamic glaze over the bruschetta for added sweetness and depth of flavor. Arrange the bruschetta on a serving platter and serve immediately.
Extra Tips:
For the best results, choose tomatoes that are in season and at their ripest; they’ll provide the most flavor.
Alternatively, cherry tomatoes can be used for a sweeter taste. When selecting bread, opt for a sturdy, crusty type to prevent sogginess.
If you prefer a more intense garlic flavor, you can finely mince the garlic and mix it directly with the tomatoes. Remember to serve the bruschetta as soon as possible after assembling to guarantee the bread remains crispy.
Italian Antipasto Platter

An Italian Antipasto Platter is a vibrant and versatile starter that sets the perfect tone for a delightful meal. It’s a colorful and flavorful assortment of Italian delicacies that can be tailored to suit various tastes and preferences. Traditionally, an antipasto platter includes a variety of cured meats, cheeses, olives, roasted vegetables, and other delectable nibbles.
The beauty of this dish lies in its flexibility, allowing you to create a spread that’s both visually appealing and appetizing. This recipe will guide you in assembling a classic Italian Antipasto Platter, perfect for serving 4-6 people.
When preparing an Italian Antipasto Platter, it’s essential to focus on variety and balance. Choose a mix of textures and flavors to create a well-rounded spread. The dish should include a blend of salty, sweet, savory, and tangy elements, guaranteeing a delightful experience for every palate.
Make certain to use high-quality, fresh ingredients to enhance the overall taste and presentation. This recipe will walk you through the essential components to include and how to artfully arrange them on a platter.
Ingredients for 4-6 people:
- 200g prosciutto
- 200g salami
- 150g mortadella
- 200g mozzarella balls
- 150g parmesan cheese, cut into chunks
- 200g marinated olives
- 150g roasted red peppers
- 150g artichoke hearts
- 100g sun-dried tomatoes
- 100g cherry tomatoes
- 1 small bunch of fresh basil
- 6-8 slices of crusty Italian bread
- 100ml olive oil
- Freshly ground black pepper
Instructions:
- Prepare the Meats and Cheeses: Start by arranging the cured meats on a large platter. Fold or roll the slices of prosciutto, salami, and mortadella for an appealing presentation. Place the mozzarella balls in a small bowl and position it on the platter. Add the chunks of parmesan cheese around the meats, creating a balanced display.
- Add the Vegetables and Olives: Next, add the marinated olives to a small bowl and place them on the platter. Arrange the roasted red peppers, artichoke hearts, and sun-dried tomatoes around the meats and cheeses. Scatter the cherry tomatoes across the platter for a pop of color.
- Incorporate Fresh Elements: Tear the fresh basil leaves and sprinkle them over the platter to add a vibrant, aromatic touch. This not only enhances the visual appeal but also infuses the dish with a fresh, herbaceous flavor.
- Finish with Bread and Olive Oil: Lightly toast the slices of crusty Italian bread and place them on the side of the platter. Serve a small dish of olive oil seasoned with freshly ground black pepper for dipping.
- Present the Platter: Make sure all components are evenly distributed and visually appealing. Use contrasting colors and textures to make the platter inviting and appetizing.
Extra Tips:
When assembling your Italian Antipasto Platter, consider the layout and spacing between ingredients to make it easy for guests to serve themselves. Use a large wooden board or a ceramic platter to showcase the ingredients attractively.
It’s also a good idea to label some of the more unique items so guests know exactly what they’re enjoying. Finally, feel free to experiment with additional elements like marinated mushrooms or a selection of Italian pickles to further customize your platter.
Spinach and Ricotta Stuffed Shells

Spinach and Ricotta Stuffed Shells are a delightful Italian dish that combines the creamy richness of ricotta cheese with the fresh, earthy taste of spinach, all encased in tender pasta shells. This dish is perfect for a potluck or family dinner, offering a comforting and satisfying meal that’s certain to please a crowd. The combination of cheeses, herbs, and tomato sauce makes for a flavorful filling that will have everyone coming back for seconds.
This recipe is designed to serve 4-6 people, making it an ideal choice for gatherings or a hearty family meal. The preparation involves a simple process of filling large pasta shells with a delicious mixture of ricotta, spinach, and Parmesan cheese, before baking them in a rich tomato sauce topped with mozzarella. The result is a savory, cheesy dish with a perfect balance of flavors and textures.
Ingredients:
- 20-24 large pasta shells
- 2 cups ricotta cheese
- 1 cup cooked spinach (thoroughly drained and chopped)
- 1 cup grated Parmesan cheese
- 1 egg
- 2 cups shredded mozzarella cheese
- 3 cups marinara sauce
- 1 teaspoon dried Italian herbs
- Salt and pepper to taste
- 2 tablespoons olive oil
- Fresh basil for garnish (optional)
Instructions:
- Preheat the Oven: Preheat your oven to 375°F (190°C).
- Cook the Pasta Shells: In a large pot of boiling salted water, cook the pasta shells for about 8-10 minutes until they’re al dente. Drain and set aside to cool slightly.
- Prepare the Filling: In a large mixing bowl, combine the ricotta cheese, cooked spinach, 1/2 cup of the Parmesan cheese, and the egg. Season with salt, pepper, and the dried Italian herbs. Mix well until all ingredients are thoroughly incorporated.
- Stuff the Shells: Carefully fill each cooked pasta shell with the ricotta mixture, using a spoon or a piping bag for ease. Place the stuffed shells in a single layer in a large baking dish.
- Add the Sauce: Pour the marinara sauce evenly over the stuffed shells. Sprinkle the remaining Parmesan cheese and half of the mozzarella cheese on top.
- Bake the Shells: Cover the baking dish with aluminum foil and bake in the preheated oven for 25 minutes. Remove the foil, sprinkle the remaining mozzarella cheese on top, and bake for an additional 10-15 minutes, or until the cheese is melted and bubbly.
- Garnish and Serve: Remove from the oven and let cool for a few minutes. Garnish with fresh basil if desired before serving.
Extra Tips:
For the best results, make sure that the spinach is well-drained to prevent the filling from becoming too watery. You can use fresh spinach that has been wilted in a pan or frozen spinach that has been thawed and squeezed of excess moisture.
Also, feel free to customize the filling by adding other ingredients such as sautéed mushrooms, garlic, or even a pinch of nutmeg for added depth of flavor. If you prefer a spicier version, consider adding a pinch of red pepper flakes to the marinara sauce.
Creamy Pesto Pasta Salad
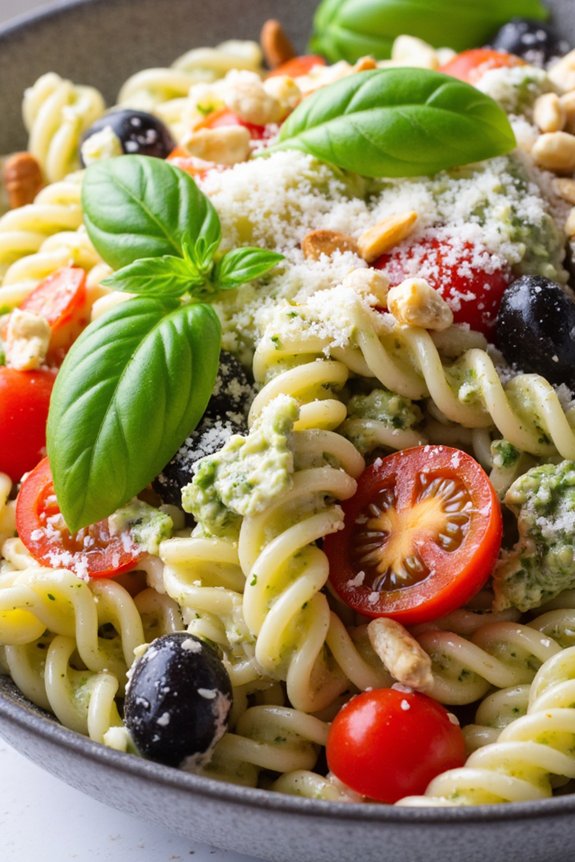
Creamy Pesto Pasta Salad is a delightful and invigorating dish that combines the rich flavors of creamy pesto with the satisfying texture of pasta, making it an excellent choice for any Italian potluck gathering.
This salad is a vibrant mix of colors and flavors, with the pesto dressing providing a zesty and aromatic base that coats each piece of pasta perfectly. It’s an easy-to-make dish that can be prepared ahead of time, allowing the flavors to meld together beautifully for a more intense taste.
This pasta salad isn’t only delicious but also versatile, as it can be served as a main dish or a side dish, making it a staple for any potluck menu. The combination of fresh vegetables, pasta, and pesto sauce creates a well-rounded dish that’s both hearty and invigorating.
It’s perfect for serving a group of 4-6 people and is sure to be a crowd-pleaser, leaving everyone at the potluck asking for seconds.
Ingredients (Serves 4-6):
- 12 oz (340g) fusilli or rotini pasta
- 1 cup (240ml) prepared pesto sauce
- 1/2 cup (120g) mayonnaise
- 1/4 cup (60ml) sour cream
- 1 cup (150g) cherry tomatoes, halved
- 1/2 cup (75g) black olives, sliced
- 1/2 cup (75g) diced red bell pepper
- 1/4 cup (30g) grated Parmesan cheese
- 1/4 cup (30g) pine nuts, toasted
- Salt and pepper to taste
- Fresh basil leaves for garnish
Instructions:
- Cook the Pasta: Begin by boiling a large pot of salted water. Add the fusilli or rotini pasta and cook according to the package instructions until al dente. Drain the pasta and rinse it under cold water to stop the cooking process and cool it down. Set aside.
- Prepare the Dressing: In a large mixing bowl, combine the prepared pesto sauce, mayonnaise, and sour cream. Stir until the ingredients are thoroughly mixed and smooth.
- Combine Ingredients: Add the cooled pasta to the bowl of dressing. Toss gently to guarantee the pasta is evenly coated with the creamy pesto mixture.
- Add Vegetables and Cheese: Incorporate the cherry tomatoes, black olives, and diced red bell pepper into the pasta. Add the grated Parmesan cheese and gently toss everything together until well combined.
- Season and Garnish: Season the salad with salt and pepper to taste. Top with toasted pine nuts and garnish with fresh basil leaves for an added touch of flavor and presentation.
- Chill: Refrigerate the pasta salad for at least 1 hour before serving to allow the flavors to meld together. This step enhances the taste and makes the salad more invigorating.
Extra Tips:
For a healthier variation, consider using whole wheat or gluten-free pasta. You can also customize the vegetables based on your preference or what’s in season, such as adding artichoke hearts or sun-dried tomatoes.
If you prefer a nut-free version, you can omit the pine nuts or replace them with sunflower seeds. Remember to taste the salad before serving and adjust the seasoning if necessary, as chilling can sometimes dull the flavors.
Chicken Parmesan Bites

Chicken Parmesan Bites are a delightful twist on the traditional Italian favorite, perfect for a potluck or casual gathering. These bite-sized morsels offer the savory flavors of classic Chicken Parmesan in a convenient, handheld form. By using small pieces of chicken breast, coating them with Parmesan cheese and breadcrumbs, and baking until golden, you can create a dish that’s both delicious and easy to share. The result is crispy, cheesy bites full of flavor with a satisfying crunch in every bite.
Whether served as an appetizer or a main dish, Chicken Parmesan Bites are sure to be a hit at any Italian-themed potluck. Paired with a side of marinara sauce for dipping, these bites capture the essence of traditional Italian cuisine while being fun and accessible for guests of all ages. With simple preparation and a short cooking time, you’ll have a crowd-pleasing dish ready in no time.
Ingredients for 4-6 servings:
- 1.5 pounds boneless, skinless chicken breasts
- 1 cup all-purpose flour
- 2 large eggs
- 1 cup Italian-style breadcrumbs
- 1 cup grated Parmesan cheese
- 1 teaspoon garlic powder
- 1 teaspoon dried oregano
- 1 teaspoon salt
- 1/2 teaspoon black pepper
- 1/2 cup olive oil
- 2 cups marinara sauce
- 1 cup shredded mozzarella cheese
- Fresh basil leaves for garnish (optional)
Cooking Instructions:
- Preheat the Oven: Begin by preheating your oven to 400°F (200°C). This guarantees that your bites will cook evenly and develop a nice, crispy exterior.
- Prepare the Chicken: Cut the chicken breasts into bite-sized pieces, approximately 1 to 1.5 inches in size. Pat them dry with paper towels to remove excess moisture.
- Set Up Breading Station: Arrange three shallow bowls in a row. In the first bowl, place the flour. In the second bowl, beat the eggs. In the third bowl, combine the breadcrumbs, Parmesan cheese, garlic powder, oregano, salt, and black pepper.
- Coat the Chicken: Dip each chicken piece first in the flour, shaking off any excess. Then, dip it into the beaten eggs, ensuring it’s fully coated. Finally, press the chicken into the breadcrumb mixture, making sure each piece is evenly covered.
- Cook the Chicken: In a large skillet over medium heat, heat the olive oil. Once hot, add the coated chicken pieces in batches, cooking for about 2-3 minutes on each side until golden brown. Transfer the cooked pieces to a paper towel-lined plate to drain any excess oil.
- Bake the Chicken: Transfer the browned chicken pieces to a baking sheet lined with parchment paper. Spoon a small amount of marinara sauce over each piece, then sprinkle with shredded mozzarella cheese.
- Finish Baking: Place the baking sheet in the preheated oven and bake for 10-12 minutes, or until the mozzarella is melted and bubbly and the chicken is cooked through.
- Serve: Remove from the oven and let cool slightly. Garnish with fresh basil leaves if desired and serve with additional marinara sauce for dipping.
Extra Tips:
For best results, make sure to cut the chicken into uniform pieces to guarantee even cooking. You can prepare the chicken bites ahead of time up to the baking step, and store them in the refrigerator. When ready to serve, simply top with sauce and cheese, and bake.
For a healthier option, you can bake the chicken bites instead of frying them initially, by placing them on a greased baking sheet and baking at 400°F (200°C) for about 20 minutes, flipping halfway through. This dish also complements well with a light salad or roasted vegetables for a complete meal.
Sausage and Pepper Frittata

The Sausage and Pepper Frittata is a versatile Italian dish that’s perfect for any potluck gathering. This hearty frittata combines the rich flavors of seasoned sausage and sweet bell peppers, all bound together in a fluffy, golden egg base. It can be served hot or at room temperature, making it an ideal dish for entertaining.
The combination of ingredients offers a delightful balance of savory and slightly sweet notes, guaranteeing that it will be a crowd-pleaser at any event. This recipe is designed to serve 4-6 people, making it a great choice for a small gathering or a family meal.
The frittata can be prepared in advance and reheated, allowing you to enjoy the company of your guests without being tied to the kitchen. With its vibrant colors and robust flavors, the Sausage and Pepper Frittata not only tastes delicious but also makes an attractive addition to any potluck spread.
Ingredients:
- 8 large eggs
- 1/2 cup whole milk
- Salt and pepper to taste
- 1 tablespoon olive oil
- 1 pound Italian sausage, casings removed
- 1 red bell pepper, diced
- 1 green bell pepper, diced
- 1/2 cup shredded mozzarella cheese
- 1/4 cup grated Parmesan cheese
- 2 tablespoons chopped fresh parsley
Instructions:
- Preheat the Oven: Set your oven to 375°F (190°C) to make sure it’s ready for baking the frittata after stovetop cooking.
- Prepare the Egg Mixture: In a large bowl, whisk together the eggs, milk, salt, and pepper until well combined. Set aside for later use.
- Cook the Sausage: In a large oven-safe skillet, heat olive oil over medium heat. Add the sausage and cook, breaking it apart with a spatula, until it’s browned and cooked through. This should take about 5-7 minutes.
- Add the Peppers: Once the sausage is cooked, add the diced red and green bell peppers to the skillet. Cook for another 3-4 minutes until the peppers are softened.
- Combine with Egg Mixture: Pour the egg mixture over the sausage and peppers in the skillet. Stir gently to guarantee even distribution of ingredients.
- Add Cheese: Sprinkle the mozzarella and Parmesan cheese evenly over the egg mixture.
- Bake the Frittata: Transfer the skillet to the preheated oven and bake for 20-25 minutes, or until the frittata is set in the center and lightly golden on top.
- Garnish and Serve: Remove the frittata from the oven and allow it to cool slightly. Sprinkle with chopped parsley before slicing and serving.
Extra Tips:
For best results, use a well-seasoned cast-iron skillet, as it distributes heat evenly and can shift from stovetop to oven seamlessly.
If you prefer a spicier dish, consider using hot Italian sausage or adding a pinch of red pepper flakes to the egg mixture. The frittata can be customized with additional vegetables such as onions, mushrooms, or spinach, depending on your preference.
Leftovers can be stored in the refrigerator for up to three days and are delicious when reheated.
Margherita Pizza Squares

Margherita Pizza Squares are a delightful and easy-to-make dish perfect for any Italian-themed potluck. This version of the classic pizza dish is cut into convenient squares, making it easy for guests to enjoy at a gathering. The combination of fresh mozzarella, ripe tomatoes, and fragrant basil makes this dish a crowd-pleaser. By using a pre-made pizza dough, you can save time and effort while still delivering a fresh and delicious taste.
The Margherita Pizza Squares are ideal for serving 4-6 people, which makes them perfect for a small gathering or family dinner. The key to making this dish shine is using high-quality ingredients. Fresh mozzarella cheese provides a creamy texture, while ripe tomatoes add a burst of flavor. A sprinkle of fresh basil and a drizzle of olive oil bring all the flavors together, creating a harmonious blend that’s sure to impress your guests.
Ingredients (Serving Size: 4-6 People):
- 1 pound of pre-made pizza dough
- 1 cup of pizza sauce
- 8 ounces of fresh mozzarella cheese, sliced
- 2 medium ripe tomatoes, thinly sliced
- 1/4 cup of fresh basil leaves
- 2 tablespoons of olive oil
- Salt and pepper to taste
- Cornmeal or flour for dusting
Cooking Instructions:
- Preheat the Oven: Start by preheating your oven to 475°F (245°C). This high temperature will help achieve a crispy crust.
- Prepare the Dough: On a lightly floured or cornmeal-dusted surface, roll out the pizza dough into a large rectangle, approximately 12×16 inches. Transfer the dough onto a baking sheet lined with parchment paper.
- Add the Sauce: Spread the pizza sauce evenly over the dough, leaving a small border around the edges for the crust.
- Top with Cheese and Tomatoes: Evenly distribute the sliced fresh mozzarella over the sauced dough, followed by the thinly sliced tomatoes. Season with a pinch of salt and pepper.
- Bake the Pizza: Place the baking sheet in the preheated oven and bake for 12-15 minutes, or until the crust is golden brown and the cheese is bubbly and slightly browned.
- Add Basil and Olive Oil: Once out of the oven, sprinkle fresh basil leaves over the pizza. Drizzle with olive oil for added flavor.
- Cut and Serve: Allow the pizza to cool slightly before cutting it into squares. Serve warm and enjoy!
Extra Tips:
For the best results, use a pizza stone if you have one. It helps to achieve a crispier crust by evenly distributing the oven’s heat.
If fresh mozzarella isn’t available, you can use low-moisture mozzarella, but be sure to slice it thinly to prevent excess moisture from making the pizza soggy.
Don’t skip the olive oil drizzle; it enhances the flavors and adds a nice sheen to the pizza.
Finally, remember that fresh basil should be added after baking to preserve its flavor and vibrant color.
Tuscan White Bean Soup
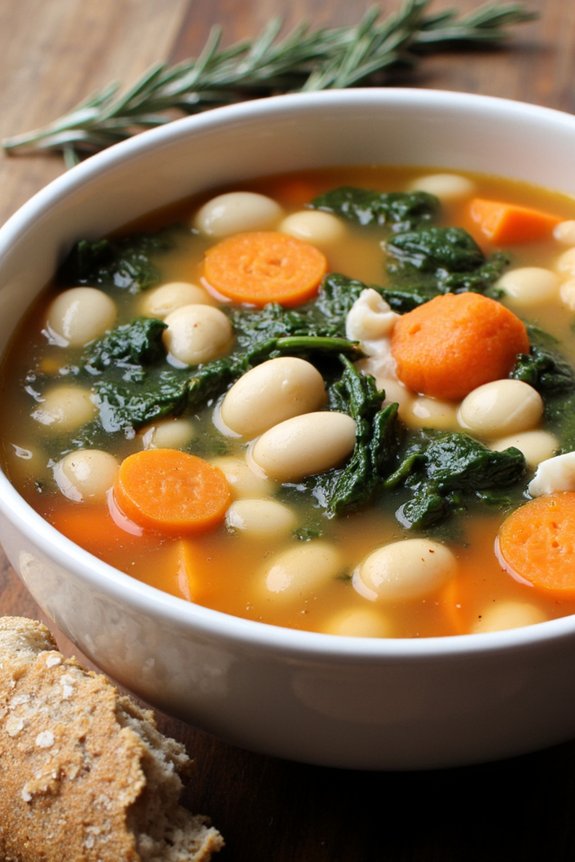
Tuscan White Bean Soup is a comforting and hearty dish perfect for any Italian potluck. This classic soup hails from the Tuscan region of Italy, known for its rich flavors and rustic cuisine. Combining creamy white beans with aromatic herbs and vegetables, this soup is both nutritious and delicious.
It’s an excellent choice for a cozy family dinner or a gathering with friends, as it can easily be scaled up to serve a crowd.
This recipe serves 4-6 people and is relatively simple to prepare. With a base of onions, carrots, and celery, the soup is infused with the earthy flavors of rosemary and thyme. The addition of spinach or kale adds a vibrant green touch, while a splash of lemon juice at the end brightens the flavors. Serve it with crusty bread for a complete and satisfying meal.
Ingredients:
- 2 tablespoons olive oil
- 1 large onion, diced
- 2 carrots, peeled and diced
- 2 celery stalks, diced
- 3 garlic cloves, minced
- 2 teaspoons fresh rosemary, chopped
- 1 teaspoon dried thyme
- 2 cans (15 ounces each) cannellini beans, drained and rinsed
- 6 cups vegetable broth
- 2 cups fresh spinach or kale, chopped
- Salt and pepper to taste
- 1 tablespoon lemon juice
- Optional: grated Parmesan cheese for serving
Cooking Instructions:
- Prepare the Base: Heat the olive oil in a large pot over medium heat. Add the diced onion, carrots, and celery. Sauté for about 5-7 minutes until the vegetables start to soften.
- Add Garlic and Herbs: Stir in the minced garlic, rosemary, and thyme. Cook for another minute until the garlic is fragrant, taking care not to let it burn.
- Incorporate Beans and Broth: Add the cannellini beans to the pot, followed by the vegetable broth. Bring the mixture to a boil, then reduce the heat to low. Let it simmer for about 20 minutes, allowing the flavors to meld together.
- Add the Greens: Stir in the chopped spinach or kale. Continue to simmer for another 5 minutes until the greens are wilted and tender.
- Season and Finish: Season the soup with salt and pepper to taste. Stir in the lemon juice to brighten the flavors. If desired, adjust the seasonings to your preference.
- Serve: Ladle the soup into bowls and, if using, sprinkle with grated Parmesan cheese. Serve hot with crusty bread on the side.
Extra Tips:
For an even heartier soup, you can add diced potatoes or pasta during the simmering process. If you prefer a creamier texture, use an immersion blender to partially blend the soup before adding the greens. This will create a thicker consistency without losing the chunkiness of the vegetables.
Additionally, for a more robust flavor, consider adding a splash of white wine after sautéing the vegetables. Always taste and adjust the seasoning before serving, as the flavors develop over time. Enjoy this comforting dish with friends and family at your next Italian potluck!
Eggplant Rollatini
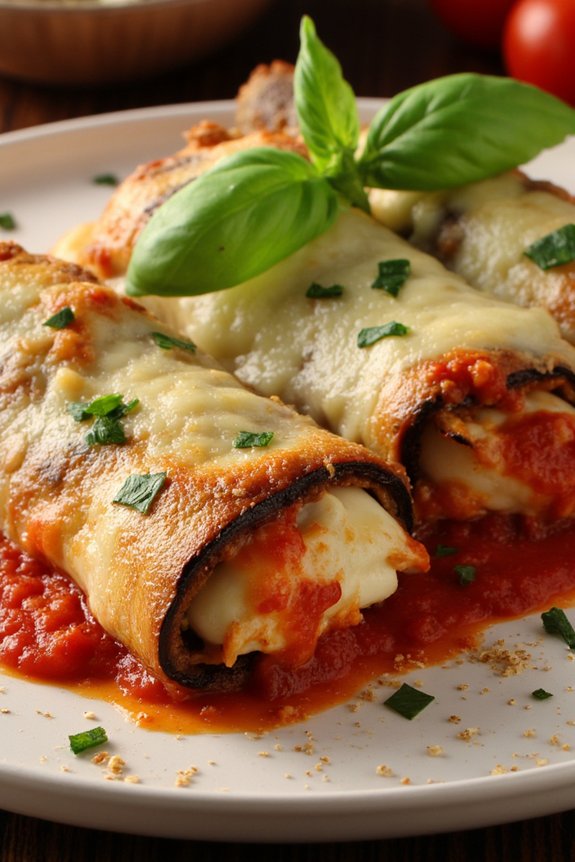
To make Eggplant Rollatini, you’ll start with fresh, firm eggplants, which serve as the base for the rollatini. The eggplant slices are typically salted to draw out excess moisture and bitterness, then fried until just tender. The filling consists of ricotta cheese, Parmesan, mozzarella, and a hint of nutmeg, creating a creamy and flavorful interior.
Once the eggplant is filled and rolled, it’s topped with marinara sauce and more cheese before baking. This dish can be served as a main course or as a hearty side dish, making it versatile for any gathering.
Ingredients (for 4-6 servings):
- 2 large eggplants
- 2 cups marinara sauce
- 1 cup ricotta cheese
- 1 cup shredded mozzarella cheese
- 1/2 cup grated Parmesan cheese
- 1 egg
- 1/4 teaspoon nutmeg
- 1/4 cup chopped fresh basil
- Salt and pepper to taste
- Olive oil, for frying
Cooking Instructions:
- Prepare the Eggplants: Slice the eggplants lengthwise into 1/4-inch thick slices. Sprinkle each slice generously with salt and let them sit for 20 minutes to draw out excess moisture. Rinse the slices under cold water and pat them dry with paper towels.
- Fry the Eggplants: Heat olive oil in a large skillet over medium heat. Fry the eggplant slices until they’re golden brown on both sides, about 2-3 minutes per side. Transfer them to a plate lined with paper towels to drain any excess oil.
- Make the Cheese Filling: In a mixing bowl, combine ricotta cheese, 1/4 cup of the Parmesan cheese, 1/2 cup of the mozzarella cheese, egg, nutmeg, chopped basil, salt, and pepper. Mix well until all ingredients are thoroughly combined.
- Assemble the Rollatini: Preheat your oven to 375°F (190°C). Spread a thin layer of marinara sauce on the bottom of a baking dish. Place a spoonful of the cheese mixture at the narrow end of each eggplant slice, then roll up the slice tightly. Arrange the rolls seam-side down in the baking dish.
- Add Sauce and Cheese: Pour the remaining marinara sauce over the eggplant rolls. Sprinkle the top with the remaining mozzarella and Parmesan cheeses.
- Bake the Rollatini: Cover the baking dish with aluminum foil and bake in the preheated oven for 20 minutes. Remove the foil and bake for an additional 10 minutes, or until the cheese is bubbly and lightly browned.
- Serve: Allow the dish to cool slightly before serving. Garnish with additional fresh basil if desired.
Extra Tips:
When preparing Eggplant Rollatini, it’s essential to properly salt and drain the eggplant slices to avoid a watery dish. You can also grill the eggplant instead of frying for a lighter version.
If you’re short on time, store-bought marinara sauce works perfectly, but homemade can elevate the flavors even more. For an extra kick, consider adding a pinch of red pepper flakes to the cheese mixture.
This dish can be assembled a day in advance and baked just before serving, making it a convenient option for a busy potluck day.
Italian Wedding Soup
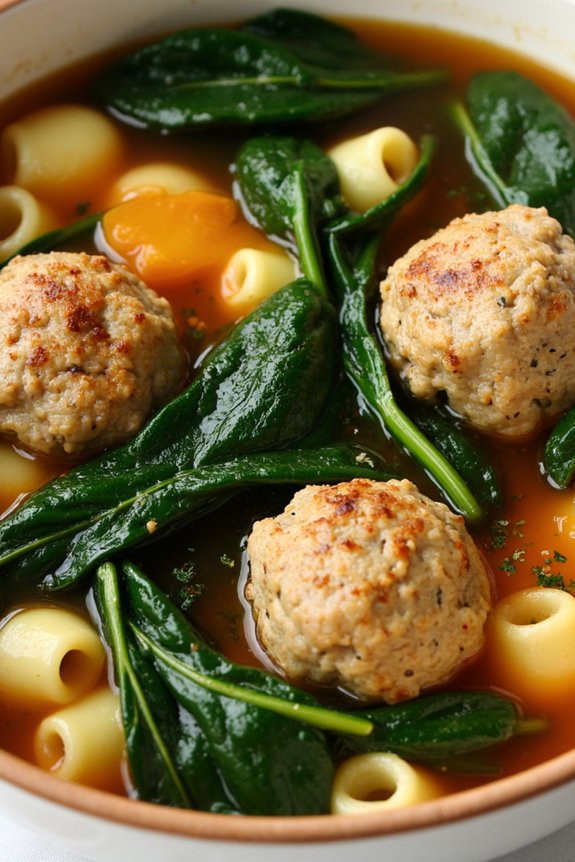
Italian Wedding Soup is a delicious and comforting dish that’s perfect for any potluck gathering. Despite its name, the soup isn’t traditionally served at weddings, but rather the name refers to the harmonious marriage of its ingredients. This hearty soup features tender meatballs, vibrant greens, and a flavorful broth, making it a favorite among many.
Ideal for a cozy night in or an impressive dish to share with friends and family, Italian Wedding Soup is sure to delight all who try it. The soup’s rich flavors come from the combination of well-seasoned meatballs and the aromatic broth. The meatballs are typically made from a mixture of ground meat, herbs, and cheese, and are simmered in a savory broth with pasta and leafy greens.
The result is a nourishing and satisfying dish that’s both filling and flavorful. This recipe serves 4-6 people, making it a perfect choice for your next potluck or family dinner.
Ingredients:
- 1 pound ground beef or pork
- 1/2 cup breadcrumbs
- 1/4 cup grated Parmesan cheese
- 1 large egg
- 2 tablespoons chopped fresh parsley
- 1 teaspoon dried oregano
- Salt and pepper, to taste
- 1 tablespoon olive oil
- 1 medium onion, chopped
- 2 cloves garlic, minced
- 8 cups chicken broth
- 1 cup small pasta (such as acini di pepe or orzo)
- 4 cups fresh spinach or escarole, chopped
- 2 tablespoons lemon juice
Cooking Instructions:
- Prepare the Meatballs: In a large bowl, combine the ground meat, breadcrumbs, Parmesan cheese, egg, parsley, oregano, salt, and pepper. Mix until well combined. Shape the mixture into small meatballs, about 1 inch in diameter.
- Cook the Meatballs: In a large pot, heat the olive oil over medium heat. Add the meatballs and cook until browned on all sides, about 5-7 minutes. Remove the meatballs from the pot and set aside.
- Sauté the Aromatics: In the same pot, add the chopped onion and minced garlic. Sauté until the onion is translucent, about 3-4 minutes.
- Simmer the Broth: Pour in the chicken broth and bring it to a boil. Once boiling, reduce the heat to a simmer.
- Add the Pasta and Meatballs: Add the pasta to the simmering broth and cook for about 5 minutes. Return the meatballs to the pot and continue to simmer for another 5 minutes, or until the pasta is cooked al dente.
- Add the Greens: Stir in the chopped spinach or escarole and cook for an additional 2-3 minutes, until the greens are wilted.
- Finish and Serve: Stir in the lemon juice, taste, and adjust seasoning with salt and pepper as needed. Serve the soup hot, garnished with additional Parmesan cheese if desired.
Extra Tips:
When making Italian Wedding Soup, you can customize the meatballs by using a combination of ground beef and pork for added flavor. If you prefer a lighter version, ground turkey or chicken can be used as well.
For an extra depth of flavor, consider adding a pinch of nutmeg to the meatball mixture. Additionally, if you’re planning to make the soup ahead of time, cook the pasta separately and add it just before serving to prevent it from becoming too soft.
This soup also freezes well, making it a convenient option for meal prep or future gatherings.
Tiramisu in a Jar
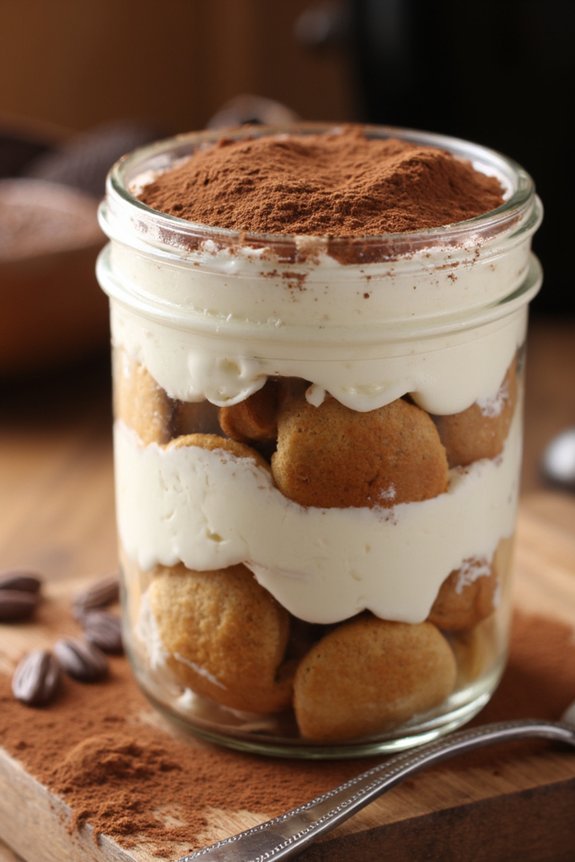
Tiramisu in a Jar is a delightful and charming twist on the classic Italian dessert, perfect for an Italian-themed potluck. This recipe captures the quintessential flavors of tiramisu – coffee-soaked ladyfingers, rich mascarpone cream, and a hint of cocoa – all beautifully presented in individual jars. Not only does this make serving a breeze, but it also adds an elegant touch to any gathering.
Plus, the jars make it easy to transport and serve, guaranteeing your dessert stays fresh and intact. This version of Tiramisu in a Jar is designed to serve 4-6 people, making it ideal for a small get-together or as part of a larger spread. The layering process is simple, yet the result is an indulgent treat that looks as impressive as it tastes. Each jar is filled with alternating layers of mascarpone cream and coffee-dipped ladyfingers, topped off with a dusting of cocoa powder for an irresistible finish.
Ingredients (Serves 4-6):
- 1 cup of brewed espresso or strong coffee, cooled
- 3 tablespoons coffee liqueur (optional)
- 3 large eggs, separated
- 1/2 cup granulated sugar
- 8 oz mascarpone cheese, room temperature
- 1 teaspoon vanilla extract
- 1 cup heavy cream
- 24 ladyfinger biscuits
- Unsweetened cocoa powder, for dusting
- 6 small jars or glasses for serving
Cooking Instructions:
- Prepare the Coffee Mixture: In a shallow dish, combine the brewed espresso or strong coffee with the coffee liqueur, if using. Set aside to cool completely.
- Make the Mascarpone Cream: In a large bowl, whisk the egg yolks and sugar together until the mixture is pale and creamy. Add the mascarpone cheese and vanilla extract, and continue whisking until smooth and well combined.
- Whip the Cream: In a separate bowl, whip the heavy cream until soft peaks form. Gently fold the whipped cream into the mascarpone mixture until fully incorporated and smooth.
- Beat the Egg Whites: In another clean bowl, beat the egg whites until stiff peaks form. Carefully fold the egg whites into the mascarpone and cream mixture, making sure not to deflate the volume.
- Assemble the Tiramisu Jars: Quickly dip each ladyfinger into the coffee mixture, making sure they’re soaked but not soggy. Place a layer of soaked ladyfingers at the bottom of each jar.
- Layer the Cream: Spoon a layer of the mascarpone cream over the ladyfingers in each jar. Repeat the process with another layer of coffee-soaked ladyfingers and top with more mascarpone cream, filling the jars.
- Chill the Dessert: Cover each jar with plastic wrap and refrigerate for at least 4 hours, or overnight if possible, to allow the flavors to meld together.
- Finish and Serve: Just before serving, dust the top of each tiramisu jar with a generous amount of unsweetened cocoa powder. Serve chilled, straight from the jar.
Extra Tips:
When making Tiramisu in a Jar, make sure that the coffee used is strong enough to impart a rich flavor to the ladyfingers. If you’re concerned about using raw eggs, you can use pasteurized eggs as a safer option.
For a non-alcoholic version, simply omit the coffee liqueur without compromising on taste. Adjust the number of ladyfingers for each layer based on the size of your jars to maintain a balanced ratio of cream to biscuit. Refrigerating overnight not only enhances the flavor but also improves the texture, making it even more delectable.
Lemon Ricotta Cookies

Lemon Ricotta Cookies are a delightful Italian treat that offers a perfect balance of tangy lemon flavor and creamy ricotta cheese. These cookies are soft, moist, and slightly cake-like, making them an irresistible addition to any potluck or gathering. The light and invigorating lemon glaze adds a sweet finish that complements the subtle flavors of the cookie.
Whether you’re serving them at a holiday party or enjoying them with a cup of tea, these cookies are sure to be a hit.
One of the best things about Lemon Ricotta Cookies is their ease of preparation. They require simple ingredients that you likely already have in your pantry, and they come together quickly without any complicated techniques. The key to their tender texture is the ricotta cheese, which keeps the cookies moist and flavorful.
The lemon zest and juice provide a bright, citrusy note that makes these cookies truly special. This recipe yields enough to serve 4-6 people, perfect for sharing with friends and family.
Ingredients:
- 2 cups all-purpose flour
- 1 teaspoon baking powder
- 1/2 teaspoon salt
- 1/2 cup (1 stick) unsalted butter, softened
- 1 cup granulated sugar
- 1 egg
- 1 cup ricotta cheese
- 3 tablespoons lemon juice
- Zest of 1 lemon
- 1 cup powdered sugar (for glaze)
- 2-3 tablespoons lemon juice (for glaze)
Instructions:
- Preheat and Prepare: Preheat your oven to 350°F (175°C). Line two baking sheets with parchment paper or silicone baking mats.
- Mix Dry Ingredients: In a medium bowl, whisk together the flour, baking powder, and salt. Set aside.
- Cream Butter and Sugar: In a large mixing bowl, cream the softened butter and granulated sugar together using an electric mixer on medium speed until light and fluffy, about 2-3 minutes.
- Add Egg and Ricotta: Beat in the egg until fully incorporated, followed by the ricotta cheese, lemon juice, and lemon zest. Mix until smooth.
- Combine Mixtures: Gradually add the dry ingredients to the wet ingredients, mixing on low speed until just combined. Don’t overmix.
- Scoop and Bake: Using a tablespoon or cookie scoop, drop spoonfuls of dough onto the prepared baking sheets, spacing them about 2 inches apart. Bake for 12-15 minutes or until the edges are lightly golden.
- Cool Cookies: Allow the cookies to cool on the baking sheets for 5 minutes before transferring them to a wire rack to cool completely.
- Prepare Glaze: In a small bowl, whisk together the powdered sugar and lemon juice until smooth. Adjust the consistency with additional powdered sugar or lemon juice as needed.
- Glaze Cookies: Once the cookies are completely cool, drizzle the lemon glaze over the tops using a spoon.
- Set Glaze: Allow the glaze to set for about 15 minutes before serving.
Extra Tips:
For an extra lemony kick, consider adding an additional teaspoon of lemon zest to the dough. If you prefer a thicker glaze, reduce the amount of lemon juice or add more powdered sugar.
These cookies can be stored in an airtight container at room temperature for up to 3 days. To make them ahead of time, you can prepare and freeze the dough balls, then bake them directly from the freezer, adding a few extra minutes to the baking time.
Enjoy these delightful cookies with a cup of tea or coffee for a truly invigorating treat.
Almond Biscotti
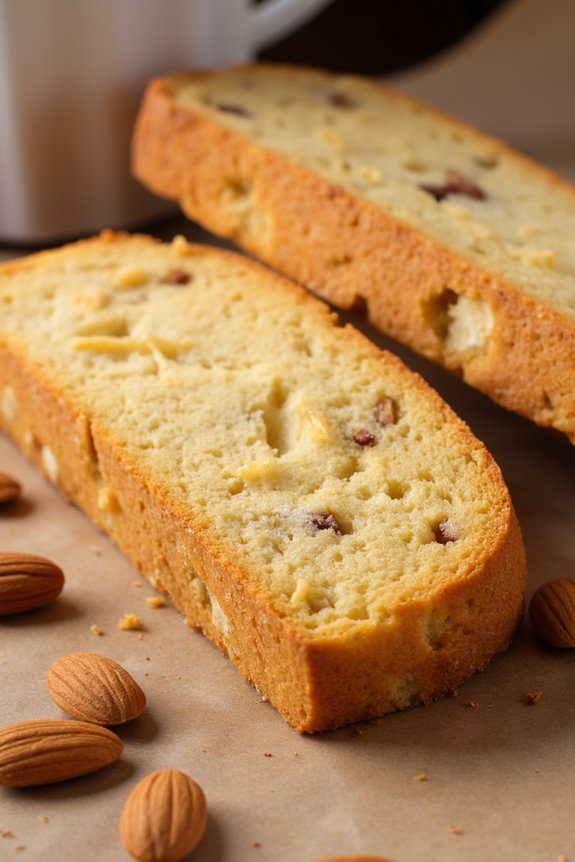
Almond Biscotti are classic Italian cookies that are enjoyed for their crunchy texture and delightful almond flavor. Perfect for dipping in coffee or tea, these biscotti are twice-baked to achieve their signature crispness. Traditionally, they’re made with simple ingredients and can be stored for a long time, making them ideal for sharing at a potluck or giving as a homemade gift. The combination of almonds provides a nutty richness that complements the subtle sweetness of the cookies.
This recipe yields enough Almond Biscotti to serve 4-6 people. The preparation is straightforward, requiring basic baking techniques and common pantry ingredients. Once you’ve mastered this recipe, you can easily customize it by adding your favorite nuts or dried fruits. Follow the steps carefully, and soon you’ll be enjoying these delightful treats with friends and family.
Ingredients:
- 2 cups all-purpose flour
- 1 cup granulated sugar
- 1 teaspoon baking powder
- 1/4 teaspoon salt
- 3 large eggs
- 1 teaspoon vanilla extract
- 1 teaspoon almond extract
- 1 cup whole almonds, toasted and coarsely chopped
Cooking Instructions:
- Preheat and Prepare: Preheat your oven to 350°F (175°C). Line a baking sheet with parchment paper to prevent sticking.
- Mix Dry Ingredients: In a large mixing bowl, combine the all-purpose flour, granulated sugar, baking powder, and salt. Stir these dry ingredients together until well combined.
- Whisk Eggs and Extracts: In a separate bowl, whisk together the eggs, vanilla extract, and almond extract until the mixture is smooth and well blended.
- Combine Wet and Dry Ingredients: Gradually add the wet mixture to the dry ingredients. Stir until a dough begins to form. The dough will be slightly sticky.
- Incorporate Almonds: Gently fold the chopped almonds into the dough until they’re evenly distributed throughout.
- Shape the Dough: Divide the dough in half. On a lightly floured surface, shape each half into a log about 12 inches long and 2 inches wide. Place the logs on the prepared baking sheet.
- First Bake: Bake in the preheated oven for 25-30 minutes, or until the logs are golden brown and firm to the touch.
- Cool and Slice: Remove the logs from the oven and let them cool for about 10 minutes. Using a serrated knife, slice the logs diagonally into 1/2-inch thick slices.
- Second Bake: Arrange the slices cut-side down on the baking sheet. Bake for an additional 10-12 minutes, then flip the slices and bake for another 10-12 minutes on the other side, until the biscotti are crisp and golden.
- Cool Completely: Transfer the biscotti to a wire rack to cool completely before serving or storing.
Extra Tips:
For an even crunchier texture, leave the biscotti in the oven with the heat turned off for an additional 10 minutes after the second bake.
Experiment with different nut varieties like pistachios or hazelnuts for a unique twist.
To guarantee even baking, make sure the biscotti slices are of uniform thickness.
Store the biscotti in an airtight container at room temperature; they can last for several weeks. Enjoy dipping them in your favorite coffee or tea for a delightful Italian treat.