

If you adore Italian flavors as much as I do, you’ll love these dessert recipes that use extra virgin olive oil to add a special touch. Picture a slice of moist Olive Oil Cake or a spoonful of creamy Chocolate Olive Oil Mousse. These 12 recipes bring a bakery-style twist to your table, sure to delight your taste buds. Each one is a testament to how olive oil can elevate classic desserts into something gourmet. Ready to explore these unique treats?
Classic Italian Olive Oil Cake
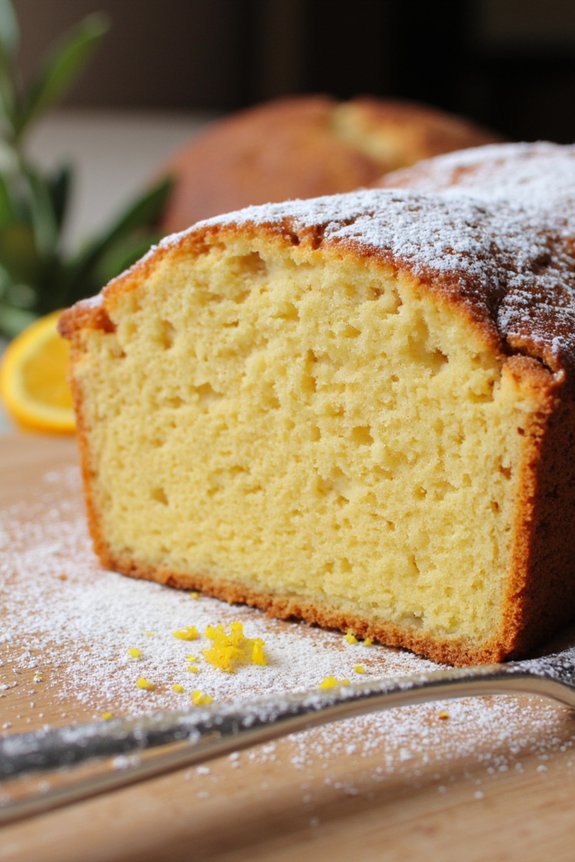
The Classic Italian Olive Oil Cake is a timeless dessert that beautifully showcases the rich flavors and smooth texture of high-quality olive oil. This cake is known for its moist crumb, delicate citrus notes, and subtly sweet profile, making it a versatile treat that pairs well with a variety of toppings or can be enjoyed on its own.
Traditionally served as a simple yet elegant dessert, the olive oil cake also makes for a delightful breakfast or afternoon snack, thanks to its light and airy texture.
With its origins deeply rooted in Italian culinary traditions, this cake captures the essence of rustic Italian baking, where quality ingredients shine through. The olive oil not only adds a unique flavor but also contributes to the cake’s tender and moist crumb. A hint of citrus zest and a sprinkle of powdered sugar finish the cake, adding a touch of brightness and sweetness that perfectly complements the olive oil’s robust flavor.
Whether you’re a seasoned baker or a novice in the kitchen, this Classic Italian Olive Oil Cake is bound to impress with its simplicity and depth of flavor.
Ingredients (serving size: 4-6 people):
- 1 3/4 cups all-purpose flour
- 1 teaspoon baking powder
- 1/2 teaspoon baking soda
- 1/4 teaspoon salt
- 1 cup granulated sugar
- 3 large eggs
- 1 cup high-quality extra virgin olive oil
- 3/4 cup whole milk
- 1 tablespoon grated lemon zest
- 1 tablespoon grated orange zest
- 1/4 cup freshly squeezed orange juice
- Powdered sugar for dusting
Instructions:
- Preheat the Oven: Begin by preheating your oven to 350°F (175°C). This guarantees that the oven is hot enough to bake the cake evenly from the start.
- Prepare the Baking Pan: Grease and flour a 9-inch round cake pan, making certain every nook and cranny is covered to prevent the cake from sticking. You can also line the bottom with parchment paper for extra assurance.
- Mix Dry Ingredients: In a medium bowl, whisk together the all-purpose flour, baking powder, baking soda, and salt. This helps distribute the leavening agents evenly throughout the flour.
- Beat Wet Ingredients: In a large bowl, beat the granulated sugar and eggs together using a hand mixer or stand mixer on medium speed until the mixture becomes thick and pale, about 3 minutes.
- Incorporate Olive Oil: Gradually add the olive oil to the sugar and egg mixture, continuing to beat on low speed until well combined. The mixture should be smooth and slightly thick.
- Combine with Citrus and Milk: Add the milk, lemon zest, orange zest, and orange juice to the wet mixture, mixing until just combined. The citrus elements add a fragrant aroma and flavor to the cake.
- Fold in Dry Ingredients: Gently fold the dry ingredient mixture into the wet mixture using a spatula, being careful not to overmix. Stir until just combined and no flour pockets remain.
- Bake the Cake: Pour the batter into the prepared cake pan, smoothing the top with a spatula. Bake in the preheated oven for 40-45 minutes, or until a toothpick inserted into the center of the cake comes out clean.
- Cool and Serve: Allow the cake to cool in the pan for about 15 minutes, then transfer it to a wire rack to cool completely. Once cooled, dust the top with powdered sugar before serving.
Extra Tips:
To enhance the citrus flavor, consider adding a teaspoon of vanilla extract to the batter for a subtle aromatic boost. Additionally, using high-quality olive oil is essential as it directly impacts the cake’s flavor and texture.
If you prefer a more pronounced citrus flavor, adding a bit more zest or a dash of citrus extract can elevate the cake’s fragrance and taste. Finally, this cake pairs wonderfully with fresh berries or a dollop of whipped cream for a more decadent presentation.
Lemon and Olive Oil Biscotti
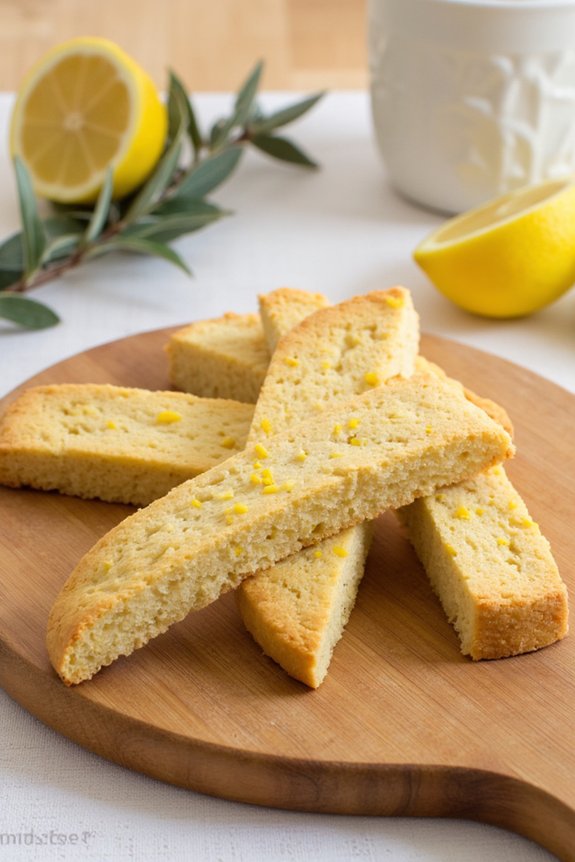
Lemon and Olive Oil Biscotti is a delightful Italian treat that combines the zesty flavor of fresh lemons with the rich, fruity notes of quality olive oil. This biscotti is perfect for those who appreciate a crisp, twice-baked cookie that’s not overly sweet but bursting with flavor. Traditionally enjoyed with a cup of coffee or tea, Lemon and Olive Oil Biscotti are ideal for breakfast, a snack, or even as a light dessert.
The addition of olive oil not only guarantees a tender crumb but also gives the biscotti a unique depth of flavor that pairs beautifully with the lemon zest and juice.
Making Lemon and Olive Oil Biscotti is a straightforward process that requires a few simple ingredients and a bit of patience during the baking process. The dough is first formed into logs and baked, then sliced and baked again to achieve that characteristic crunch. This recipe makes enough biscotti to serve 4-6 people, making it perfect for family gatherings or as a thoughtful homemade gift. The combination of lemon and olive oil is a match made in heaven, offering a revitalizing twist on the classic biscotti.
Ingredients for 4-6 servings:
- 2 cups all-purpose flour
- 1 cup granulated sugar
- 1 teaspoon baking powder
- 1/4 teaspoon salt
- 2 large eggs
- 1/4 cup extra virgin olive oil
- 1 tablespoon lemon zest
- 2 tablespoons lemon juice
- 1 teaspoon vanilla extract
- Optional: 1/2 cup sliced almonds
Cooking Instructions:
- Preheat the Oven: Start by preheating your oven to 350°F (175°C). Line a baking sheet with parchment paper or a silicone baking mat.
- Mix Dry Ingredients: In a medium-sized bowl, whisk together the all-purpose flour, baking powder, and salt. This guarantees that the baking powder is evenly distributed throughout the flour.
- Combine Wet Ingredients: In a separate large bowl, beat the eggs and sugar together until the mixture becomes pale and creamy. Then, gradually mix in the olive oil, lemon zest, lemon juice, and vanilla extract until all the ingredients are well combined.
- Form the Dough: Gradually add the dry ingredients into the wet mixture, stirring until just combined. If using, fold the sliced almonds into the dough. The dough will be sticky, but that’s perfect for biscotti.
- Shape the Logs: Divide the dough in half and shape each portion into a log about 12 inches long and 2 inches wide. Place the logs on the prepared baking sheet, leaving some space between them as they’ll expand during baking.
- First Bake: Bake the logs in the preheated oven for 25-30 minutes, or until they’re lightly golden and firm to the touch. Remove them from the oven and let them cool on a wire rack for about 10 minutes.
- Slice the Biscotti: Once slightly cooled, use a sharp serrated knife to slice the logs diagonally into 1/2-inch thick slices.
- Second Bake: Lay the biscotti slices cut side down on the baking sheet. Return them to the oven and bake for an additional 10-12 minutes, flipping them halfway through, until they’re golden and crisp.
- Cool and Serve: Allow the biscotti to cool completely on a wire rack before serving. They’ll continue to harden as they cool.
Extra Tips:
When making Lemon and Olive Oil Biscotti, using a high-quality extra virgin olive oil will greatly enhance the flavor of the biscotti. If you enjoy a more pronounced lemon flavor, feel free to increase the amount of lemon zest.
To achieve perfectly crisp biscotti, make sure that the logs are completely cooled before slicing, and use a gentle sawing motion with a serrated knife to avoid crumbling. Finally, store the biscotti in an airtight container at room temperature to maintain their crunchiness. Enjoy them with your favorite hot beverage for a truly delightful experience.
Chocolate Olive Oil Mousse
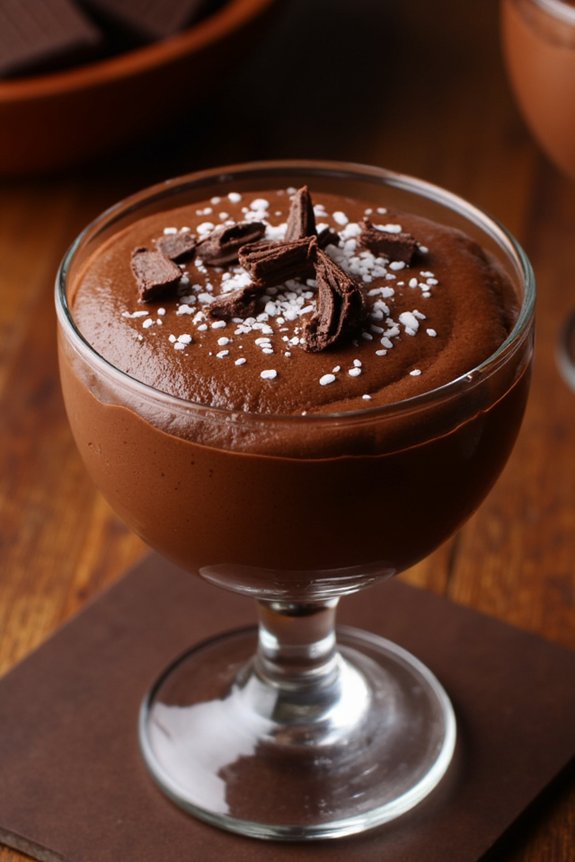
Indulge in the luxurious and velvety textures of Chocolate Olive Oil Mousse, a delightful dessert that brings together the richness of chocolate and the subtle, fruity notes of high-quality Italian olive oil. This dessert isn’t only a treat for the palate but also a feast for the senses, offering a balance of deep chocolate flavors and the unique, aromatic essence of olive oil.
Perfect for dinner parties or a special family gathering, this mousse is sure to impress with its elegant presentation and sophisticated taste.
Crafted to serve 4-6 people, this Chocolate Olive Oil Mousse is both simple to make and incredibly satisfying. The use of olive oil instead of traditional cream gives the mousse a lighter texture while enhancing the chocolate’s natural flavors.
Whether you’re a seasoned cook or a dessert novice, this recipe is designed to be approachable and rewarding, allowing you to create a restaurant-quality dessert at home with ease.
Ingredients:
- 200g dark chocolate (70% cocoa or higher)
- 100ml high-quality Italian olive oil
- 4 large eggs, separated
- 100g granulated sugar
- A pinch of sea salt
- 1 teaspoon vanilla extract
- Optional garnishes: shaved chocolate or a sprinkle of sea salt
Instructions:
- Prepare the Chocolate: Begin by roughly chopping the dark chocolate into small pieces and place them in a heatproof bowl. Set the bowl over a pot of gently simmering water, making certain the bottom of the bowl doesn’t touch the water. Stir occasionally until the chocolate is completely melted and smooth. Remove from heat and let it cool slightly.
- Incorporate Olive Oil: Once the chocolate has cooled slightly, slowly whisk in the olive oil until fully combined. The mixture should be glossy and smooth.
- Prepare the Egg Yolks: In a separate bowl, whisk the egg yolks with half of the sugar (50g) until pale and thick. Add the vanilla extract and a pinch of sea salt, then gradually fold in the chocolate and olive oil mixture until well blended.
- Whip Egg Whites: In a clean, dry bowl, beat the egg whites until soft peaks form. Gradually add the remaining sugar (50g) while continuing to beat until the whites form firm, glossy peaks.
- Combine Mixtures: Gently fold one-third of the whipped egg whites into the chocolate mixture to lighten it. Carefully fold in the remaining egg whites in two additions, ensuring not to deflate the mixture.
- Chill the Mousse: Spoon the mousse into individual serving glasses or bowls. Cover and refrigerate for at least 2 hours, or until set.
- Serve and Garnish: Before serving, optionally garnish with shaved chocolate or a sprinkle of sea salt to enhance the flavors. Enjoy your Chocolate Olive Oil Mousse at the perfect consistency!
Extra Tips:
To guarantee the best results, use high-quality dark chocolate and extra virgin olive oil, as these are key to the mousse’s flavor.
Be patient while folding the egg whites into the chocolate mixture, as a gentle touch preserves the mousse’s airy texture. If a more intense olive oil flavor is desired, consider using a robust, peppery olive oil.
This dessert can be made a day in advance, allowing the flavors to meld beautifully overnight.
Olive Oil and Almond Tart
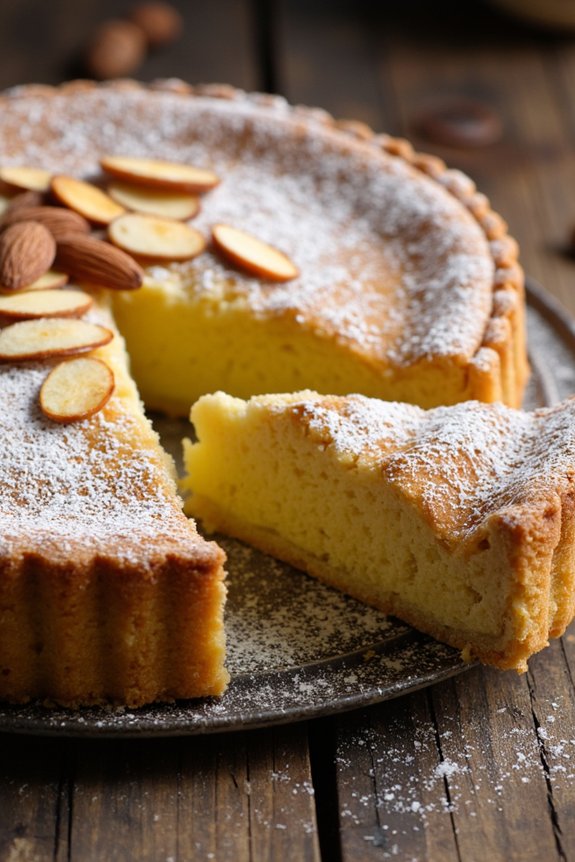
The Olive Oil and Almond Tart is a delightful Italian dessert that combines the rich, nutty flavor of almonds with the smooth, fruity notes of high-quality olive oil. This tart is a unique take on traditional desserts, offering a moist and tender crumb that’s perfectly complemented by a light, crispy crust. The use of olive oil not only enhances the flavor but also provides a healthier alternative to butter, making it a guilt-free indulgence.
Perfect for a casual family gathering or a more formal dinner party, this tart is sure to impress your guests with its elegant simplicity and sophisticated taste.
In addition to its delicious flavor, the Olive Oil and Almond Tart is also incredibly easy to make. With a few simple ingredients and straightforward steps, you can create this stunning dessert in no time. The combination of almond meal and olive oil creates a batter that’s both rich and aromatic, while the addition of lemon zest adds a revitalizing citrus note.
Once baked, the tart is adorned with a sprinkle of powdered sugar and a scattering of toasted almonds for a beautiful presentation. Serve it with a dollop of whipped cream or a scoop of vanilla ice cream for an extra touch of luxury.
Ingredients (Serves 4-6):
- 1 1/2 cups almond meal
- 1 cup all-purpose flour
- 1 cup granulated sugar
- 3/4 cup high-quality extra virgin olive oil
- 3 large eggs
- 1 teaspoon baking powder
- 1/2 teaspoon salt
- Zest of 1 lemon
- 1 teaspoon vanilla extract
- Powdered sugar, for dusting
- 1/4 cup sliced almonds, toasted
Instructions:
- Preheat the Oven: Start by preheating your oven to 350°F (175°C). This guarantees that your oven reaches the right temperature by the time your tart is ready to bake.
- Prepare the Tart Pan: Grease a 9-inch tart pan with a removable bottom with a little olive oil or line it with parchment paper. This will prevent the tart from sticking and make it easier to remove once baked.
- Mix Dry Ingredients: In a medium bowl, combine the almond meal, all-purpose flour, baking powder, and salt. Stir until well mixed. This will guarantee even distribution of the baking powder, which helps the tart rise.
- Combine Wet Ingredients: In a large mixing bowl, whisk together the eggs, granulated sugar, olive oil, lemon zest, and vanilla extract until smooth and well blended. The mixture should be pale and slightly thickened.
- Incorporate Dry Ingredients: Gradually add the dry ingredient mixture to the wet ingredients, stirring gently until just combined. Be careful not to overmix, as this can result in a tough texture.
- Pour into Pan: Pour the batter into the prepared tart pan, spreading it evenly with a spatula. Tap the pan lightly on the counter to release any air bubbles.
- Bake the Tart: Place the tart in the preheated oven and bake for 30-35 minutes, or until a toothpick inserted into the center comes out clean and the top is golden brown.
- Cool and Decorate: Allow the tart to cool in the pan for about 10 minutes before removing it. Once cooled completely, dust the top with powdered sugar and sprinkle with toasted sliced almonds for decoration.
Extra Tips:
For an even more pronounced almond flavor, you can replace a portion of the all-purpose flour with additional almond meal. To toast the sliced almonds, spread them in a single layer on a baking sheet and place in the preheated oven for 5-7 minutes, checking frequently to prevent burning.
If you want to add a little more zest to the tart, consider adding a tablespoon of freshly squeezed lemon juice to the batter. Always use fresh, high-quality olive oil for the best flavor, and remember that the quality of your ingredients can greatly affect the final taste of the tart.
Pistachio Olive Oil Gelato
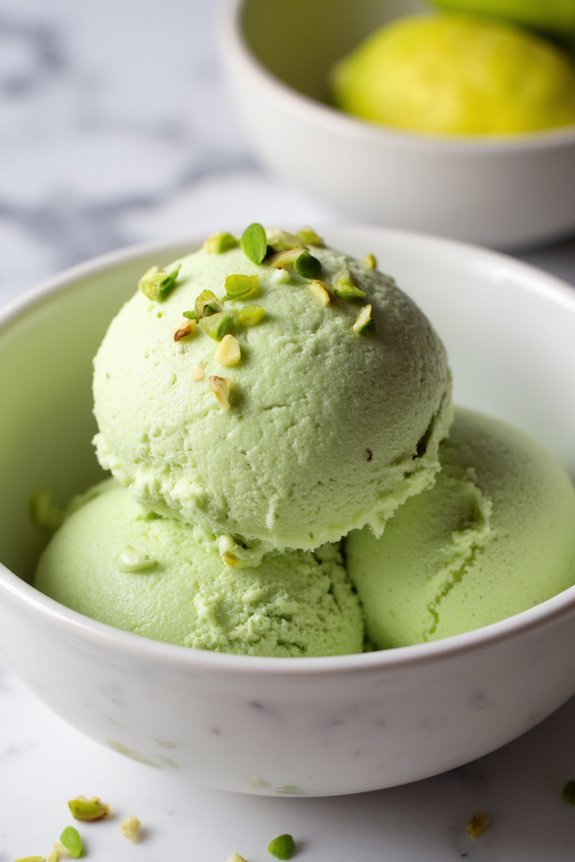
Indulge in the creamy, nutty delight of Pistachio Olive Oil Gelato, a unique take on a classic Italian dessert. This gelato combines the smooth richness of high-quality olive oil with the earthy flavor of pistachios, resulting in a luxurious treat that’s both invigorating and satisfying. The olive oil not only enhances the flavor of the pistachios but also adds a velvety texture to the gelato, making each bite a delightful experience.
Whether you’re looking to impress your dinner guests or simply want a special homemade dessert, this Pistachio Olive Oil Gelato is sure to be a hit.
The recipe begins by creating a rich custard base that’s infused with finely ground pistachios. By using an ice cream maker, this mixture is churned to perfection, resulting in a smooth and creamy gelato. The addition of a fruity extra virgin olive oil not only elevates the flavor but also adds a subtle complexity that distinguishes this gelato from other nut-flavored ice creams. A sprinkle of chopped pistachios on top adds a delightful crunch, making it an irresistible treat for any occasion.
Ingredients (Serves 4-6):
- 1 ½ cups whole milk
- 1 cup heavy cream
- ¾ cup granulated sugar
- 5 large egg yolks
- 1 cup unsalted pistachios, finely ground
- ½ cup extra virgin olive oil
- 1 teaspoon pure vanilla extract
- ¼ teaspoon salt
- ½ cup chopped pistachios for topping (optional)
Cooking Instructions:
- Prepare the Base: In a medium saucepan, combine whole milk, heavy cream, and half of the sugar. Heat the mixture over medium heat until it begins to steam, stirring occasionally. Don’t let it boil.
- Whisk the Yolks: In a separate bowl, whisk the egg yolks with the remaining sugar until the mixture is pale and thick.
- Temper the Yolks: Gradually add a small amount of the hot milk mixture to the egg yolks, whisking constantly to prevent the eggs from cooking. Once combined, pour the yolk mixture back into the saucepan with the remaining milk mixture.
- Cook the Custard: Cook the mixture over low heat, stirring constantly, until it thickens and coats the back of a spoon. This should take about 5-7 minutes. Don’t let it boil, or the eggs may curdle.
- Infuse with Pistachios: Remove the saucepan from heat and stir in the finely ground pistachios, olive oil, vanilla extract, and salt. Mix well to combine all the flavors.
- Chill the Mixture: Transfer the custard to a large bowl and cover it with plastic wrap, pressing it directly onto the surface to prevent a skin from forming. Refrigerate until completely chilled, about 2-3 hours or overnight.
- Churn the Gelato: Once chilled, pour the mixture into an ice cream maker and churn according to the manufacturer’s instructions, usually about 20-25 minutes, until it reaches a soft-serve consistency.
- Freeze the Gelato: Transfer the churned gelato to an airtight container and freeze for at least 2 hours to firm up before serving.
- Serve and Garnish: Before serving, allow the gelato to soften slightly at room temperature, about 5 minutes. Scoop into bowls and sprinkle with chopped pistachios, if desired.
Extra Tips:
For the best flavor, use fresh, high-quality pistachios and a fruity, high-grade olive oil. Be sure to grind the pistachios finely to avoid a gritty texture in the gelato.
If you don’t have an ice cream maker, you can still make this gelato by freezing the mixture in a shallow dish and stirring it every 30 minutes until it reaches the desired consistency. This method will result in a slightly less creamy texture but will still be delicious.
Enjoy your Pistachio Olive Oil Gelato as an invigorating end to any meal or as a delightful treat on a warm day.
Orange Olive Oil Pound Cake
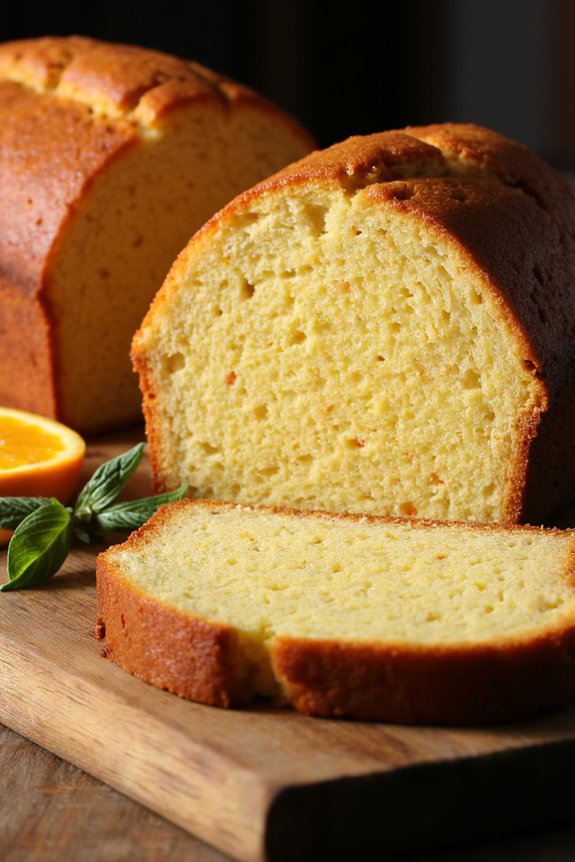
Orange Olive Oil Pound Cake is a delightful twist on the classic pound cake that incorporates the rich, fruity notes of high-quality Italian olive oil and the bright, invigorating zest of oranges. This dessert is perfect for those who appreciate the nuanced flavors of Mediterranean cuisine, bringing a touch of Italian sunshine to your table.
With its moist texture and aromatic citrus flavor, this cake is ideal for an afternoon tea or as a sophisticated end to a dinner party. The use of olive oil in place of butter not only makes the cake lighter but also adds a unique depth of flavor that pairs beautifully with the orange.
This cake is simple to make yet looks and tastes like a gourmet treat. Serve it alone or with a dollop of whipped cream or a scoop of vanilla ice cream to enhance the dessert experience. Whether you’re an olive oil aficionado or just curious to try something new, this Orange Olive Oil Pound Cake will surely impress.
Ingredients (Serves 4-6)
- 1 ½ cups all-purpose flour
- ¾ cup granulated sugar
- ½ teaspoon baking powder
- ½ teaspoon baking soda
- ¼ teaspoon salt
- ¾ cup extra virgin olive oil
- ¾ cup whole milk
- 3 large eggs
- Zest of 2 oranges
- ¼ cup fresh orange juice
- 1 teaspoon vanilla extract
Cooking Instructions
- Preheat the Oven: Begin by preheating your oven to 350°F (175°C). This guarantees that the cake will bake evenly from the moment it goes in.
- Prepare the Baking Pan: Grease a 9×5 inch loaf pan lightly with olive oil or line it with parchment paper for easy removal after baking.
- Mix Dry Ingredients: In a medium-sized bowl, whisk together the flour, sugar, baking powder, baking soda, and salt. Set aside. This step helps distribute the leavening agents evenly throughout the batter.
- Combine Wet Ingredients: In a large mixing bowl, whisk together the olive oil, milk, eggs, orange zest, orange juice, and vanilla extract until well combined. The olive oil will lend a lush texture to the cake.
- Incorporate Dry Ingredients: Gradually add the dry ingredients to the wet ingredients, stirring gently. Mix until just combined to avoid overworking the batter, which could make the cake tough.
- Pour and Bake: Pour the batter into the prepared loaf pan and smooth the top with a spatula. Bake for 45-50 minutes, or until a toothpick inserted into the center of the cake comes out clean.
- Cool and Serve: Allow the cake to cool in the pan for about 10 minutes, then transfer it to a wire rack to cool completely. Once cooled, slice and serve.
Extra Tips
When baking your Orange Olive Oil Pound Cake, it’s essential to use high-quality extra virgin olive oil, as this will notably impact the flavor of the finished cake. Freshly squeezed orange juice and zest will provide a more vibrant flavor than store-bought options.
If you prefer a more pronounced citrus flavor, consider adding a bit more orange zest. For a decorative touch, you can sprinkle some powdered sugar on top of the cake before serving.
Store any leftovers in an airtight container to keep the cake moist and delicious for up to three days.
Rosemary Olive Oil Cookies

Rosemary Olive Oil Cookies are a delightful Italian-inspired treat that perfectly balances the savory aroma of rosemary with the rich, fruity flavor of high-quality olive oil. These cookies aren’t only unique in flavor but also have a tender, melt-in-your-mouth texture that makes them irresistible.
Perfect for an afternoon tea or as a light dessert, these cookies are best enjoyed with a sprinkle of sea salt on top to enhance the flavors.
This recipe is designed to serve 4-6 people, making it ideal for small gatherings or family treats. The use of olive oil in the dough not only adds a depth of flavor but also keeps the cookies moist and tender. Fresh rosemary gives a subtle herbaceous note that pairs beautifully with the sweetness of the sugar, creating a cookie that’s both unexpected and delightful.
Ingredients (serving size: 4-6 people):
- 1 3/4 cups all-purpose flour
- 1/2 teaspoon baking soda
- 1/4 teaspoon salt
- 1/2 cup olive oil
- 3/4 cup granulated sugar
- 1 large egg
- 1 teaspoon vanilla extract
- 1 tablespoon finely chopped fresh rosemary
- Coarse sea salt, for sprinkling
Cooking Instructions:
- Preheat the Oven: Start by preheating your oven to 350°F (175°C). This guarantees that the cookies will bake evenly and develop a nice golden color.
- Prepare the Dry Ingredients: In a medium-sized bowl, whisk together the all-purpose flour, baking soda, and salt. This helps to evenly distribute the leavening agent and salt throughout the flour, guaranteeing a consistent texture in the cookies.
- Mix the Wet Ingredients: In a separate large bowl, combine the olive oil and granulated sugar. Use a whisk or an electric mixer to beat the mixture until it’s smooth and slightly fluffy. This step is essential for incorporating air into the batter, which will help the cookies rise.
- Add Egg and Vanilla: Add the egg and vanilla extract to the wet mixture. Mix until well combined. The egg acts as a binding agent, while the vanilla adds an additional layer of flavor.
- Incorporate Rosemary: Stir in the finely chopped rosemary. Make sure it’s evenly distributed throughout the mixture to guarantee each cookie has a burst of rosemary flavor.
- Combine Wet and Dry Mixtures: Gradually add the dry ingredients to the wet mixture, stirring until a dough forms. Be careful not to over-mix, as this can result in tough cookies.
- Shape the Cookies: Scoop tablespoon-sized portions of dough onto a baking sheet lined with parchment paper, spacing them about 2 inches apart. Flatten each ball slightly with the back of a spoon or your fingers.
- Sprinkle with Sea Salt: Lightly sprinkle each cookie with a pinch of coarse sea salt. This will enhance the flavors and add a pleasant crunch.
- Bake: Place the baking sheet in the preheated oven and bake for 10-12 minutes, or until the edges of the cookies are golden brown.
- Cool the Cookies: Remove the cookies from the oven and let them cool on the baking sheet for 5 minutes before transferring them to a wire rack to cool completely. This allows them to firm up and develop their full flavor.
Extra Tips:
- For the best flavor, use a high-quality extra virgin olive oil; its fruity notes will complement the rosemary beautifully.
- If you prefer a stronger rosemary flavor, you can increase the amount of rosemary to 1 1/2 tablespoons.
- These cookies can be stored in an airtight container at room temperature for up to a week, maintaining their freshness and flavor. Consider making a double batch, as they tend to disappear quickly!
Olive Oil and Fig Crostata
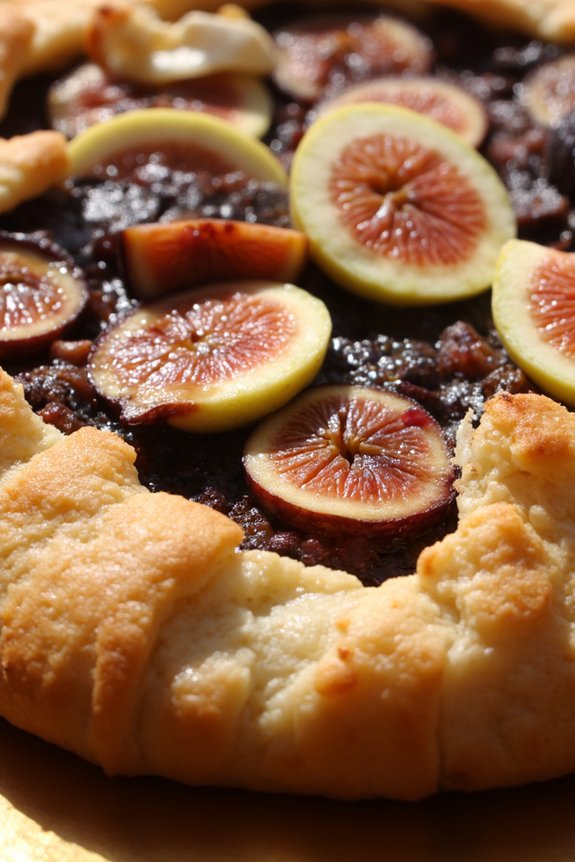
Indulge in the rustic charm of an Italian Olive Oil and Fig Crostata, a delightful dessert that beautifully combines the creamy richness of olive oil with the natural sweetness of figs. This crostata is a perfect treat for those who appreciate the subtleties of Italian cuisine, capturing the essence of the Mediterranean with each bite.
The olive oil-based crust is both tender and flaky, providing a perfect base for the luscious fig filling that’s lightly sweetened and infused with a hint of lemon zest. This dessert isn’t only a feast for the palate but also a visual delight with its golden-brown crust and jewel-like fig topping.
Ideal for serving 4-6 people, this Olive Oil and Fig Crostata is a sophisticated yet simple dessert that makes a wonderful centerpiece for any gathering. Whether you’re planning a cozy dinner party or a festive occasion, this crostata will surely impress your guests with its elegant flavors and rustic presentation.
With its straightforward preparation, even novice bakers can create this exquisite dessert with confidence.
Ingredients (serves 4-6):
- 1 ½ cups all-purpose flour
- ½ cup granulated sugar
- ¼ teaspoon salt
- ½ teaspoon baking powder
- ⅓ cup extra virgin olive oil
- 1 large egg
- 1 teaspoon vanilla extract
- Zest of 1 lemon
- 1 pound fresh figs, quartered
- 2 tablespoons honey
- 2 tablespoons lemon juice
- 2 tablespoons cornstarch
- 1 tablespoon milk (for brushing)
- Powdered sugar (for dusting, optional)
Instructions:
1. Prepare the Dough: In a large mixing bowl, combine the flour, sugar, salt, and baking powder. Whisk together to evenly distribute the dry ingredients. In a separate bowl, whisk the olive oil, egg, vanilla extract, and lemon zest until well combined. Gradually add the wet mixture to the dry ingredients and mix until a dough forms. If the dough is too sticky, add a bit more flour until it’s manageable.
Shape the dough into a disc, wrap it in plastic wrap, and refrigerate for at least 30 minutes.
2. Preheat the Oven: Preheat your oven to 350°F (175°C). Line a baking sheet with parchment paper to prevent sticking and facilitate easy cleanup.
3. Prepare the Fig Filling: In a medium bowl, combine the quartered figs, honey, lemon juice, and cornstarch. Gently toss the figs to coat them evenly. Let the mixture sit for about 10 minutes to allow the flavors to meld together.
4. Roll Out the Dough: On a floured surface, roll out the chilled dough into a rough circle about 12 inches in diameter and ¼ inch thick. Transfer the dough to the prepared baking sheet.
5. Assemble the Crostata: Spoon the fig mixture onto the center of the dough, leaving a 2-inch border around the edges. Gently fold the edges of the dough over the filling, pleating as you go to create a rustic edge. Brush the crust with milk to promote browning.
6. Bake the Crostata: Place the crostata in the preheated oven and bake for 35-40 minutes, or until the crust is golden brown and the figs are tender and bubbly. Remove from the oven and let cool on the baking sheet for at least 15 minutes.
7. Serve: Once slightly cooled, transfer the crostata to a serving platter. Dust with powdered sugar if desired, and serve warm or at room temperature.
Extra Tips:
For the best results, choose ripe but firm figs to guarantee they hold their shape during baking. If fresh figs are unavailable, dried figs can be rehydrated and used as a substitute.
When rolling out the dough, guarantee it’s of even thickness to promote even baking. Additionally, feel free to experiment with additional spices such as cinnamon or nutmeg in the filling for an extra layer of flavor.
Serving the crostata with a scoop of vanilla ice cream or a dollop of mascarpone cream can elevate this dessert to a truly decadent experience.
Olive Oil Panna Cotta
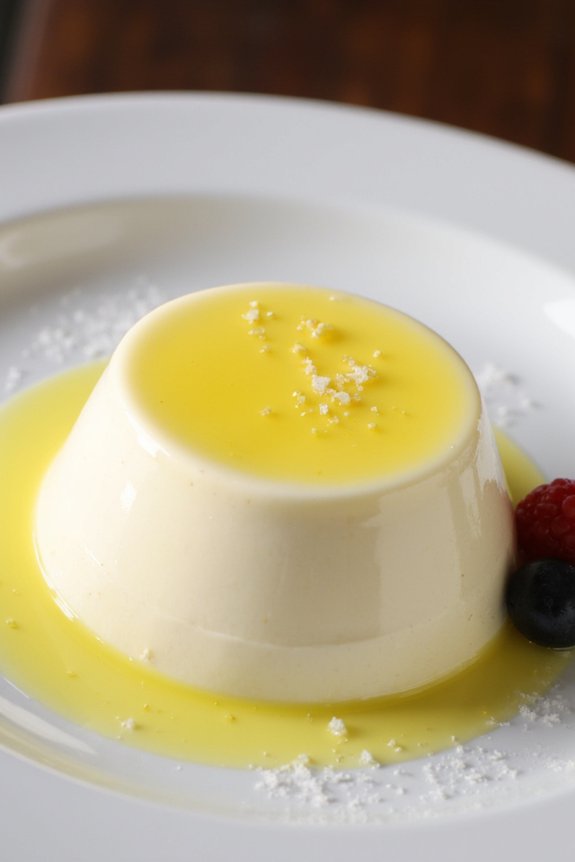
Indulge in the creamy, luscious texture of Olive Oil Panna Cotta, a delightful Italian dessert that elevates the classic panna cotta with the unique richness of high-quality extra virgin olive oil. This dessert offers a beautifully balanced blend of sweet and nutty flavors, making it a perfect choice for a sophisticated dinner party or a cozy family gathering.
The olive oil not only adds depth and complexity to the dish but also provides a smooth mouthfeel that complements the creamy base. Traditionally made with cream, sugar, and gelatin, panna cotta is transformed by the addition of olive oil, which imparts a subtle fruitiness and enhances the overall flavor profile.
This recipe for Olive Oil Panna Cotta serves 4-6 people, making it an ideal dessert for sharing. The panna cotta is best served chilled, topped with a drizzle of olive oil and a sprinkle of sea salt, or paired with fresh berries for added freshness and color.
Ingredients (serving size: 4-6 people):
- 2 cups heavy cream
- 1/2 cup whole milk
- 1/2 cup granulated sugar
- 1/4 cup high-quality extra virgin olive oil
- 1 tablespoon unflavored gelatin
- 1/4 cup cold water
- 1 teaspoon vanilla extract
- Pinch of sea salt
Instructions:
- Prepare the Gelatin: In a small bowl, sprinkle the gelatin over the cold water and let it sit for about 5 minutes. This allows the gelatin to bloom and guarantees it will dissolve smoothly in the cream mixture.
- Heat the Cream Mixture: In a saucepan, combine the heavy cream, whole milk, and granulated sugar. Place the saucepan over medium heat and stir occasionally until the sugar is completely dissolved and the mixture is hot but not boiling.
- Incorporate the Gelatin: Remove the cream mixture from the heat and add the bloomed gelatin. Stir gently until the gelatin is completely dissolved.
- Add Flavorings: Stir in the vanilla extract and a pinch of sea salt, mixing well to combine the flavors evenly.
- Blend in Olive Oil: Slowly pour in the extra virgin olive oil while continuously stirring to fully incorporate it into the mixture. The olive oil should blend smoothly without separating.
- Pour into Molds: Carefully pour the mixture into individual serving molds or ramekins. Allow the panna cotta to cool at room temperature for about 10 minutes.
- Chill: Transfer the molds to the refrigerator and let them chill for at least 4 hours, or until the panna cotta is set and firm.
- Serve: To serve, run a thin knife around the edge of each mold to loosen the panna cotta, then gently invert onto a serving plate. Drizzle with a bit more olive oil and a sprinkle of sea salt, or garnish with fresh berries if desired.
Extra Tips: When selecting olive oil for this recipe, opt for a high-quality, fruity extra virgin olive oil to enhance the flavor of the panna cotta. If you prefer a more pronounced olive oil taste, increase the amount slightly, but be cautious not to overpower the dessert’s delicate balance.
If you find it challenging to unmold the panna cotta, briefly dipping the molds in warm water can help release them more easily. Finally, this dessert pairs wonderfully with a light, crisp white wine or a dessert wine to complement the flavors.
Honey and Olive Oil Sorbet

Indulge in the invigorating and sophisticated flavors of Honey and Olive Oil Sorbet, a unique Italian-inspired dessert that will leave your palate delighted. This sorbet combines the fruity, slightly peppery notes of high-quality extra virgin olive oil with the natural sweetness of honey to create a silky and satisfying treat. Ideal for cleansing the palate after a rich meal or as a standalone dessert, this sorbet is a reflection of the versatility of olive oil in sweet dishes.
It’s a marvelous example of how simple, quality ingredients can be transformed into something extraordinary.
Preparing this sorbet is an uncomplicated process that requires minimal ingredients, yet the results are both elegant and flavorful. The smooth texture and aromatic qualities of the olive oil work in harmony with the honey, creating a delightful balance that’s sure to impress your guests or provide a moment of luxurious indulgence for yourself.
Perfect for serving 4-6 people, this recipe is a demonstration of the art of simplicity, allowing each ingredient to shine through in its own right.
Ingredients (serving size: 4-6 people):
- 1 cup water
- 1/2 cup honey
- 1/4 teaspoon salt
- 1/2 cup high-quality extra virgin olive oil
- 2 tablespoons fresh lemon juice
- Zest of 1 lemon
- Fresh mint leaves (optional, for garnish)
Instructions:
- Make the Honey Syrup: In a medium saucepan, combine the water, honey, and salt. Place the saucepan over medium heat and stir occasionally until the honey is fully dissolved. This should take about 2-3 minutes. Once dissolved, remove the saucepan from the heat and let the syrup cool to room temperature.
- Blend with Olive Oil: Once the syrup is cool, transfer it to a blender. Add the extra virgin olive oil to the blender and blend on medium speed until the mixture is fully emulsified and smooth. This step guarantees that the olive oil is evenly distributed within the sorbet, contributing to its rich texture.
- Add Lemon and Chill: Pour the lemon juice and zest into the blended mixture and give it one final blend to incorporate the citrus flavors thoroughly. Transfer the mixture to a shallow dish or airtight container and refrigerate for at least 2 hours, or until thoroughly chilled.
- Freeze the Sorbet: Once chilled, pour the mixture into an ice cream maker and churn according to the manufacturer’s instructions, usually about 20-25 minutes. The sorbet should have a light, airy texture when done.
- Set and Serve: Transfer the churned sorbet to a freezer-safe container and freeze for at least 2 additional hours before serving to allow it to firm up. Serve scoops of the sorbet in chilled bowls or glasses, garnished with fresh mint leaves if desired.
Extra Tips:
When selecting an olive oil for this sorbet, choose one that’s of high quality and has a fruity, peppery flavor profile; this will greatly enhance the taste of the dessert.
Be sure to chill the sorbet mixture thoroughly before churning to guarantee a smooth and even texture. If you don’t have an ice cream maker, you can freeze the mixture in a shallow dish and stir it every 30 minutes until it reaches the desired consistency, although this method may result in a slightly less smooth texture.
Finally, consider serving the sorbet in chilled bowls to keep it from melting too quickly, allowing your guests to savor every spoonful.
Olive Oil and Sea Salt Brownies
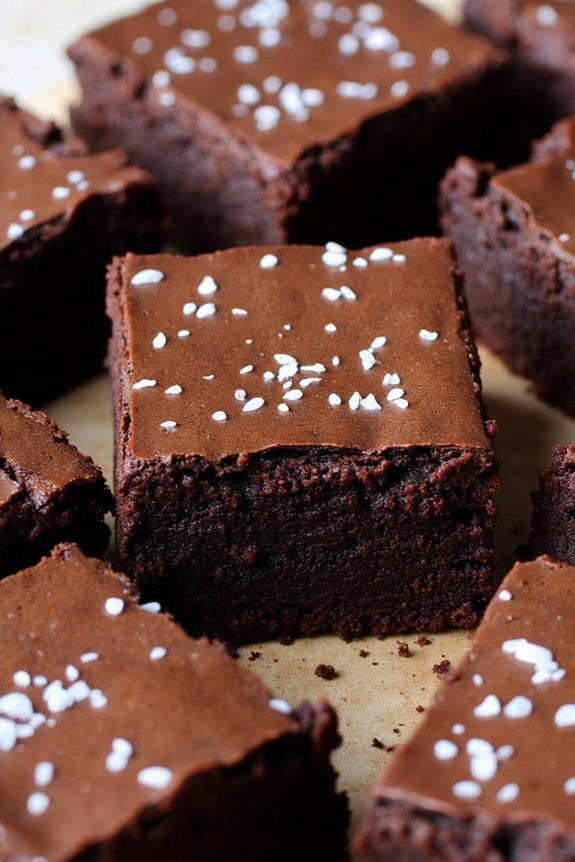
Indulge in a decadent fusion of flavors with these Olive Oil and Sea Salt Brownies, a unique twist on the classic brownie recipe. These brownies are enriched with the robust flavor of extra virgin olive oil, offering a subtle fruitiness that pairs beautifully with the rich cocoa. The sprinkle of sea salt on top enhances the chocolate flavor, creating a delightful contrast that elevates this dessert to a gourmet experience. Perfect for a sophisticated dinner party or a cozy night in, these brownies will impress even the most discerning palates.
These Olive Oil and Sea Salt Brownies aren’t only delicious but also easy to prepare, making them an ideal choice for both novice and experienced bakers. By substituting butter with olive oil, these brownies boast a moist, fudgy texture that’s irresistibly satisfying. Serve them warm with a scoop of vanilla ice cream or enjoy them on their own, and watch as they quickly become a favorite go-to dessert. Here’s how you can make them for 4-6 people:
Ingredients:
- 1/2 cup extra virgin olive oil
- 1 cup granulated sugar
- 3/4 cup unsweetened cocoa powder
- 1/4 teaspoon salt
- 1 teaspoon pure vanilla extract
- 2 large eggs
- 1/2 cup all-purpose flour
- 1/4 teaspoon baking powder
- 1/2 teaspoon coarse sea salt
Cooking Instructions:
- Preheat and Prepare: Preheat your oven to 350°F (175°C). Line an 8×8 inch baking pan with parchment paper or lightly grease it with olive oil to guarantee the brownies don’t stick.
- Mix Dry Ingredients: In a large mixing bowl, combine the cocoa powder, sugar, salt, and baking powder. Whisk these dry ingredients together until they’re well mixed.
- Add Wet Ingredients: Gradually add the olive oil and vanilla extract to the dry ingredients, mixing gently until the mixture is smooth and glossy.
- Incorporate Eggs: Crack the eggs into a small bowl and beat them lightly. Add the eggs to the brownie batter one at a time, stirring well after each addition until the mixture is fully combined.
- Fold in Flour: Sift the all-purpose flour over the batter and gently fold it in with a spatula just until no streaks of flour remain. Be careful not to overmix as this can make the brownies tough.
- Bake the Brownies: Pour the batter into the prepared baking pan and spread it evenly. Sprinkle the coarse sea salt evenly over the top of the batter for that perfect sweet-salty finish.
- Bake: Place the pan in the preheated oven and bake for 20-25 minutes, or until a toothpick inserted into the center comes out with a few moist crumbs. Don’t overbake to guarantee a fudgy texture.
- Cool and Serve: Allow the brownies to cool in the pan on a wire rack for at least 15 minutes before slicing. Serve warm or at room temperature.
Extra Tips:
For the best results, use a high-quality extra virgin olive oil as it greatly influences the flavor profile of these brownies. If you prefer a slightly more intense chocolate flavor, consider adding a handful of dark chocolate chips to the batter before baking.
Additionally, feel free to experiment with different types of sea salt, such as fleur de sel, to find your preferred level of saltiness. Remember, the key to the perfect brownie texture lies in not overbaking them, so keep a close eye on them as they near the end of their baking time. Enjoy your culinary creation!
Olive Oil Zucchini Bread
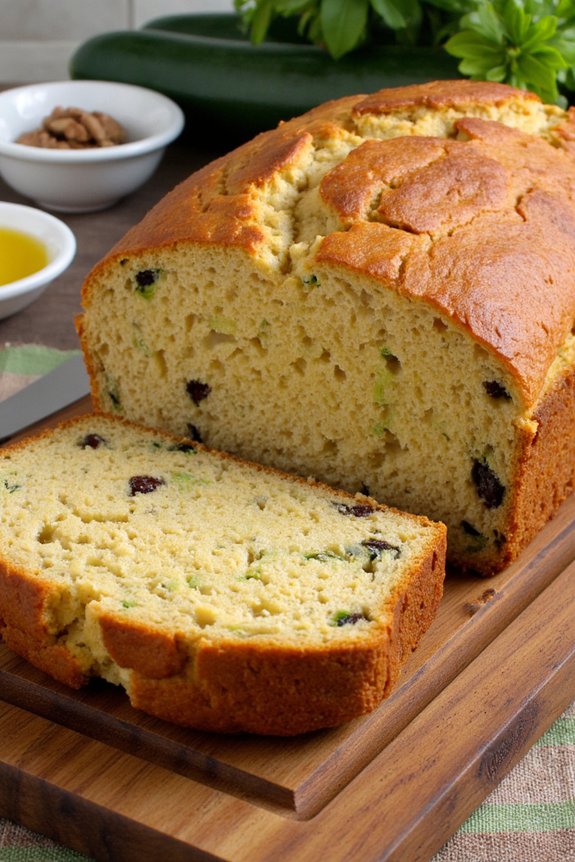
Olive Oil Zucchini Bread is a delightful twist on traditional zucchini bread, infusing it with a rich, fruity essence from extra virgin olive oil. This Italian-inspired recipe embraces the natural sweetness of zucchini while adding a moist texture that pairs beautifully with the subtle nutty flavor of olive oil. A perfect treat for breakfast or a midday snack, this bread is easy to make and certain to please a crowd.
This recipe combines the earthy flavors of zucchini with the aromatic intensity of olive oil, creating a healthy and flavorful loaf. The use of olive oil not only enhances the taste but also provides a healthier alternative to butter, making this zucchini bread both delicious and nutritious. Whether enjoyed plain or with a spread of your choice, Olive Oil Zucchini Bread is a classic dessert that brings a taste of Italy to your home kitchen.
Ingredients (Serves 4-6 people):
- 2 cups grated zucchini
- 2 cups all-purpose flour
- 1 cup granulated sugar
- 1/2 cup extra virgin olive oil
- 2 large eggs
- 1 teaspoon vanilla extract
- 1 teaspoon baking powder
- 1/2 teaspoon baking soda
- 1/2 teaspoon salt
- 1 teaspoon ground cinnamon
- 1/2 cup walnuts (optional)
- 1/2 cup raisins (optional)
Cooking Instructions:
- Preheat the Oven: Start by preheating your oven to 350°F (175°C). This guarantees the oven is hot enough to bake the bread evenly once it’s ready to go in.
- Prepare Zucchini: Wash the zucchini thoroughly and grate it using a box grater. You’ll need about 2 cups of grated zucchini. Place the grated zucchini in a clean kitchen towel and squeeze out the excess moisture. This step is essential to prevent the bread from becoming too soggy.
- Mix Dry Ingredients: In a large mixing bowl, combine the flour, sugar, baking powder, baking soda, salt, and cinnamon. Whisk these ingredients together until they’re well combined.
- Combine Wet Ingredients: In another bowl, beat the eggs, then add the olive oil and vanilla extract. Whisk together until the mixture is smooth and emulsified.
- Combine Wet and Dry Ingredients: Gradually add the wet ingredients to the dry ingredients, stirring gently until just combined. Be careful not to overmix, as this can make the bread tough.
- Fold in Zucchini: Gently fold the grated zucchini into the batter. If you’d like, stir in the walnuts and raisins at this point for added texture and flavor.
- Bake the Bread: Pour the batter into a greased 9×5-inch loaf pan. Smooth the top with a spatula. Bake in the preheated oven for 50-60 minutes, or until a toothpick inserted into the center comes out clean.
- Cool and Serve: Once baked, remove the loaf from the oven and let it cool in the pan for about 10 minutes. Then transfer it to a wire rack to cool completely before slicing and serving.
Extra Tips:
When making Olive Oil Zucchini Bread, you can experiment by adding different spices such as nutmeg or allspice for a unique flavor profile. Additionally, using high-quality olive oil will enhance the taste and aroma of the bread.
If you prefer a sweeter bread, consider adding a tablespoon of honey to the batter. To keep the bread moist, store it in an airtight container at room temperature for up to three days, or refrigerate for a longer shelf life.
Enjoy your homemade zucchini bread with a hot cup of coffee or tea for a perfect Italian-inspired treat!