

As the sun shines brightly, let’s embrace the delightful flavors of Italian summer. Picture the zesty Lemon Ricotta Pasta alongside the vibrant Grilled Vegetable Antipasto on your table. Each recipe captures the heart of Italy with its unique taste. Curious about how these dishes can elevate your summer gatherings? A delicious culinary adventure awaits you.
Lemon Ricotta Pasta

Lemon Ricotta Pasta is a delightful Italian summer recipe that combines the creamy richness of ricotta cheese with the bright and zesty flavor of fresh lemons. This dish is perfect for a warm evening meal, offering a revitalizing twist to traditional pasta dishes. The simplicity of the ingredients highlights the natural flavors, making it a great choice for both novice cooks and seasoned chefs looking to enjoy a taste of Italy in their own kitchen.
This recipe isn’t only delicious but also incredibly easy to prepare. With a few fresh ingredients and a short cooking time, you’ll have a meal that feels both indulgent and light. The combination of lemon and ricotta creates a silky sauce that clings to the pasta perfectly, while the addition of fresh herbs adds a burst of color and flavor. Whether you’re hosting a dinner party or simply want to enjoy a quick yet satisfying meal, Lemon Ricotta Pasta is sure to impress.
Ingredients (serves 4-6):
- 1 pound (450g) of pasta (such as fettuccine or spaghetti)
- 1 cup (250g) ricotta cheese
- Zest and juice of 2 lemons
- 1/2 cup (120ml) of reserved pasta cooking water
- 1/4 cup (60ml) extra-virgin olive oil
- Salt and freshly ground black pepper to taste
- 1/2 cup (50g) grated Parmesan cheese
- 1/4 cup (15g) fresh basil leaves, torn
- 1/4 cup (15g) fresh parsley, chopped
Cooking Instructions:
- Cook the Pasta: Bring a large pot of salted water to a boil. Add the pasta and cook according to the package instructions until al dente. Before draining, reserve 1/2 cup (120ml) of the pasta cooking water. Drain the pasta and set aside.
- Prepare the Ricotta Mixture: In a large mixing bowl, combine the ricotta cheese, lemon zest, lemon juice, and olive oil. Stir until smooth and creamy. Season with salt and freshly ground black pepper according to your taste preference.
- Combine Pasta and Sauce: Add the hot pasta to the bowl with the ricotta mixture. Toss well to coat the pasta thoroughly. Gradually add the reserved pasta cooking water, a little at a time, to help create a silky sauce that clings to the pasta.
- Add Cheese and Herbs: Stir in the grated Parmesan cheese, confirming it melts and mixes completely with the pasta. Add the torn basil leaves and chopped parsley, gently tossing everything together until the herbs are well distributed.
- Serve and Enjoy: Transfer the Lemon Ricotta Pasta to serving plates. Garnish with extra Parmesan cheese and a sprinkle of freshly ground black pepper if desired. Serve immediately and enjoy the fresh, vibrant flavors.
Extra Tips:
When preparing Lemon Ricotta Pasta, using high-quality ricotta cheese will enhance the creaminess and overall flavor of the dish. If you prefer a stronger lemon flavor, feel free to add more lemon zest or a splash of lemon juice.
Additionally, be sure to toss the pasta with the sauce immediately after cooking while the pasta is still hot; this confirms the ricotta mixture melts evenly and coats the pasta beautifully. For an extra touch of flavor, consider adding a pinch of red pepper flakes or a handful of toasted pine nuts.
Caprese Skewers
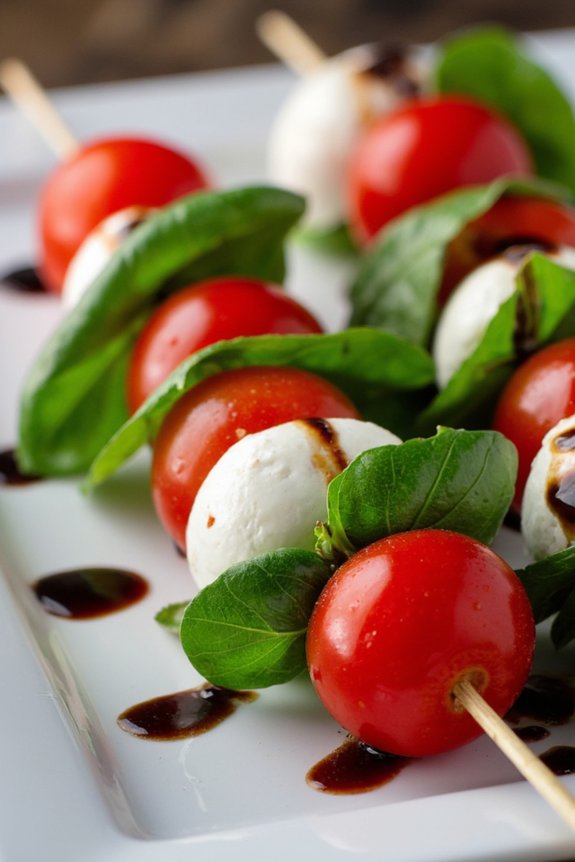
Caprese Skewers are the quintessential Italian summer appetizer, bringing together the fresh flavors of ripe tomatoes, creamy mozzarella, and aromatic basil. Perfect for entertaining or a light snack, these skewers are a no-cook delight that captures the essence of Italy with every bite.
The vibrant colors and simple ingredients make them as visually appealing as they’re delicious, offering a taste of the Mediterranean that’s both invigorating and satisfying.
These skewers aren’t only quick to assemble but also incredibly versatile, allowing for easy customization to suit your personal taste. Whether you’re hosting a garden party or enjoying a casual meal al fresco, Caprese Skewers are sure to impress.
With a drizzle of balsamic glaze adding a touch of sweetness, they balance the creamy and tangy elements beautifully. This recipe serves 4-6 people, making it a perfect choice for small gatherings or family meals.
Ingredients:
- 1 pint cherry tomatoes
- 1 pound fresh mozzarella balls (bocconcini)
- Fresh basil leaves
- 2 tablespoons extra-virgin olive oil
- Salt and pepper to taste
- Balsamic glaze
- Wooden or metal skewers
Instructions:
- Prepare the Ingredients: Begin by washing and drying the cherry tomatoes and fresh basil leaves. Drain the mozzarella balls if they’re packed in water.
- Assemble the Skewers: Take a skewer and thread a cherry tomato onto it, followed by a basil leaf and a mozzarella ball. Repeat this pattern until the skewer is filled, leaving a small space at each end for handling. Continue this process until all ingredients are used.
- Season the Skewers: Once assembled, lay the skewers on a serving platter. Drizzle them with extra-virgin olive oil, and sprinkle with salt and pepper to taste. This step enhances the natural flavors of the ingredients.
- Add the Finishing Touch: Just before serving, drizzle a small amount of balsamic glaze over the skewers. This adds a sweet and tangy flavor that complements the tomatoes and cheese beautifully.
- Serve and Enjoy: Serve the Caprese Skewers immediately. They’re best enjoyed fresh, retaining the crispness of the basil and the juiciness of the tomatoes.
Extra Tips: When selecting your ingredients, opt for the freshest basil and the ripest cherry tomatoes you can find, as their quality greatly impacts the dish’s flavor.
If you’re making these skewers ahead of time, assemble them and store them in the refrigerator, but remember to add the balsamic glaze just before serving to prevent sogginess. For an extra touch of flavor, consider marinating the mozzarella in olive oil and herbs for a few hours before assembling the skewers.
Grilled Vegetable Antipasto

Indulge in the vibrant flavors of summer with this delightful Grilled Vegetable Antipasto. This dish is a quintessential Italian appetizer, perfect for showcasing the bounty of fresh, seasonal produce.
Ideal for gatherings or family dinners, this colorful spread of grilled vegetables serves as a rejuvenating and healthy start to any meal. The slight char from grilling enhances the natural sweetness of the vegetables, while a drizzle of balsamic glaze adds a touch of tangy sophistication.
Designed to serve 4-6 people, this antipasto platter isn’t only visually appealing but also incredibly versatile. You can easily adjust the selection of vegetables based on what’s available or personal preference.
Whether served as a starter or a side dish, these grilled vegetables are sure to be a hit. Pair them with crusty Italian bread, your favorite cheese, or a glass of wine for the ultimate Italian summer experience.
Ingredients:
- 2 medium zucchinis, sliced lengthwise
- 2 red bell peppers, quartered and seeds removed
- 1 large eggplant, sliced into 1/2-inch rounds
- 1 red onion, sliced into rings
- 1 bunch asparagus, ends trimmed
- 1/4 cup extra virgin olive oil
- 2 tablespoons balsamic vinegar
- 3 cloves garlic, minced
- Salt and pepper to taste
- 1/4 cup fresh basil leaves
- 1/4 cup grated parmesan cheese (optional)
Cooking Instructions:
- Prepare the Vegetables: Start by washing and drying all your vegetables thoroughly. Slice the zucchinis and eggplant lengthwise, quarter the bell peppers, and slice the red onion into rings. Trim the asparagus ends to make sure they’re tender.
- Marinate the Vegetables: In a large bowl, combine the olive oil, balsamic vinegar, minced garlic, salt, and pepper. Add the sliced vegetables to the bowl and toss them gently until they’re all well coated with the marinade. Let them sit for at least 15-30 minutes to absorb the flavors.
- Preheat the Grill: Preheat your grill to medium-high heat. If you’re using a charcoal grill, allow the coals to become gray and ashy before adding the vegetables.
- Grill the Vegetables: Place the marinated vegetables directly onto the grill grates. Grill each side for about 3-5 minutes, or until you see nice grill marks and the vegetables are tender. Be sure to turn them occasionally to make certain of even cooking.
- Arrange the Antipasto: Once grilled, remove the vegetables from the grill and arrange them on a serving platter. Drizzle any remaining marinade over the top for extra flavor.
- Garnish and Serve: Sprinkle fresh basil leaves and grated parmesan cheese over the top of the grilled vegetables. Serve immediately while the vegetables are warm, accompanied by your choice of bread or cheese.
Extra Tips:
For an added depth of flavor, consider adding a sprinkle of smoked paprika or chili flakes to the marinade for a subtle kick.
If you prefer a stronger balsamic flavor, reduce the balsamic vinegar in a saucepan until thickened and drizzle over the vegetables just before serving.
Prosciutto and Melon Salad

Prosciutto and Melon Salad is a quintessential Italian summer dish that perfectly captures the essence of Mediterranean cuisine. This revitalizing salad combines the sweet juiciness of ripe melon with the salty savoriness of prosciutto, creating a delightful balance of flavors that’s both simple and elegant. Ideal as an appetizer or a light summer meal, this dish requires minimal preparation and no cooking, making it a favorite for hot summer days when you want something quick and satisfying.
The key to a successful Prosciutto and Melon Salad lies in the quality of the ingredients. Choose ripe, fragrant melons and high-quality prosciutto for the best results. The combination is then enhanced with a drizzle of balsamic glaze, a sprinkle of fresh basil, and a touch of freshly ground black pepper for added depth and complexity. This recipe serves 4-6 people, making it perfect for a small gathering or family meal.
Ingredients (serves 4-6):
- 1 ripe cantaloupe or honeydew melon
- 8-12 slices of prosciutto
- Fresh basil leaves (about 12-15 leaves)
- Balsamic glaze
- Freshly ground black pepper
Cooking Instructions:
- Prepare the Melon: Begin by cutting the melon in half and removing the seeds with a spoon. Carefully slice each half into 1-inch thick wedges, then remove the rind from each wedge. Cut the melon into bite-sized pieces or leave them as wedges, depending on your presentation preference.
- Arrange the Prosciutto: On a large serving platter, arrange the melon pieces or wedges. Gently drape the prosciutto slices over the melon. The contrast in colors between the melon and prosciutto adds to the visual appeal of the dish.
- Add Fresh Basil: Tear or julienne the fresh basil leaves and scatter them over the melon and prosciutto. The basil adds a fresh, aromatic note that complements the other flavors.
- Finish with Balsamic Glaze and Pepper: Drizzle a small amount of balsamic glaze over the salad. Be careful not to overdo it, as the glaze can easily overpower the dish. Finish with a light seasoning of freshly ground black pepper to taste.
Extra Tips:
For the best Prosciutto and Melon Salad, verify your melon is perfectly ripe by checking for a sweet aroma and slight softness at the stem end.
Prosciutto should be of high quality; look for thinly sliced pieces with a good balance of fat and meat. If balsamic glaze isn’t available, you can make a quick reduction by simmering balsamic vinegar until it thickens.
This salad is best served immediately after preparation to maintain the freshness of the ingredients. Enjoy it with a crisp white wine or a chilled glass of Prosecco for a truly Italian experience.
Tomato and Basil Bruschetta
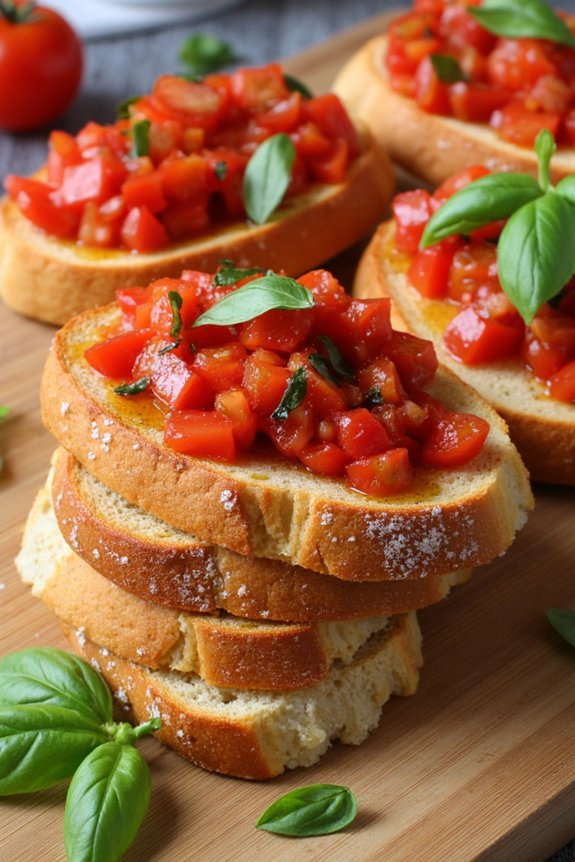
Tomato and Basil Bruschetta is a quintessential Italian appetizer that perfectly captures the essence of summer. This dish is a delightful combination of fresh, ripe tomatoes, fragrant basil, and crispy bread, bringing a burst of flavor and color to your table.
It’s an easy-to-make recipe that highlights the simplicity and freshness of Italian cuisine, making it an ideal choice for a summer gathering or a light snack. The contrast between the juicy tomatoes and the crunchy bruschetta makes every bite a joy, and the aromatic basil adds an herbaceous touch that elevates the dish to a new level.
What makes Tomato and Basil Bruschetta a favorite among many is its versatility and the ability to prepare it with minimal ingredients. It’s a dish that can be made in advance, allowing you to enjoy more time with your guests.
Whether you’re hosting a summer backyard party or simply enjoying a quiet evening at home, this bruschetta will surely impress. Make sure you use the freshest tomatoes and basil for the best results, as the quality of these ingredients will make a significant difference in the flavor of the final dish.
Ingredients for 4-6 servings:
- 6 ripe tomatoes
- 1 baguette or Italian loaf
- 2 cloves garlic
- 1/4 cup fresh basil leaves
- 3 tablespoons extra virgin olive oil
- Salt to taste
- Freshly ground black pepper to taste
- Balsamic glaze (optional)
Cooking Instructions:
- Prepare the Tomatoes: Start by washing and drying the tomatoes. Cut them into small, evenly sized pieces, discarding the seeds if desired. Place the chopped tomatoes in a bowl and season with salt and pepper. Set aside for the flavors to meld while you prepare the rest of the ingredients.
- Toast the Bread: Preheat your oven to 400°F (200°C). Slice the baguette or Italian loaf into 1/2-inch thick slices. Arrange the bread slices on a baking sheet and drizzle with a little olive oil. Toast them in the oven for about 5-7 minutes, or until they’re golden brown and crispy. Remove from the oven and let them cool slightly.
- Prep the Garlic and Basil: Peel the garlic cloves and cut them in half. Rub the cut side of the garlic on each toasted bread slice for a subtle garlic flavor. Chop the fresh basil leaves finely and mix them with the tomatoes.
- Assemble the Bruschetta: Spoon the tomato and basil mixture onto each slice of toasted bread. Drizzle with extra virgin olive oil and, if desired, a touch of balsamic glaze for added sweetness and depth of flavor.
- Serve: Arrange the bruschetta on a serving platter and garnish with additional basil leaves if desired. Serve immediately while the bread is still warm and crispy.
Extra Tips:
For the best Tomato and Basil Bruschetta, use the freshest ingredients you can find. Heirloom tomatoes are particularly flavorful and will enhance the dish.
If you prefer a stronger garlic flavor, you can mince the garlic and mix it directly with the tomatoes. Additionally, if you’re preparing the dish ahead of time, assemble the bruschetta just before serving to prevent the bread from becoming soggy.
Enjoy this delightful appetizer as it’s or pair it with a chilled glass of white wine for a perfect summer experience.
Panzanella Salad
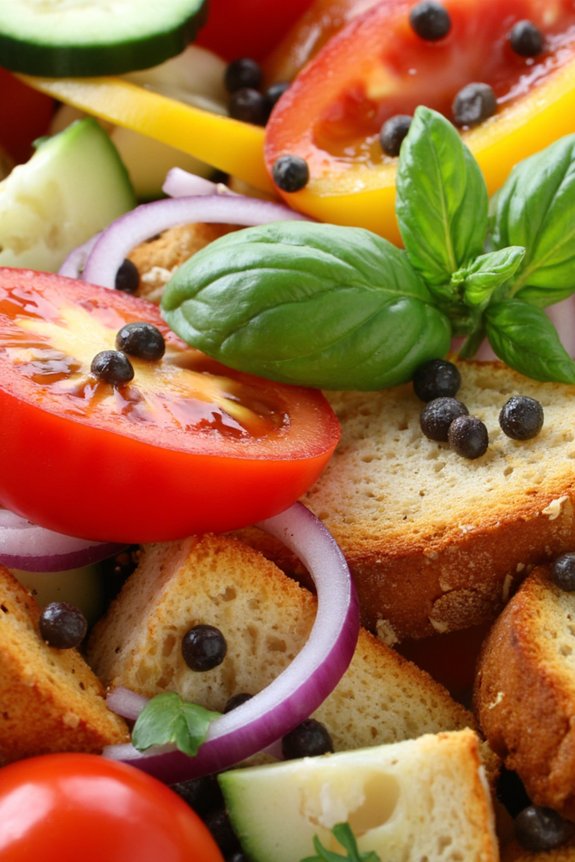
Panzanella is a classic Italian salad that captures the essence of summer with its vibrant colors and fresh flavors. Originating from the Tuscany region, this dish is traditionally made with ripe tomatoes, stale bread, and a medley of vegetables, all tossed together with a simple dressing.
It’s a perfect way to use up leftover bread and enjoy the bounty of summer produce. The key to a great Panzanella is using high-quality ingredients; fresh, juicy tomatoes and good olive oil make all the difference in bringing out the salad’s rich and invigorating taste.
This salad isn’t only easy to prepare but also versatile. You can personalize it with your favorite vegetables or herbs, making it a delightful addition to any summer meal. Whether served as a side dish or a light main course, Panzanella offers a taste of Italian summer in every bite.
This recipe serves 4-6 people and is perfect for a family gathering or a casual dinner with friends.
Ingredients (serving size: 4-6)
- 4 cups of stale Italian bread, cut into 1-inch cubes
- 1/2 cup of extra-virgin olive oil
- 2 tbsp of red wine vinegar
- 4 large ripe tomatoes, diced
- 1 cucumber, peeled and sliced
- 1 red onion, thinly sliced
- 1 yellow bell pepper, chopped
- 1/4 cup of capers, drained
- 1/4 cup of fresh basil leaves, torn
- Salt and freshly ground black pepper to taste
Cooking Instructions
- Prepare the Bread: Start by preheating your oven to 350°F (175°C). Spread the bread cubes evenly on a baking sheet and bake them for about 10 minutes, or until they’re dry and slightly golden. This step guarantees the bread absorbs the dressing without becoming soggy.
- Make the Dressing: In a small bowl, whisk together the extra-virgin olive oil and red wine vinegar. Season with salt and freshly ground black pepper to taste. Adjust the seasoning as needed for a balanced flavor.
- Assemble the Salad: In a large salad bowl, combine the diced tomatoes, sliced cucumber, red onion, and yellow bell pepper. Add the toasted bread cubes and capers.
- Toss the Salad: Pour the dressing over the salad mixture. Toss everything gently to coat the ingredients evenly, guaranteeing the bread absorbs the dressing and the flavors meld together.
- Add the Basil: Just before serving, add the torn basil leaves to the salad. Toss lightly to distribute the basil through the salad, enhancing its aroma and taste.
- Rest and Serve: Allow the salad to rest for at least 30 minutes at room temperature before serving. This resting period lets the flavors develop and the bread soak up the dressing.
Extra Tips
For the best results, use stale bread as it holds up better when mixed with the dressing. If your bread isn’t stale, you can dry it out in the oven, as mentioned in the instructions.
Adjust the amount of vinegar according to your taste preference; some may prefer a tangier salad. Feel free to experiment with additional ingredients like olives or mozzarella for added flavor.
Panzanella is best enjoyed fresh, but it can be stored in the refrigerator for a day if needed. Just be aware that the bread will continue to absorb moisture over time, potentially becoming softer.
Seafood Risotto

Indulge in the rich and aromatic flavors of the Italian coast with this seafood risotto, a quintessential summer dish that brings the fresh tastes of the sea to your table. This creamy, luscious risotto is a delightful combination of tender Arborio rice cooked slowly with a medley of seafood, infused with the essence of the sea and complemented by the subtle sweetness of white wine.
Each spoonful offers a burst of flavors, with the delicate taste of shrimp, mussels, and clams beautifully harmonizing with the savory notes of garlic and onion. This seafood risotto makes for an impressive dish that’s perfect for a summer dinner party or a cozy evening meal.
Despite its elegant presentation, this dish is quite simple to prepare, making it accessible even for novice cooks. The key to a perfect risotto is patience, allowing the rice to absorb the flavors gradually, resulting in a creamy texture that’s both satisfying and invigorating. Serve this seafood risotto with a chilled glass of white wine for the ultimate Italian summer dining experience.
Ingredients for 4-6 People:
- 1 1/2 cups Arborio rice
- 1 pound mixed seafood (shrimp, mussels, clams)
- 1 small onion, finely chopped
- 2 cloves garlic, minced
- 1/2 cup dry white wine
- 4 cups seafood or chicken broth
- 2 tablespoons olive oil
- 2 tablespoons unsalted butter
- Salt and black pepper to taste
- 1/4 cup grated Parmesan cheese
- Fresh parsley, chopped, for garnish
- Lemon wedges, for serving
Instructions:
- Prepare the Seafood: Clean and prepare your seafood. Peel and devein the shrimp, scrub the mussels, and rinse the clams under cold water. Discard any mussels or clams that are open and don’t close when tapped.
- Sauté the Aromatics: In a large saucepan, heat the olive oil over medium heat. Add the chopped onion and minced garlic, sautéing until the onion becomes translucent and fragrant.
- Toast the Rice: Add the Arborio rice to the pan, stirring well to coat the grains with the oil. Toast the rice for about 2 minutes until it becomes slightly translucent around the edges.
- Deglaze with Wine: Pour in the white wine, stirring continuously until it’s mostly absorbed by the rice. This step adds a lovely depth of flavor to the risotto.
- Gradually Add Broth: Begin adding the warm seafood or chicken broth, one ladle at a time, stirring frequently. Allow each addition of broth to be absorbed before adding the next, which should take about 18-20 minutes in total.
- Cook the Seafood: When the rice is about halfway cooked, add the seafood to the pan. Continue to add broth and stir until the seafood is cooked and the rice is al dente.
- Finish with Butter and Cheese: Once the rice is creamy and cooked to your liking, remove the pan from heat. Stir in the butter and grated Parmesan cheese, mixing until well combined. Season with salt and black pepper to taste.
- Garnish and Serve: Garnish the risotto with fresh parsley and serve immediately with lemon wedges on the side.
Extra Tips:
For the best results, make sure to use high-quality, fresh seafood to truly capture the essence of this dish. If you prefer a richer flavor, you can substitute some of the broth with fish stock.
Zucchini and Mint Frittata

Embrace the flavors of an Italian summer with a delightful Zucchini and Mint Frittata. This dish is a perfect representation of light and fresh summer cooking, combining the delicate taste of zucchini with the aromatic freshness of mint. Ideal for brunch, lunch, or a light dinner, this frittata is both nutritious and satisfying.
The frittata is simple yet elegant, showcasing the natural flavors of the ingredients and allowing you to experience a taste of Italy in your own kitchen. A frittata is an Italian-style omelet that’s hearty and versatile. It can be served warm or at room temperature, making it perfect for a leisurely summer meal.
The zucchini adds a tender, slightly sweet element, while the mint provides a revitalizing contrast. When cooked to perfection, the frittata is golden on the outside and tender on the inside, making it an appealing dish for both the eyes and the palate. This recipe serves 4-6 people, making it a great option for a family meal or small gathering.
Ingredients for 4-6 servings:
- 6 large eggs
- 2 medium zucchinis, thinly sliced
- 1 medium onion, finely chopped
- 3 tablespoons fresh mint leaves, chopped
- 1/2 cup grated Parmesan cheese
- 2 tablespoons olive oil
- Salt and pepper to taste
Cooking Instructions:
- Prepare the Ingredients: Begin by washing and drying the zucchinis. Once dry, slice them thinly. Chop the onion finely and set both aside. Rinse the mint leaves, pat them dry, and chop them coarsely.
- Beat the Eggs: In a large bowl, crack the eggs and beat them well. Add salt and pepper to taste, then stir in the grated Parmesan cheese and chopped mint leaves. Mix until all ingredients are well incorporated.
- Cook the Zucchini and Onion: Heat the olive oil in a large, non-stick skillet over medium heat. Add the chopped onion and sauté until it becomes translucent. Add the sliced zucchinis and cook until they’re tender, about 5-7 minutes. Stir occasionally to guarantee even cooking.
- Combine and Cook the Frittata: Once the zucchini and onions are cooked, evenly distribute them in the skillet. Pour the egg mixture over the vegetables, making sure it covers them completely. Reduce the heat to low and cook without stirring until the edges start to set, about 10 minutes.
- Finish Cooking: Preheat your oven to broil. Once the edges of the frittata are set, transfer the skillet to the oven. Broil for about 3-5 minutes, watching closely, until the top is golden brown and the center is set.
- Serve the Frittata: Remove the frittata from the oven and let it cool for a few minutes. Carefully slide it onto a serving plate and cut into wedges. Serve warm or at room temperature.
Extra Tips:
For a richer flavor, consider adding a handful of crumbled feta cheese to the egg mixture before pouring it over the vegetables. If you’re short on fresh mint, substitute with other fresh herbs such as basil or parsley for a different twist.
Make sure to use a skillet that’s oven-safe, as you’ll need to transfer it from the stovetop to the oven. If your skillet has a plastic handle, wrap it in aluminum foil to protect it from the heat. Finally, remember that the frittata can be a great make-ahead dish; it stores well and can be enjoyed cold or reheated gently for a quick meal later on.
Peach and Burrata Salad
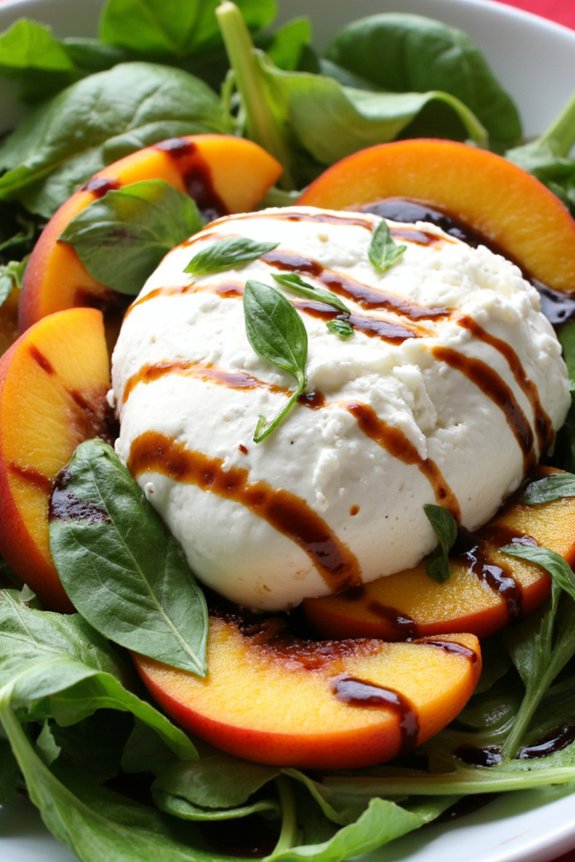
Indulge in the vibrant and fresh flavors of summer with a delightful Peach and Burrata Salad. This Italian-inspired dish is perfect for warm weather, combining the sweetness of juicy peaches with the creamy, rich taste of burrata cheese. The addition of fresh basil leaves and a drizzle of balsamic glaze adds a fragrant and tangy twist, making it a rejuvenating and elegant appetizer or side dish.
Whether you’re hosting a summer gathering or simply enjoying a quiet evening meal, this salad promises to captivate your taste buds with its harmonious blend of textures and flavors.
The Peach and Burrata Salad isn’t only visually appealing but also incredibly easy to prepare. Using fresh, high-quality ingredients is key to achieving the best results. This recipe serves 4-6 people, making it an excellent choice for entertaining friends and family.
With minimal effort and maximum flavor, this salad is sure to become a favorite go-to dish in your summer recipe collection.
Ingredients for 4-6 servings:
- 4 ripe peaches
- 2 balls of burrata cheese
- 2 cups arugula or mixed greens
- 1/4 cup fresh basil leaves
- 1/4 cup extra virgin olive oil
- 2 tablespoons balsamic glaze
- Salt and freshly ground black pepper to taste
Instructions:
- Prepare the Peaches: Begin by washing the peaches thoroughly. Slice each peach into thin wedges, approximately 8-10 slices per peach. Set aside in a bowl.
- Prepare the Greens: Rinse and dry the arugula or mixed greens. Arrange the greens evenly on a large serving platter or individual plates as the base of the salad.
- Slice the Burrata: Carefully drain the burrata cheese balls and gently pat them dry with paper towels. Using a sharp knife, slice each ball into halves or quarters, depending on your preference. Place the pieces of burrata on top of the greens.
- Assemble the Salad: Evenly distribute the peach slices over the greens and burrata. Tear the fresh basil leaves by hand and scatter them across the salad for a burst of flavor and color.
- Dress the Salad: Drizzle the extra virgin olive oil generously over the entire salad. Follow with a drizzle of balsamic glaze, creating a beautiful contrast and adding sweetness and acidity to the dish.
- Season and Serve: Finish by sprinkling salt and freshly ground black pepper to taste. Serve the salad immediately to guarantee that the ingredients retain their freshness and vibrant flavors.
Extra Tips:
For the best Peach and Burrata Salad, choose peaches that are ripe yet firm to the touch, guaranteeing they hold their shape when sliced. If burrata is unavailable, fresh mozzarella can be a suitable substitute, though it lacks the creamy center.
Feel free to experiment by adding other seasonal fruits like nectarines or berries for additional layers of flavor. Finally, if you prefer a stronger balsamic presence, consider using balsamic reduction instead of glaze for a more intense flavor.
Enjoy the invigorating taste of summer with this simple yet sophisticated salad!
Limoncello Sorbet

Transport yourself to the sun-drenched Amalfi Coast with a revitalizing scoop of Limoncello Sorbet. This delightful Italian dessert marries the bright and zesty flavors of lemons with the smooth, spiritous notes of limoncello, creating an irresistible treat perfect for cooling down on a hot summer day.
Whether served as a palate cleanser between courses or as a sweet finish to an alfresco meal, limoncello sorbet is a celebration of Italy’s love affair with lemons.
Crafting this sorbet at home is remarkably simple and requires only a handful of ingredients, making it a go-to recipe for impressing guests with minimal effort. The key to a perfect sorbet lies in achieving the right balance of sweetness and tartness, alongside a smooth texture that melts delicately on the tongue.
The following recipe will yield enough sorbet to serve 4-6 people, guaranteeing everyone has a chance to savor this Italian gem.
Ingredients for 4-6 servings:
- 1 cup fresh lemon juice (about 5-6 lemons)
- 1 cup granulated sugar
- 1 cup water
- 1/2 cup limoncello
- Zest of 2 lemons
- Pinch of salt
Instructions:
- Prepare the Simple Syrup: In a medium saucepan, combine the granulated sugar and water. Place over medium heat and stir occasionally until the sugar has completely dissolved, forming a simple syrup. This should take about 5 minutes. Remove from heat and allow the syrup to cool to room temperature.
- Mix the Ingredients: Once the simple syrup has cooled, combine it with the fresh lemon juice, limoncello, lemon zest, and a pinch of salt in a large mixing bowl. Stir well to guarantee that all the ingredients are fully integrated.
- Chill the Mixture: Cover the mixture and place it in the refrigerator for at least 2 hours, or until it’s thoroughly chilled. This step is vital for achieving a smooth texture when freezing the sorbet.
- Freeze the Sorbet: Pour the chilled mixture into an ice cream maker and churn according to the manufacturer’s instructions, usually about 20-25 minutes, until the sorbet reaches a thick, slushy consistency. If you don’t have an ice cream maker, you can place the mixture in a shallow container in the freezer and stir every 30 minutes until it achieves the desired texture.
- Set the Sorbet: Transfer the churned sorbet into a lidded container and freeze for an additional 2-3 hours to allow it to firm up. Scoop and serve the sorbet in chilled bowls or glasses for the best experience.
Extra Tips:
For an enhanced flavor profile, consider adding a few fresh mint leaves to the mixture before freezing, which will lend a subtle, revitalizing note to the sorbet.
Additionally, if you prefer a softer sorbet texture, remove it from the freezer about 10 minutes before serving to allow it to soften slightly.
When selecting lemons, opt for organic ones, as you’ll be using the zest and want to avoid any wax or pesticides.
Finally, if you find the sorbet too tart, feel free to adjust the sweetness by adding a bit more sugar to the simple syrup, tasting as you go to guarantee the perfect balance.
Enjoy your homemade limoncello sorbet as a taste of Italy’s vibrant summer!