

As a busy Italian food lover, I’ve discovered the magic of air frying that fits perfectly into my schedule. Arancini and calamari can now be enjoyed with all their delicious crunch, minus the deep-frying chaos. These 14 recipes bring all the flavors we love with much less hassle. Transforming your kitchen into an Italian bistro has never been easier. Let’s explore these delightful creations together!
Air Fryer Arancini

Arancini, a traditional Italian snack, are delicious rice balls that are stuffed with various fillings, coated in breadcrumbs, and typically deep-fried. With the advent of air fryers, you can now enjoy these delightful treats with a fraction of the oil, making them a healthier option while still retaining their deliciously crispy exterior.
The air fryer Arancini is perfect as an appetizer or a snack, and with this recipe, you can recreate this classic Italian dish in your own kitchen. This version of Arancini is filled with a classic combination of cheese and meat, providing a flavorful burst with every bite.
The rice is cooked to perfection, mixed with Parmesan cheese for an added depth of flavor, and then stuffed with a savory meat and mozzarella filling. The air fryer will give these Arancini a golden-brown, crunchy crust without the need for deep frying, making them a guilt-free indulgence for your family and friends.
Ingredients for 4-6 servings:
- 2 cups arborio rice
- 4 cups chicken broth
- 1 cup grated Parmesan cheese
- 1 tablespoon olive oil
- 1 small onion, finely chopped
- 2 cloves garlic, minced
- 1/2 cup marinara sauce
- 1/2 cup frozen peas, thawed
- 1/2 pound ground beef or sausage
- 1 cup shredded mozzarella cheese
- 3 large eggs
- 2 cups breadcrumbs
- Salt and pepper to taste
- Cooking spray
Instructions:
- Prepare the Rice: Begin by cooking the arborio rice in chicken broth. Bring the broth to a boil, add the rice, and reduce the heat to a simmer. Cook until tender and the liquid is absorbed, about 18-20 minutes. Stir in the Parmesan cheese and let the mixture cool.
- Cook the Filling: In a skillet, heat olive oil over medium heat. Add the chopped onion and garlic, sauté until translucent. Add the ground beef or sausage, cooking until browned. Stir in marinara sauce and peas, and cook for another 5 minutes. Season with salt and pepper, then let it cool.
- Form the Arancini: Once the rice and filling have cooled, whisk 2 eggs in a bowl. Take a small handful of rice, flatten it slightly, and place a spoonful of the meat mixture and a piece of mozzarella in the center. Enclose the filling with more rice, forming a ball. Repeat with the remaining ingredients.
- Coat the Arancini: Prepare a breading station with flour, beaten egg, and breadcrumbs in separate bowls. Roll each rice ball in flour, dip in egg, and coat with breadcrumbs. Confirm each ball is well covered.
- Air Fry the Arancini: Preheat your air fryer to 400°F (200°C). Lightly spray the Arancini with cooking spray and place them in the air fryer basket, ensuring they aren’t touching. Cook for 10-12 minutes, turning halfway through, until they’re golden brown and crispy.
Extra Tips:
For the best results, confirm that the rice and filling are completely cooled before shaping the Arancini to help them hold their shape better. If the mixture is too sticky, wet your hands slightly to make handling easier.
Feel free to experiment with different fillings, such as using mushrooms, spinach, or different cheeses to suit your taste preferences. Arancini can also be made ahead of time and stored in the refrigerator; simply reheat them in the air fryer before serving.
Crispy Air Fryer Calamari

Crispy Air Fryer Calamari is a delightful Italian appetizer that’s both delicious and easy to prepare. This dish takes the traditional deep-fried calamari and gives it a healthier twist by using the air fryer. The result is a perfectly crispy exterior with tender and succulent calamari inside, all achieved with considerably less oil.
Whether you’re hosting a dinner party or looking for a quick snack, this recipe is sure to impress your guests with its savory flavor and appealing texture.
The key to making the perfect Crispy Air Fryer Calamari lies in the seasoning and the cooking technique. The calamari rings are coated in a flavorful mixture of breadcrumbs, parmesan cheese, and spices, guaranteeing every bite is bursting with taste.
Cooking them in the air fryer not only reduces the amount of oil needed but also guarantees an even cook, giving your calamari a consistent crunch. This recipe serves 4-6 people, making it ideal for family gatherings or as a party appetizer.
Ingredients for 4-6 servings:
- 1 pound calamari rings
- 1 cup all-purpose flour
- 2 large eggs
- 1 cup breadcrumbs
- 1/4 cup grated parmesan cheese
- 1 teaspoon salt
- 1/2 teaspoon ground black pepper
- 1 teaspoon garlic powder
- 1 teaspoon dried oregano
- 1 teaspoon paprika
- Cooking spray
- Lemon wedges, for serving
- Marinara sauce, for dipping
Cooking Instructions:
- Prepare the Calamari: Rinse the calamari rings under cold water and pat them dry with paper towels. Make sure they’re completely dry to guarantee the coating sticks well.
- Set Up the Breading Station: Place the flour in a shallow bowl. In another bowl, beat the eggs. In a third bowl, combine the breadcrumbs, parmesan cheese, salt, black pepper, garlic powder, oregano, and paprika.
- Coat the Calamari: Dredge each calamari ring in the flour, shaking off any excess. Then dip it into the beaten eggs, allowing any excess to drip off. Finally, coat the calamari in the breadcrumb mixture, pressing gently to adhere the crumbs.
- Preheat the Air Fryer: Preheat your air fryer to 400°F (200°C) for about 5 minutes.
- Cook the Calamari: Lightly spray the air fryer basket with cooking spray to prevent sticking. Arrange the breaded calamari rings in a single layer in the basket, guaranteeing they don’t overlap. Lightly spray the tops of the calamari with cooking spray for extra crispiness.
- Air Fry the Calamari: Cook the calamari at 400°F (200°C) for 8-10 minutes, flipping them halfway through the cooking time, until they’re golden brown and crispy.
- Serve: Transfer the cooked calamari to a serving platter. Serve immediately with lemon wedges and marinara sauce for dipping.
Extra Tips:
For the best results, avoid overcrowding the air fryer basket as this can lead to uneven cooking. If necessary, cook the calamari in batches.
Additionally, you can experiment with different seasonings or add a touch of heat by incorporating cayenne pepper into the breadcrumb mixture. Make sure to serve the calamari right away to enjoy them at their crispiest.
If you prefer a gluten-free option, substitute the all-purpose flour and breadcrumbs with gluten-free alternatives.
Air Fryer Eggplant Parmesan

Air Fryer Eggplant Parmesan is a delightful and healthier twist on the classic Italian dish. By using an air fryer, you can achieve that perfect crispy texture without the need for excessive amounts of oil, making it a guilt-free indulgence. The eggplant slices are coated in a delicious mixture of breadcrumbs and Parmesan cheese, providing a satisfying crunch that complements the tender inside. Topped with marinara sauce and melted mozzarella, this dish is sure to become a family favorite with its rich flavors and comforting warmth.
This recipe is perfect for a serving size of 4-6 people, making it a great option for family dinners or gatherings. By preparing it in the air fryer, you not only save on calories but also cut down on cooking time, making it a convenient choice for busy weeknights. Pair it with a side of pasta or a fresh salad for a complete meal that everyone will love.
Ingredients:
- 2 large eggplants
- 1 cup all-purpose flour
- 3 large eggs
- 1 cup breadcrumbs
- 1 cup grated Parmesan cheese
- 1 teaspoon garlic powder
- 1 teaspoon dried oregano
- 1 teaspoon salt
- 1/2 teaspoon black pepper
- 2 cups marinara sauce
- 2 cups shredded mozzarella cheese
- Fresh basil leaves (optional, for garnish)
- Cooking spray
Instructions:
- Prepare the Eggplant: Wash and slice the eggplants into 1/4-inch thick rounds. Sprinkle salt over the slices and let them sit for about 20 minutes. This helps to draw out any bitterness. After 20 minutes, rinse the slices under cold water and pat them dry with a paper towel.
- Set Up the Breading Station: In three separate shallow bowls, place the flour in one, beat the eggs in the second, and combine the breadcrumbs, grated Parmesan cheese, garlic powder, dried oregano, salt, and black pepper in the third.
- Coat the Eggplant Slices: Dredge each eggplant slice in the flour, shaking off any excess, then dip it into the beaten eggs, and finally coat it thoroughly with the breadcrumb mixture. Confirm that each slice is evenly coated on all sides.
- Preheat the Air Fryer: Preheat your air fryer to 375°F (190°C) for about 5 minutes. This ensures that the eggplant cooks evenly and achieves a crispy texture.
- Fry the Eggplant: Lightly spray the air fryer basket with cooking spray. Place the breaded eggplant slices in a single layer in the basket, making sure not to overcrowd them. Spray the tops of the slices with a little more cooking spray. Cook in the air fryer for 10-12 minutes, flipping halfway through, until golden brown and crispy.
- Assemble the Dish: Once the eggplant slices are cooked, remove them from the air fryer. Spread a thin layer of marinara sauce at the bottom of a baking dish. Place a layer of eggplant slices over the sauce, then top with more marinara sauce and mozzarella cheese. Repeat the layers until all the eggplant is used, finishing with a layer of mozzarella on top.
- Melt the Cheese: Place the assembled dish back into the air fryer (if your air fryer is large enough) or under an oven broiler for about 5-7 minutes, until the cheese is melted and bubbly.
- Serve: Garnish with fresh basil leaves before serving for a pop of color and added flavor.
Extra Tips: When choosing eggplants, look for ones that are firm and shiny with no blemishes for the best results. You can adjust the seasoning in the breadcrumb mixture to your liking, adding some red pepper flakes for a little heat if desired.
If you have leftover eggplant slices, they can be stored in the refrigerator for up to 3 days or frozen for longer storage. To reheat, simply pop them back in the air fryer for a few minutes until heated through and crispy.
Air Fryer Italian Meatballs

Air Fryer Italian Meatballs are a delicious and healthier alternative to traditional fried meatballs, offering the classic Italian flavors you love with a fraction of the oil. Using an air fryer allows you to achieve a perfect golden-brown crust on the outside while keeping the inside juicy and tender. This recipe is perfect for a hearty family meal or a crowd-pleasing appetizer, and it pairs beautifully with your favorite pasta or a fresh salad.
These meatballs are made with a blend of ground beef and pork, seasoned with Italian herbs, garlic, and Parmesan cheese, guaranteeing they’re packed with flavor. The air fryer not only cooks the meatballs evenly but also reduces cooking time, making this dish quick and easy to prepare. Whether you’re a seasoned cook or a kitchen novice, you’ll find this recipe straightforward and rewarding.
Ingredients (Serves 4-6):
- 1 pound ground beef
- 1/2 pound ground pork
- 1/2 cup breadcrumbs
- 1/4 cup grated Parmesan cheese
- 1/4 cup milk
- 2 cloves garlic, minced
- 1 large egg
- 1 tablespoon dried Italian herbs
- Salt and pepper to taste
- Cooking spray
- Marinara sauce for serving (optional)
Cooking Instructions:
- Prepare the Mixture: In a large bowl, combine the ground beef, ground pork, breadcrumbs, Parmesan cheese, milk, minced garlic, egg, Italian herbs, salt, and pepper. Mix everything thoroughly until all the ingredients are well incorporated. It’s best to use your hands for mixing to guarantee even distribution of the ingredients.
- Shape the Meatballs: Once the mixture is well combined, use your hands to form the mixture into meatballs, each about 1.5 inches in diameter. This size is ideal for guaranteeing that the meatballs cook evenly in the air fryer.
- Preheat the Air Fryer: Preheat your air fryer to 400°F (200°C) for about 5 minutes. This step helps to guarantee that the meatballs start cooking immediately once they’re placed in the air fryer.
- Arrange the Meatballs: Lightly spray the air fryer basket with cooking spray to prevent sticking. Arrange the meatballs in a single layer in the basket. Make sure to leave a little space between each meatball to allow for even cooking. You may need to cook them in batches depending on the size of your air fryer.
- Cook the Meatballs: Cook the meatballs in the air fryer at 400°F (200°C) for 10-12 minutes. Halfway through the cooking time, shake the basket or turn the meatballs to guarantee they brown evenly on all sides.
- Check for Doneness: After the cooking time, check one of the meatballs by cutting it open to guarantee it’s cooked through. The meat should no longer be pink, and the internal temperature should reach at least 160°F (71°C).
- Serve: Once cooked, remove the meatballs from the air fryer and let them rest for a couple of minutes. Serve them warm with marinara sauce or your favorite pasta dish.
Extra Tips: For an extra burst of flavor, consider adding chopped fresh parsley or basil to the meatball mixture. If you prefer a spicier kick, a dash of red pepper flakes can be added to the seasoning.
When shaping the meatballs, try to keep them uniform in size to guarantee even cooking. If you plan to make this dish ahead of time, the uncooked meatballs can be frozen and cooked directly from frozen in the air fryer, though you may need to extend the cooking time by a few minutes.
Crunchy Air Fryer Zucchini Fries

Crunchy Air Fryer Zucchini Fries are the perfect guilt-free snack or side dish that brings the flavors of Italy right to your kitchen. These fries are a healthier alternative to traditional deep-fried options and are incredibly easy to prepare using an air fryer. The combination of crispy-coated zucchini with a hint of Italian seasoning makes these fries a delightful treat for both kids and adults.
Whether you’re looking to serve them as an appetizer, a side dish, or a snack, these zucchini fries are sure to be a hit with your family and friends.
Made with fresh zucchini, these fries are coated with a savory blend of breadcrumbs, Parmesan cheese, and Italian herbs. The air fryer guarantees they turn out perfectly crispy on the outside while remaining tender on the inside, without the excess oil. This recipe isn’t only easy to follow but also allows for versatility, whether you want to add more spice or keep it mild.
With a serving size of 4-6 people, this dish is perfect for gatherings or family dinners, offering a nutritious twist on a classic favorite.
Ingredients for 4-6 servings:
- 3 medium zucchini
- 1 cup of breadcrumbs
- 1/2 cup of grated Parmesan cheese
- 1 teaspoon of Italian seasoning
- 1/2 teaspoon of garlic powder
- 1/4 teaspoon of salt
- 1/4 teaspoon of black pepper
- 2 large eggs
- Olive oil spray
Cooking Instructions:
- Prepare the Zucchini: Wash the zucchini thoroughly and pat them dry with a paper towel. Trim the ends off each zucchini and cut them into fry-sized sticks, approximately 1/2 inch thick.
- Set up the Breading Station: In a shallow bowl, combine the breadcrumbs, grated Parmesan cheese, Italian seasoning, garlic powder, salt, and black pepper. Mix well to guarantee the seasonings are evenly distributed. In a separate bowl, beat the eggs until they’re well mixed.
- Coat the Zucchini: Dip each zucchini stick into the beaten eggs, allowing any excess to drip off. Then, coat the stick in the breadcrumb mixture, pressing gently to guarantee the breadcrumbs adhere. Repeat this process until all zucchini sticks are coated.
- Preheat the Air Fryer: Preheat your air fryer to 400°F (200°C) for about 5 minutes. This step is vital for achieving a crispy exterior.
- Arrange and Cook: Lightly spray the air fryer basket with olive oil spray to prevent sticking. Place the zucchini fries in a single layer in the basket, ensuring they don’t overlap. You may need to cook them in batches depending on the size of your air fryer.
- Air Fry the Zucchini Fries: Cook the zucchini fries for 10-12 minutes, flipping them halfway through the cooking time, until they’re golden brown and crispy. Adjust the cooking time as necessary based on your air fryer model.
- Serve: Once cooked, remove the zucchini fries from the air fryer and let them cool slightly before serving. Enjoy them with your favorite dipping sauce.
Extra Tips:
For extra crispiness, try double-coating the zucchini by repeating the egg and breadcrumb steps. This will create a thicker crust. If you prefer a spicier kick, add a pinch of cayenne pepper or red pepper flakes to the breadcrumb mixture.
Be sure not to overcrowd the air fryer basket, as this can prevent the fries from cooking evenly. If you find that your fries aren’t browning as desired, a light mist of olive oil spray over the top before cooking can help achieve a more golden finish.
Air Fryer Mozzarella Sticks

Air Fryer Mozzarella Sticks is a delicious and healthier twist on the classic appetizer, perfect for serving at parties or enjoying as a snack. By utilizing an air fryer, you eliminate the need for excessive oil while still achieving a crispy, golden exterior and a gooey, cheesy interior. This method not only reduces the mess associated with traditional frying but also makes it a more convenient option for home cooks.
Whether you’re planning a family gathering or just craving a cheesy treat, these air fryer mozzarella sticks are sure to be a crowd-pleaser.
The key to realizing the perfect mozzarella sticks lies in the preparation and cooking technique. By freezing the cheese before coating it with breadcrumbs, you ascertain that the cheese doesn’t melt too quickly, allowing the breadcrumb coating to crisp up perfectly. Additionally, using a double coating of breadcrumbs provides an extra crispy texture.
Serve these mozzarella sticks with your favorite marinara sauce or ranch dressing for dipping, and you’ll have a delightful appetizer that’s both satisfying and easy to prepare.
Ingredients (Serves 4-6):
- 12 mozzarella cheese sticks
- 1 cup all-purpose flour
- 2 large eggs
- 2 tablespoons milk
- 2 cups Italian seasoned breadcrumbs
- 1 teaspoon garlic powder
- 1 teaspoon onion powder
- 1 teaspoon dried oregano
- Cooking spray
- Marinara sauce for serving (optional)
Cooking Instructions:
- Prepare the Cheese Sticks: Begin by freezing the mozzarella cheese sticks for at least 1 hour. This prevents the cheese from melting too quickly during cooking.
- Set Up the Breading Station: In three separate shallow dishes, place the flour in the first dish, whisk together the eggs and milk in the second dish, and combine the breadcrumbs, garlic powder, onion powder, and dried oregano in the third dish.
- Coat the Cheese Sticks: Dredge each frozen cheese stick in the flour, ensuring it’s fully coated. Shake off any excess flour. Next, dip the cheese stick into the egg mixture, allowing any excess to drip off. Finally, roll the cheese stick in the breadcrumb mixture, pressing gently to adhere. For an extra crispy coating, repeat the egg and breadcrumb steps once more.
- Preheat the Air Fryer: Preheat your air fryer to 390°F (200°C) for about 5 minutes.
- Arrange and Cook: Lightly spray the air fryer basket with cooking spray, then arrange the coated mozzarella sticks in a single layer without touching. Lightly spray the tops of the mozzarella sticks with cooking spray as well.
- Air Fry: Cook the mozzarella sticks in the preheated air fryer for 6-8 minutes, or until golden brown and crispy. It’s important to monitor them to prevent overcooking.
- Serve: Remove the mozzarella sticks from the air fryer and serve immediately with marinara sauce or your preferred dipping sauce.
Extra Tips:
To ascertain the best results, make sure the mozzarella sticks are thoroughly frozen before breading, as this helps maintain their shape during cooking. If you find any mozzarella sticks bursting open while frying, reduce the cooking time slightly or check the air fryer temperature.
Additionally, consider experimenting with different seasoning blends in the breadcrumbs for a personalized touch. If you have leftovers, reheat them in the air fryer to maintain their crispiness.
Air Fryer Italian Sausage and Peppers

Italian Sausage and Peppers is a classic comfort dish that marries the flavors of robust sausage with the natural sweetness of bell peppers and onions. Traditionally cooked on the stovetop or in the oven, this dish can now be easily prepared using an air fryer, making it a quick and convenient option for weeknight dinners.
The air fryer not only speeds up the cooking process but also enhances the flavors by providing a nice char on the sausage and vegetables, creating a delicious caramelization that pairs perfectly with pasta, crusty bread, or even on its own.
This recipe for Air Fryer Italian Sausage and Peppers is designed to serve 4-6 people, making it ideal for family dinners or small gatherings. The dish comes together with minimal ingredients, each contributing to a harmonious blend of flavors and textures.
Whether you’re a seasoned home cook or new to using an air fryer, this recipe is straightforward and guarantees delicious results every time. So let’s plunge into the ingredients and steps needed to create this mouthwatering meal.
Ingredients (Serves 4-6):
- 4 Italian sausages (mild or spicy, as preferred)
- 2 large bell peppers (red and green, sliced)
- 1 large onion (sliced)
- 2 tablespoons olive oil
- 1 teaspoon garlic powder
- 1 teaspoon dried oregano
- 1 teaspoon dried basil
- Salt and pepper to taste
- Fresh parsley for garnish (optional)
Cooking Instructions:
- Preheat the Air Fryer: Start by preheating your air fryer to 375°F (190°C). Preheating guarantees that the sausages and vegetables cook evenly and develop a nice char.
- Prepare the Ingredients: While the air fryer is preheating, slice the bell peppers and onion into strips. Place them in a large mixing bowl.
- Season the Vegetables: Add olive oil, garlic powder, dried oregano, dried basil, salt, and pepper to the bowl with the sliced vegetables. Toss everything together until the vegetables are well coated with the seasoning.
- Arrange in the Air Fryer: Place the seasoned vegetables in the bottom of the air fryer basket in an even layer. Lay the Italian sausages on top of the vegetables. This arrangement guarantees that the juices from the sausages flavor the vegetables as they cook.
- Cook in the Air Fryer: Cook the sausage and peppers in the air fryer for 20-25 minutes, shaking the basket halfway through to guarantee even cooking. The sausages should be golden brown and cooked through, and the vegetables should be tender with a slight char.
- Check for Doneness: Use a meat thermometer to verify the sausages have reached an internal temperature of at least 160°F (71°C). Adjust cooking time if necessary.
- Serve and Garnish: Once cooked, remove the sausages and peppers from the air fryer. Slice the sausages if desired and serve with the peppers and onions. Garnish with fresh parsley for an added touch of color and freshness.
Extra Tips:
For an even more flavorful dish, consider adding a splash of balsamic vinegar or a sprinkle of red pepper flakes to the vegetables before cooking.
If you prefer a more caramelized finish, you can increase the temperature to 400°F (200°C) for the last 5 minutes of cooking. Additionally, using different colored bell peppers can enhance the visual appeal of the dish.
Remember to cut the vegetables and sausages into uniform sizes to ensure even cooking. Enjoy your Air Fryer Italian Sausage and Peppers with a side of pasta, in a sandwich, or on its own for a hearty meal.
Air Fryer Chicken Parmesan

Air Fryer Chicken Parmesan is a delicious and healthier alternative to the traditional fried version of this classic Italian dish. By using an air fryer, you can enjoy the crispy texture and rich flavors of Chicken Parmesan without the extra oil and calories. This dish combines tender chicken breasts coated in a flavorful breadcrumb mixture, topped with marinara sauce and melted mozzarella cheese, resulting in a mouth-watering meal that’s perfect for a family dinner or a special occasion.
This recipe is designed to serve 4-6 people and is both easy to prepare and quick to cook, making it a great option for busy weeknights. The air fryer guarantees that the chicken comes out perfectly cooked, with a crispy exterior and juicy interior, while the marinara sauce and cheese provide a burst of Italian flavors. Serve it with a side of pasta or a fresh salad to complete the meal.
Ingredients:
- 4 boneless, skinless chicken breasts
- Salt and pepper to taste
- 1 cup all-purpose flour
- 2 large eggs, beaten
- 1 cup Italian breadcrumbs
- 1/2 cup grated Parmesan cheese
- 1 teaspoon garlic powder
- 1 teaspoon dried oregano
- 1 teaspoon dried basil
- 1 cup marinara sauce
- 1 cup shredded mozzarella cheese
- Cooking spray
- Fresh basil for garnish (optional)
Instructions:
- Prepare the Chicken: Start by seasoning the chicken breasts with salt and pepper on both sides. This helps to enhance the flavor of the chicken.
- Set Up Breading Station: In three separate shallow bowls, place the flour in the first, the beaten eggs in the second, and a mixture of breadcrumbs, Parmesan cheese, garlic powder, oregano, and basil in the third.
- Coat the Chicken: Dredge each chicken breast in flour, making sure they’re well-coated. Shake off any excess flour, then dip them into the beaten eggs. Finally, coat them thoroughly with the breadcrumb mixture, pressing gently to make sure the breadcrumbs adhere well.
- Preheat the Air Fryer: Preheat your air fryer to 375°F (190°C) for about 5 minutes. This step is essential for achieving a crispy exterior on the chicken.
- Cook the Chicken: Lightly spray the air fryer basket with cooking spray. Place the chicken breasts in the basket in a single layer, making sure they don’t overlap. Depending on the size of your air fryer, you may need to cook them in batches. Cook for 10 minutes, then flip the chicken over and cook for an additional 5 minutes.
- Add Sauce and Cheese: Once the chicken is cooked, spoon marinara sauce over each breast, then sprinkle mozzarella cheese on top. Return the chicken to the air fryer and cook for another 2-3 minutes, or until the cheese is melted and bubbly.
- Serve: Carefully remove the chicken from the air fryer and let it rest for a couple of minutes. Garnish with fresh basil if desired and serve immediately.
Extra Tips: For best results, make sure the chicken breasts are of even thickness to guarantee uniform cooking. If necessary, pound them with a meat mallet before starting. Additionally, you can prepare the breaded chicken ahead of time and refrigerate it until ready to cook, making this recipe even more convenient. Finally, feel free to experiment with different types of cheese or add a pinch of red pepper flakes to the marinara sauce for an extra kick.
Air Fryer Garlic Breadsticks

Indulge in the savory delight of Air Fryer Garlic Breadsticks, a perfect accompaniment to any Italian meal. These breadsticks are crispy on the outside and soft on the inside, infused with a rich garlic flavor that will leave you craving more.
With the ease of an air fryer, you can achieve that perfect golden crust without the need for excessive oil, making them a slightly healthier option without compromising on taste. Perfect for serving 4-6 people, these breadsticks are ideal for a family dinner or a small gathering.
The combination of buttery garlic and Italian herbs creates a fragrant aroma that fills your kitchen, setting the stage for a delicious dining experience. Pair these breadsticks with your favorite pasta, soup, or enjoy them as a standalone snack.
Ingredients (serves 4-6):
- 1 pound pizza dough
- 4 tablespoons unsalted butter, melted
- 3 cloves garlic, minced
- 1 teaspoon dried Italian seasoning
- 1 tablespoon fresh parsley, chopped
- 1/2 teaspoon salt
- 1/4 cup grated Parmesan cheese
Cooking Instructions:
- Prepare the Dough: Start by rolling out the pizza dough on a lightly floured surface to a rectangle about 1/4 inch thick. Cut the dough into strips, approximately 1 inch wide and 6 inches long.
- Make the Garlic Butter: In a small bowl, combine the melted butter, minced garlic, Italian seasoning, and salt. Stir until the ingredients are well mixed.
- Coat the Breadsticks: Brush each dough strip generously with the garlic butter mixture. Make sure to cover both sides for maximum flavor. Reserve some of the garlic butter for later.
- Preheat the Air Fryer: Set your air fryer to 350°F (175°C) and allow it to preheat for about 3 minutes. This guarantees that the breadsticks cook evenly.
- Cook in Batches: Place the coated dough strips in the air fryer basket, leaving space between each one to guarantee even cooking. You may need to cook in batches depending on the size of your air fryer.
- Air Fry the Breadsticks: Cook the breadsticks for 8-10 minutes or until golden brown and crispy. Keep an eye on them to prevent burning.
- Final Touch: Once cooked, immediately brush the hot breadsticks with the remaining garlic butter. Sprinkle with grated Parmesan cheese and chopped fresh parsley for a burst of flavor and color.
- Serve and Enjoy: Serve the garlic breadsticks warm alongside your favorite Italian dish or as a standalone appetizer.
Extra Tips:
For a twist on flavor, experiment by adding different herbs like rosemary or thyme to the garlic butter. If you prefer a cheesier breadstick, feel free to sprinkle additional Parmesan or mozzarella cheese before the final air fry.
To make the breadsticks even more indulgent, consider drizzling them with a bit of extra virgin olive oil before serving. Remember, the key to perfect breadsticks isn’t to overcrowd the air fryer, allowing them to cook evenly and achieve that delightful crispiness.
Air Fryer Italian Stuffed Mushrooms

Air Fryer Italian Stuffed Mushrooms are a delightful appetizer or side dish that combines the earthy flavor of mushrooms with savory Italian ingredients. This dish is perfect for parties, family gatherings, or even a cozy dinner at home. The air fryer method guarantees a crispy exterior while keeping the filling moist and flavorful. With a blend of cheeses, herbs, and a touch of garlic, each bite is a burst of Italian goodness.
The beauty of this recipe lies in its simplicity and speed, made possible by the air fryer. This cooking method not only reduces the amount of oil needed but also markedly cuts down the cooking time, making it an effortless yet impressive dish. Whether you’re a seasoned chef or a beginner, these Air Fryer Italian Stuffed Mushrooms are sure to impress your family and friends with their taste and texture.
Ingredients (Serves 4-6):
- 16 large white or cremini mushrooms, stems removed
- 1 cup Italian breadcrumbs
- 1/2 cup grated Parmesan cheese
- 1/2 cup shredded mozzarella cheese
- 2 cloves garlic, minced
- 1 tablespoon fresh parsley, chopped
- 1 tablespoon fresh basil, chopped
- 1/4 teaspoon salt
- 1/4 teaspoon black pepper
- 3 tablespoons olive oil
- 1/4 cup chicken or vegetable broth
Cooking Instructions:
- Prepare the Mushrooms: Start by cleaning the mushrooms. Gently wipe each mushroom with a damp paper towel to remove any dirt. Remove the stems carefully and set them aside.
- Make the Filling: In a mixing bowl, combine the Italian breadcrumbs, Parmesan cheese, mozzarella cheese, minced garlic, parsley, basil, salt, and pepper. Mix well to guarantee all ingredients are evenly distributed.
- Stuff the Mushrooms: Spoon the filling into each mushroom cap, pressing gently to pack the filling without breaking the mushroom. Arrange them in a single layer on a plate.
- Preheat the Air Fryer: Preheat your air fryer to 350°F (175°C) for about 3 minutes to guarantee even cooking.
- Cook the Mushrooms: Lightly brush or spray the air fryer basket with olive oil to prevent sticking. Place the stuffed mushrooms in the basket, leaving some space between each for proper air circulation. Drizzle a little olive oil over the tops of the mushrooms.
- Air Fry the Mushrooms: Cook the mushrooms for 8-10 minutes, or until the tops are golden brown and the cheese is melted. If necessary, cook in batches to avoid overcrowding.
- Final Touch: Once cooked, carefully remove the mushrooms from the air fryer. Let them rest for a minute, then garnish with extra chopped parsley before serving.
Extra Tips:
To enhance the flavor of the stuffing, consider adding cooked and crumbled Italian sausage or finely chopped sun-dried tomatoes. If you prefer a spicier kick, a pinch of red pepper flakes can be added to the filling mixture.
Remember to check the mushrooms halfway through cooking to guarantee they don’t overcook or burn. Serve these stuffed mushrooms immediately while they’re warm for the best taste experience.
Air Fryer Caprese Skewers
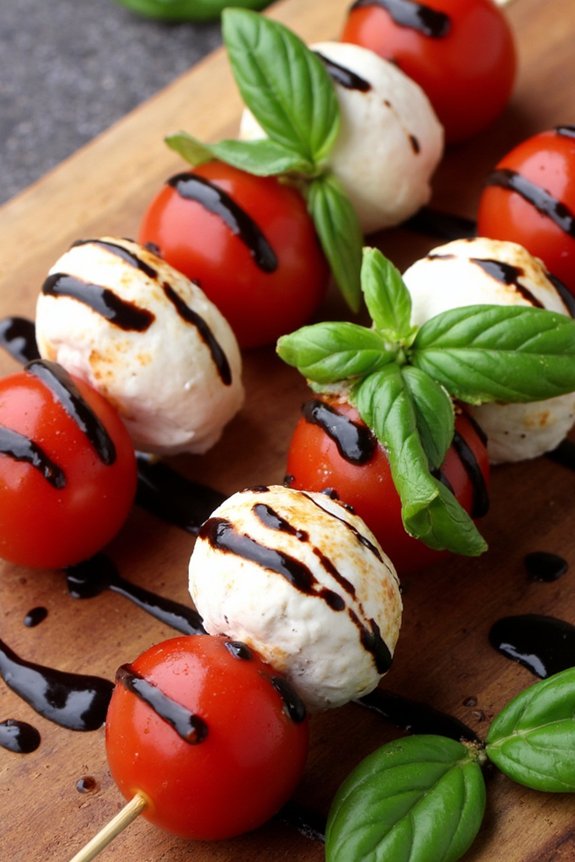
Air Fryer Caprese Skewers are a fresh and delightful twist on the traditional Caprese salad, offering a perfect appetizer or snack that combines the classic flavors of tomato, mozzarella, and basil with a slight crispiness from the air fryer.
These skewers make for an eye-catching dish at parties and are incredibly easy to prepare, requiring minimal effort for maximum flavor. The air fryer helps to enhance the taste by gently roasting the tomatoes and melting the mozzarella slightly, all while the basil adds a fragrant, aromatic touch.
Perfect for serving 4-6 people, these Air Fryer Caprese Skewers are a great way to impress your guests with a healthy, tasty option. You can tailor the recipe to your taste by adding a variety of seasonings or a drizzle of balsamic glaze for an extra zing.
Whether you’re preparing for a family gathering or just a cozy evening at home, these skewers are sure to be a hit and leave everyone asking for more.
Ingredients
- 12 cherry tomatoes
- 12 mini mozzarella balls (bocconcini)
- 12 fresh basil leaves
- 2 tablespoons olive oil
- Salt and pepper, to taste
- Balsamic glaze (optional)
- 12 wooden skewers or toothpicks
Cooking Instructions
- Prepare the Ingredients: Start by washing the cherry tomatoes and fresh basil leaves thoroughly. Pat them dry with a paper towel. Drain the mini mozzarella balls and set them aside.
- Assemble the Skewers: On each wooden skewer, thread one cherry tomato, followed by a fresh basil leaf, then a mini mozzarella ball. Repeat this pattern until all skewers are assembled.
- Season the Skewers: Lay the skewers on a plate or tray. Drizzle them with olive oil, making sure each skewer is coated lightly. Season with salt and pepper to taste.
- Preheat the Air Fryer: Set your air fryer to 360°F (180°C) and allow it to preheat for about 3-5 minutes.
- Cook the Skewers: Place the skewers in the air fryer basket in a single layer (you may have to do this in batches depending on the size of your air fryer). Cook them for 4-5 minutes or until the tomatoes are slightly blistered and the mozzarella begins to melt.
- Serve: Carefully remove the skewers from the air fryer and transfer them to a serving platter. Drizzle with balsamic glaze if desired, and serve immediately while warm.
Extra Tips
When making Air Fryer Caprese Skewers, be sure to use fresh, high-quality ingredients for the best flavor. If your air fryer has a smaller basket, consider cooking the skewers in batches to ensure even cooking.
For an added touch, try using flavored olive oils or adding a sprinkle of Italian seasoning or red pepper flakes for a kick. If you’re short on time, you can pre-assemble the skewers and store them in the refrigerator for a few hours before cooking, making them a convenient option for last-minute entertaining.
Air Fryer Italian Herb Chicken Wings

Italian Herb Chicken Wings are a delicious and flavorful dish that can be easily prepared using an air fryer. These wings are perfect for a party appetizer or a casual dinner that brings a taste of Italy right to your table. The combination of Italian herbs and spices gives the chicken wings a rich and aromatic flavor, while the air fryer guarantees they’re crispy on the outside and tender on the inside.
This method not only makes the cooking process quicker but also healthier, as it requires little to no oil. With its ease of preparation and delectable taste, Air Fryer Italian Herb Chicken Wings are sure to become a family favorite. The air fryer locks in the juices of the chicken while creating a crispy crust, making each bite a delightful experience.
Whether you’re entertaining guests or simply craving something savory, these wings won’t disappoint. Let’s explore the ingredients and the step-by-step process to create this scrumptious dish for 4-6 people.
Ingredients (Serves 4-6):
- 2 pounds chicken wings, split and tips removed
- 2 tablespoons olive oil
- 1 tablespoon dried Italian seasoning
- 1 teaspoon garlic powder
- 1 teaspoon onion powder
- 1 teaspoon paprika
- 1 teaspoon salt
- ½ teaspoon black pepper
- ½ teaspoon red pepper flakes (optional for extra heat)
- ¼ cup grated Parmesan cheese
- Fresh parsley, chopped (for garnish)
- Lemon wedges (for serving)
Cooking Instructions:
- Prepare the Chicken Wings: Rinse the chicken wings under cold water and pat them dry with paper towels. This step is essential to make sure the wings become crispy during cooking.
- Season the Wings: In a large bowl, combine the olive oil, Italian seasoning, garlic powder, onion powder, paprika, salt, black pepper, and red pepper flakes. Add the chicken wings to the bowl and toss them until they’re evenly coated with the seasoning mixture.
- Preheat the Air Fryer: Set your air fryer to 400°F (200°C) and let it preheat for about 3-5 minutes.
- Arrange the Wings: Place the seasoned chicken wings in a single layer in the air fryer basket. Make sure not to overcrowd the basket to allow for even cooking. You may need to cook in batches depending on the size of your air fryer.
- Cook the Wings: Air fry the wings for 20-25 minutes, flipping them halfway through the cooking time to make certain they cook evenly and achieve a golden brown color.
- Add Parmesan and Garnish: Once the wings are cooked, transfer them to a serving platter. Immediately sprinkle the grated Parmesan cheese over the hot wings so it melts slightly. Garnish with chopped fresh parsley for added flavor and visual appeal.
- Serve: Serve the wings hot with lemon wedges on the side for squeezing over the top, enhancing the flavors with a burst of freshness.
Extra Tips:
- For extra crispy wings, make sure they’re as dry as possible before seasoning. Pat them down with paper towels thoroughly after washing.
- If you prefer your wings less spicy, you can omit the red pepper flakes or adjust the amount to your liking.
- Ensure the wings are cooked in a single layer without overlapping in the air fryer basket for consistent cooking.
- If you have a large batch, keep the cooked wings warm in a low oven while you cook the remaining batches.
- Experiment with different herbs or add a touch of lemon zest to the seasoning mix for a unique twist.
Air Fryer Polenta Fries

Air Fryer Polenta Fries are a delicious and healthier alternative to traditional fries, offering a unique twist with their Italian-inspired flavors. Made from creamy polenta, these fries are crispy on the outside and soft on the inside, providing a delightful texture and taste. The air fryer method guarantees that they’re cooked evenly and with minimal oil, making them a guilt-free snack or side dish. Perfect for a family gathering or a cozy night in, these polenta fries are sure to become a new favorite.
Polenta is a staple in Italian cuisine, made from cornmeal and known for its versatility. By transforming it into fries, you bring a touch of Italy to your table while keeping the dish simple and approachable. These Air Fryer Polenta Fries aren’t only easy to prepare but also allow you to enjoy the authentic flavors of Italy in a fun and exciting way. Serve them with your favorite dipping sauce or as a side to grilled meats or salads for a complete meal experience.
Ingredients (serves 4-6):
- 2 cups of water
- 1 cup of polenta (coarse cornmeal)
- 1 tablespoon of olive oil
- 1/2 cup of grated Parmesan cheese
- 1 teaspoon of garlic powder
- 1 teaspoon of dried Italian herbs (such as oregano or basil)
- Salt and pepper to taste
- Cooking spray
Cooking Instructions:
- Prepare the Polenta: In a medium saucepan, bring 2 cups of water to a boil. Gradually whisk in the polenta, making sure there are no lumps. Reduce the heat to low and cook, stirring frequently, until thickened, about 15-20 minutes.
- Season and Set: Once the polenta is cooked, stir in the olive oil, Parmesan cheese, garlic powder, Italian herbs, and a pinch of salt and pepper. Mix well until all ingredients are fully incorporated. Pour the polenta into a greased baking dish, spreading it evenly. Allow it to cool and firm up at room temperature or in the refrigerator for at least 30 minutes.
- Cut the Fries: Once set, remove the polenta from the dish and cut it into even strips, resembling traditional fries.
- Preheat the Air Fryer: Preheat your air fryer to 400°F (200°C) for about 5 minutes.
- Cook the Fries: Lightly coat the polenta fries with cooking spray to promote even crisping. Arrange the fries in a single layer in the air fryer basket, making sure they aren’t overcrowded. You may need to cook them in batches depending on the size of your air fryer.
- Air Fry: Cook the polenta fries for 15-20 minutes, turning them halfway through, until they’re golden brown and crispy on the outside.
- Serve: Remove the fries from the air fryer and let them cool slightly before serving. Enjoy them with your favorite dipping sauce.
Extra Tips:
For the best results, make sure the polenta is fully set and firm before cutting into fries; this will help them hold their shape during cooking. If you prefer a spicier version, add a pinch of red pepper flakes to the seasoning mix. Experiment with different herbs and cheeses to suit your taste preferences. Additionally, keeping the fries in a single layer in the air fryer is essential for even cooking and achieving that perfect crispy texture.
Air Fryer Cannoli Chips

Air fryers have revolutionized the way we approach cooking, allowing us to enjoy our favorite fried foods with a fraction of the oil and calories. This modern kitchen gadget is perfect for crafting Italian-inspired delicacies like Air Fryer Cannoli Chips. These delightful treats offer all the crunch and flavor of traditional cannoli shells without the need for deep frying. Paired with a sweet and creamy ricotta dip, these cannoli chips are bound to be a hit at any gathering or as a delightful snack.
Air Fryer Cannoli Chips take the classic flavors of Italian cannoli and transform them into a convenient, bite-sized snack. The preparation is simple, making it an ideal recipe for those who want a quick treat with minimal cleanup. By using an air fryer, you can achieve the perfect crispiness without the excess oil, making these chips a healthier alternative to traditional fried desserts. Whether you’re serving these at a party or enjoying them solo, Air Fryer Cannoli Chips are certain to please.
Ingredients (Serves 4-6):
- 8 small flour tortillas
- 1/4 cup granulated sugar
- 1 tablespoon ground cinnamon
- 1/4 cup melted unsalted butter
- 1 cup ricotta cheese
- 1/4 cup powdered sugar
- 1 teaspoon vanilla extract
- 1/4 cup mini chocolate chips
Cooking Instructions:
- Prepare the Tortillas: Start by preheating your air fryer to 350°F (175°C). While it’s heating, cut each tortilla into 8 wedges, creating chip-sized pieces.
- Spice the Chips: In a small bowl, mix the granulated sugar and cinnamon. Brush the tortilla wedges lightly with melted butter, then sprinkle them generously with the cinnamon sugar mixture, guaranteeing even coverage.
- Air Fry the Chips: Arrange the tortilla wedges in a single layer in the air fryer basket. Depending on the size of your air fryer, you may need to do this in batches. Air fry the chips for 5-6 minutes, or until they’re golden brown and crispy. Be sure to shake the basket halfway through cooking to guarantee even crisping.
- Prepare the Ricotta Dip: While the chips are cooking, combine the ricotta cheese, powdered sugar, and vanilla extract in a mixing bowl. Stir until smooth and creamy. Gently fold in the mini chocolate chips.
- Serve: Once the chips are ready, allow them to cool slightly before serving. Serve the crispy cannoli chips with the creamy ricotta dip on the side for a delightful and interactive dessert.
Extra Tips:
When making Air Fryer Cannoli Chips, it’s important to monitor the cooking time closely, as air fryer models can vary, and the chips can go from perfectly crispy to burnt very quickly.
If you prefer a more traditional cannoli flavor, consider adding orange zest or a dash of nutmeg to the cinnamon sugar mix. For a unique twist, try using flavored tortillas, such as chocolate or cinnamon, to add an extra layer of flavor to your chips.
Additionally, verify your ricotta cheese is well-drained to avoid a watery dip; you can do this by letting it sit in a strainer for about 15 minutes before mixing. Enjoy your chips fresh for the best texture, as they may lose their crispness over time.