

Spring has arrived, and I’m excited to share my favorite sun-kissed Italian dinner recipes that capture the season’s vibrant flavors. Picture the creamy goodness of Lemon Ricotta Pasta with fresh asparagus and peas. Or the refreshing taste of a Caprese Salad with a drizzle of balsamic reduction. These dishes are perfect for celebrating spring’s bounty. Let’s embark on this delicious journey through Italy’s culinary charm together.
Lemon Ricotta Pasta With Asparagus and Peas

Lemon Ricotta Pasta With Asparagus and Peas is a delightful and crisp Italian dish perfect for a spring dinner. This recipe combines the creamy richness of ricotta cheese with the tangy brightness of lemon, while asparagus and peas add a burst of green vitality.
It’s a dish that’s not only visually appealing with its vibrant colors but also incredibly satisfying. The creamy lemon ricotta sauce clings to each strand of pasta, making every bite a flavorful experience.
This dish is easy to prepare and can be ready in under 30 minutes, making it ideal for a quick weeknight dinner or a relaxing weekend meal. The ingredients are simple, yet they come together to create a dish that feels elegant and refined.
The combination of flavors is both classic and comforting, with the lemon adding a rejuvenating twist. Whether you’re serving it as a standalone meal or as part of a larger Italian feast, Lemon Ricotta Pasta With Asparagus and Peas is sure to impress.
Ingredients for 4-6 servings:
- 1 pound pasta (such as fettuccine or linguine)
- 1 cup ricotta cheese
- Zest and juice of 1 large lemon
- 1 pound asparagus, trimmed and cut into 1-inch pieces
- 1 cup fresh or frozen peas
- 2 tablespoons olive oil
- 2 cloves garlic, minced
- Salt and pepper, to taste
- 1/4 cup grated Parmesan cheese
- 1/4 cup fresh basil leaves, chopped
Cooking Instructions:
- Cook the Pasta: Bring a large pot of salted water to a boil. Add the pasta and cook until al dente according to the package instructions. Reserve 1 cup of pasta water, then drain the pasta.
- Prepare the Vegetables: While the pasta cooks, heat the olive oil in a large skillet over medium heat. Add the minced garlic and sauté for about 30 seconds until fragrant. Add the asparagus pieces and cook for about 3-4 minutes until they’re tender but still crisp. Stir in the peas and cook for another 2-3 minutes.
- Make the Ricotta Sauce: In a mixing bowl, combine the ricotta cheese, lemon zest, and lemon juice. Season with salt and pepper to taste. Whisk until smooth and creamy.
- Combine the Ingredients: Add the cooked pasta to the skillet with the asparagus and peas. Pour the ricotta mixture over the pasta. Toss everything together over low heat, adding reserved pasta water a little at a time until the sauce reaches your desired consistency.
- Serve: Sprinkle the grated Parmesan cheese and chopped basil over the pasta. Toss again to combine. Serve the pasta warm, with additional Parmesan cheese on the side if desired.
Extra Tips:
For added richness, you can include a splash of heavy cream in the ricotta mixture. If you prefer more lemon flavor, feel free to add more lemon zest or juice according to your taste.
This dish pairs beautifully with a crisp white wine or a light salad. If using frozen peas, there’s no need to thaw them before adding to the skillet. Just remember to taste and adjust the seasoning as needed before serving.
Enjoy this crisp and flavorful meal as part of your Italian spring dinner repertoire!
Spring Vegetable Risotto With Pecorino Romano

Spring Vegetable Risotto With Pecorino Romano is a delightful Italian dish that celebrates the fresh and vibrant flavors of the season. This creamy risotto is infused with the essence of spring, featuring a medley of seasonal vegetables such as asparagus, peas, and spinach. The addition of Pecorino Romano cheese not only enhances the creaminess but also adds a delightful sharpness to the dish. Perfect for a comforting yet elegant dinner, this risotto is sure to impress your family and friends.
The key to a perfect risotto lies in its creamy consistency and the balance of flavors. The Arborio rice used in this recipe absorbs the broth and releases its starch, creating a luscious, velvety texture. As you prepare this dish, you’ll find the process of stirring the risotto to be both soothing and rewarding. The seasonal vegetables not only add color and nutrition but also a delightful crunch that contrasts beautifully with the creamy rice.
Whether you’re hosting a dinner party or simply enjoying a cozy meal at home, this Spring Vegetable Risotto With Pecorino Romano promises to deliver a taste of Italy to your table.
Ingredients (Serves 4-6 people):
- 1 1/2 cups Arborio rice
- 4 cups vegetable broth
- 1 cup dry white wine
- 1 bunch asparagus, trimmed and cut into 1-inch pieces
- 1 cup fresh peas
- 1 cup baby spinach
- 1 medium onion, finely chopped
- 3 cloves garlic, minced
- 1 cup Pecorino Romano cheese, grated
- 2 tablespoons olive oil
- 2 tablespoons butter
- Salt and pepper to taste
- Zest of 1 lemon
- Fresh basil leaves for garnish
Instructions:
- Prepare the Broth: In a medium saucepan, bring the vegetable broth to a simmer over low heat. Keep it warm throughout the cooking process to guarantee the rice absorbs the liquid evenly.
- Sauté Vegetables: In a large skillet, heat olive oil over medium heat. Add the onion and garlic, sautéing until they become translucent. Add the asparagus and peas, cooking for another 3-4 minutes until they begin to soften. Remove the vegetables from the skillet and set aside.
- Toast the Rice: In the same skillet, add the butter and Arborio rice. Stir the rice to coat it in the butter, allowing it to toast slightly for about 2 minutes. This step enhances the nutty flavor of the rice.
- Deglaze with Wine: Pour in the white wine, stirring constantly until it’s mostly absorbed by the rice. This helps to release the starch and adds depth to the flavor profile of the risotto.
- Cook the Risotto: Begin adding the warm broth, one ladleful at a time, stirring frequently. Allow each addition to be absorbed before adding the next. Continue this process for about 18-20 minutes, or until the rice is creamy and al dente.
- Incorporate Vegetables: About 5 minutes before the risotto is done, stir in the sautéed vegetables and baby spinach. Allow them to heat through and the spinach to wilt.
- Finish with Cheese and Seasoning: Remove the skillet from heat and stir in the grated Pecorino Romano cheese. Season with salt, pepper, and lemon zest to taste. Stir until the cheese is melted and the risotto is creamy.
- Serve: Divide the risotto among plates, garnishing with fresh basil leaves and additional cheese if desired. Serve immediately while hot.
Extra Tips:
When making risotto, patience is key. Stirring constantly helps to release the starch from the rice, creating a creamy texture. If you prefer your risotto on the softer side, simply add more broth until it reaches your desired consistency.
Be careful not to overcook the vegetables; they should remain slightly crisp to add texture to the dish. Finally, make sure that the Pecorino Romano cheese is freshly grated for the best flavor and melting quality. Enjoy your Spring Vegetable Risotto with a glass of white wine to complement its delicate flavors.
Grilled Bruschetta With Fresh Tomato and Basil

Grilled Bruschetta With Fresh Tomato and Basil is a delightful Italian appetizer that embodies the flavors of spring. This simple yet sophisticated dish combines the crispness of grilled bread with the juicy sweetness of ripe tomatoes and the aromatic freshness of basil. Perfect for a light starter or an elegant snack, grilled bruschetta is easy to prepare and even easier to enjoy.
The key to a perfect bruschetta lies in the quality of its ingredients: fresh, ripe tomatoes, fragrant basil leaves, and a good quality olive oil. As the bread is grilled to golden perfection, the tomatoes are mixed with garlic and seasoned just right to create a topping that bursts with flavor. The final touch of a drizzle of balsamic glaze or a splash of lemon juice elevates the dish to a new level of deliciousness.
With just a handful of ingredients, this recipe isn’t only quick to prepare but also a crowd-pleaser that will leave your guests asking for more.
Ingredients for Serving Size of 4-6 People:
- 1 rustic Italian bread loaf (such as ciabatta or baguette)
- 4 ripe tomatoes
- 1/4 cup fresh basil leaves
- 2 cloves garlic
- 1/4 cup extra-virgin olive oil
- Salt and pepper to taste
- Balsamic glaze or lemon juice (optional)
Cooking Instructions:
- Prepare the Bread: Start by slicing the bread loaf into 1/2-inch thick slices. Preheat your grill or a grill pan over medium heat. Brush each side of the bread slices with olive oil.
- Grill the Bread: Place the bread slices on the grill, cooking for about 2-3 minutes on each side until they’re crisp and have light grill marks. Remove from the grill and set aside to cool slightly.
- Prepare the Tomato Mixture: While the bread is grilling, dice the tomatoes into small cubes. Mince the garlic and roughly chop the basil leaves. In a medium bowl, combine the tomatoes, garlic, basil, and the remaining olive oil. Season with salt and pepper to taste.
- Assemble the Bruschetta: Once the bread slices have cooled slightly, top each slice generously with the tomato mixture. Drizzle with balsamic glaze or a squeeze of lemon juice if using.
- Serve Immediately: Arrange the bruschetta on a serving platter and serve immediately to guarantee the bread remains crispy.
Extra Tips:
For the best results, use tomatoes that are at their peak ripeness for maximum flavor. If your bread is too fresh and soft, lightly toasting it before grilling will help it hold up better under the weight of the tomato topping.
Additionally, if you don’t have access to a grill, you can use a broiler or a hot oven to toast the bread slices. Finally, feel free to customize your bruschetta with additional toppings like mozzarella cheese or prosciutto for added indulgence.
Saffron-Infused Seafood Paella

Transport your taste buds to the vibrant coasts of Italy with this exquisite Saffron-Infused Seafood Paella. This dish is a celebration of the sea’s bounty, combining fresh, succulent seafood with the aromatic notes of saffron and a medley of colorful vegetables. The saffron, a treasured spice in Italian cuisine, infuses the paella with a golden hue and a distinct, earthy flavor that elevates the entire dish.
Perfect for a spring gathering, this paella isn’t only visually stunning but also packed with rich, savory flavors that promise to delight your guests. This recipe is designed to serve 4-6 people, making it ideal for a family dinner or a small party. The key to a perfect paella lies in the quality of the ingredients and the care taken during its preparation. By following these detailed instructions and tips, you’ll be able to create an authentic paella that will transport your guests to the enchanting coasts of Italy with every bite.
Ingredients:
- 1 teaspoon saffron threads
- 3 cups seafood or chicken stock
- 2 tablespoons olive oil
- 1 medium onion, finely chopped
- 3 cloves garlic, minced
- 1 red bell pepper, diced
- 1 cup Arborio rice
- 1/2 cup dry white wine
- 1 pound mussels, cleaned and debearded
- 1 pound clams, scrubbed
- 1/2 pound large shrimp, peeled and deveined
- 1/2 pound calamari rings
- 1 cup frozen peas, thawed
- Salt and pepper to taste
- Fresh parsley, chopped, for garnish
- Lemon wedges, for serving
Cooking Instructions:
- Infuse the Saffron: Begin by heating the seafood or chicken stock in a saucepan. Once warm, add the saffron threads and let them steep for about 10 minutes. This process releases the saffron’s color and flavor into the stock.
- Prepare the Base: In a large, heavy-bottomed paella pan or skillet, heat the olive oil over medium heat. Add the chopped onion and sauté until translucent, about 3-4 minutes. Stir in the minced garlic and diced red bell pepper, cooking for an additional 2 minutes until the vegetables are softened.
- Cook the Rice: Add the Arborio rice to the pan, stirring to coat the grains in the oil and vegetables. Pour in the white wine, allowing it to cook until mostly evaporated. This enhances the rice with a subtle, tangy flavor.
- Combine with Stock: Gradually add the saffron-infused stock to the rice, stirring gently. Season with salt and pepper. Allow the mixture to simmer, uncovered, for about 10 minutes, stirring occasionally to prevent sticking.
- Add Seafood: Arrange the mussels, clams, shrimp, and calamari over the rice. Cover the pan with a lid or aluminum foil and cook for another 10-15 minutes until the seafood is cooked through and the mussels and clams have opened. Discard any that don’t open.
- Finish with Peas: Remove the cover and sprinkle the thawed peas over the top. Cook for an additional 5 minutes, allowing the flavors to meld together and the peas to heat through.
- Garnish and Serve: Remove the pan from heat and let it rest for a few minutes. Garnish with freshly chopped parsley and serve with lemon wedges on the side for an extra burst of freshness.
Extra Tips:
For the best results, verify that the seafood is fresh and sourced from a reputable supplier. If you prefer a more intense saffron flavor, you can gently toast the saffron threads in a dry pan over low heat before adding them to the stock.
Zucchini and Mint Pesto Tagliatelle

Zucchini and Mint Pesto Tagliatelle is a revitalizing and flavorful dish that beautifully captures the essence of Italian spring cuisine. The combination of fresh zucchini and mint creates a light and aromatic pesto that pairs perfectly with al dente tagliatelle pasta. This dish is ideal for a springtime dinner, offering a vibrant and fragrant meal that delights the senses.
The simplicity of the ingredients allows each flavor to shine, making it a perfect choice for both casual family meals and more formal occasions. This recipe serves 4-6 people and requires fresh, high-quality ingredients to guarantee the best possible flavor. The zucchini and mint pesto not only adds a unique twist to traditional pesto but also provides a healthy dose of vegetables to your meal.
Whether you’re an experienced cook or a beginner, this recipe is straightforward and easy to follow, assuring a delicious outcome every time.
Ingredients:
- 500g tagliatelle pasta
- 2 medium zucchinis
- 1 cup fresh mint leaves
- 1/2 cup fresh basil leaves
- 1/2 cup grated Parmesan cheese
- 1/4 cup pine nuts
- 2 cloves garlic
- 1/2 cup extra virgin olive oil
- Salt and pepper to taste
- Zest of 1 lemon
- Juice of 1/2 lemon
Cooking Instructions:
- Prepare the Zucchini: Start by washing the zucchinis thoroughly. Trim the ends and grate them using a box grater or food processor. Set aside in a large bowl.
- Make the Pesto: In a food processor, combine the mint leaves, basil leaves, grated Parmesan cheese, pine nuts, garlic cloves, and lemon zest. Pulse until the mixture is finely chopped and well combined.
- Add Olive Oil and Seasonings: With the processor running, slowly drizzle in the olive oil until the pesto is smooth and creamy. Add salt and pepper to taste, and squeeze in the juice of half a lemon for a revitalizing kick. Blend for a few more seconds to incorporate.
- Cook the Pasta: Bring a large pot of salted water to a boil. Add the tagliatelle pasta and cook according to the package instructions until al dente. Reserve about 1 cup of the pasta cooking water before draining the pasta.
- Combine Pasta and Pesto: Return the drained pasta to the pot. Add the zucchini and pesto mixture, and toss everything together. If the pesto is too thick, gradually add the reserved pasta water until you achieve your desired consistency.
- Serve: Divide the pasta among serving plates or bowls. Garnish with additional Parmesan cheese and a few mint leaves if desired. Serve immediately while warm.
Extra Tips:
For the best results, use the freshest ingredients you can find. Fresh mint and basil leaves make a significant difference in flavor. If you prefer a nuttier taste, lightly toast the pine nuts before adding them to the pesto.
If you want to make this dish ahead of time, prepare the pesto and store it in an airtight container in the refrigerator for up to three days. Cook the pasta fresh when you’re ready to serve, and combine it with the pesto just before serving to maintain the vibrant flavor and texture.
Artichoke and Spinach Stuffed Chicken Breasts

Artichoke and Spinach Stuffed Chicken Breasts are a delightful Italian dish that combines the earthy flavors of artichokes and spinach with succulent chicken. This dish makes for a perfect spring dinner, offering a fresh and vibrant taste that echoes the season.
The creamy filling contrasts beautifully with the tender chicken, providing a balance of textures and flavors that are sure to impress your family or guests. Whether you’re preparing a special meal or just looking to elevate your weeknight dinner, this recipe will transport you to the sunny landscapes of Italy.
The preparation involves carefully stuffing chicken breasts with a savory mixture of artichokes, spinach, and cheese, then baking them to perfection. The filling is rich yet not overpowering, making certain that the natural flavors of the chicken shine through.
Pair this dish with a light salad or a side of roasted vegetables for a complete meal that celebrates the bounty of spring. Let’s immerse ourselves in the ingredients and step-by-step instructions to create this delicious Italian-inspired dish.
Ingredients (Serves 4-6):
- 4 large boneless, skinless chicken breasts
- 1 cup canned artichoke hearts, drained and chopped
- 1 cup fresh spinach, chopped
- 1 cup mozzarella cheese, shredded
- 1/2 cup Parmesan cheese, grated
- 1/2 cup cream cheese, softened
- 2 cloves garlic, minced
- 1 tablespoon olive oil
- 1 teaspoon Italian seasoning
- Salt and pepper to taste
- Toothpicks or kitchen twine
Instructions:
- Preheat the Oven: Start by preheating your oven to 375°F (190°C). This makes sure that the oven is ready to bake the chicken evenly and thoroughly.
- Prepare the Filling: In a mixing bowl, combine the chopped artichoke hearts, spinach, mozzarella cheese, Parmesan cheese, cream cheese, and minced garlic. Mix well until all the ingredients are evenly distributed. Season the filling with salt, pepper, and Italian seasoning to taste.
- Prepare the Chicken: Lay the chicken breasts on a clean surface. Using a sharp knife, carefully cut a pocket into each chicken breast, being careful not to cut all the way through. This pocket will hold the filling.
- Stuff the Chicken: Spoon the prepared filling into each chicken breast pocket, making sure that each breast is evenly stuffed. If necessary, use toothpicks or kitchen twine to secure the openings to prevent the filling from spilling out during cooking.
- Sear the Chicken: Heat olive oil in a large oven-safe skillet over medium-high heat. Place the stuffed chicken breasts in the skillet and sear on each side for about 3-4 minutes, or until golden brown. This step helps lock in the juices and adds a nice crust to the chicken.
- Bake: Once seared, transfer the skillet to the preheated oven. Bake for 20-25 minutes, or until the chicken is cooked through and reaches an internal temperature of 165°F (74°C).
- Rest and Serve: Remove the chicken from the oven and let it rest for a few minutes before serving. This allows the juices to redistribute, making certain each bite is juicy and flavorful.
Extra Tips:
To enhance the flavor of the chicken, consider marinating the breasts in olive oil, lemon juice, and Italian herbs for a few hours before stuffing.
If you’re short on time, you can prepare the filling a day ahead and store it in the refrigerator. When searing the chicken, make sure the skillet is hot enough to prevent sticking and achieve a nice golden crust.
Finally, for a touch of acidity, you can add a splash of lemon juice or a sprinkle of lemon zest to the filling or over the finished dish before serving.
Prosciutto-Wrapped Melon With Arugula Salad
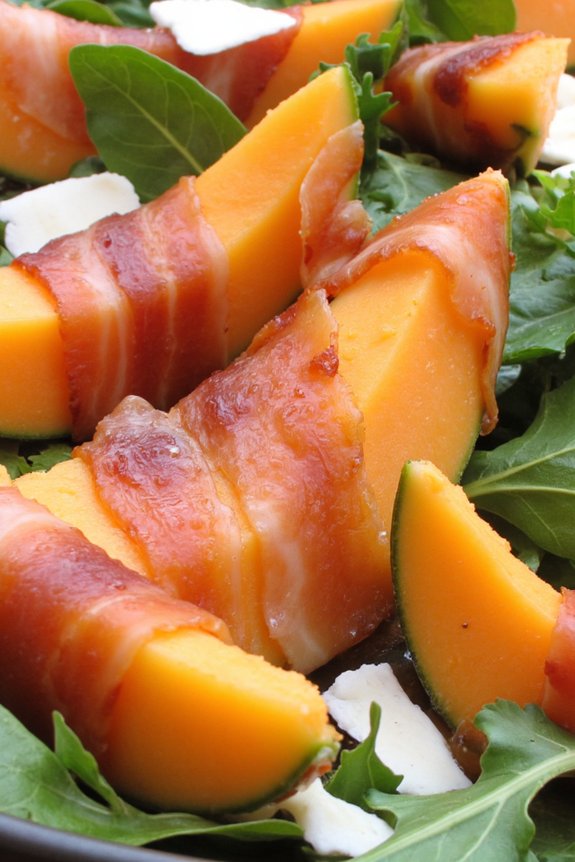
Prosciutto-wrapped melon is a classic Italian appetizer that combines the sweet, juicy flavors of ripe melon with the salty, savory taste of prosciutto. Paired with a fresh arugula salad, this dish is perfect for an Italian spring dinner party or a light lunch. The peppery arugula complements the flavors wonderfully and adds a nice crunch to each bite.
This dish isn’t only delicious but also visually appealing, making it an elegant addition to any table setting. The simplicity of this recipe allows the quality of the ingredients to shine. Be certain to select a ripe melon, such as cantaloupe or honeydew, for the best flavor. The prosciutto should be thinly sliced to wrap easily around the melon.
The arugula salad is dressed with a light lemon vinaigrette, which enhances the flavors without overpowering them. This recipe serves 4-6 people, making it perfect for small gatherings or family dinners.
Ingredients:
- 1 ripe cantaloupe or honeydew melon
- 12-18 slices of prosciutto
- 5 oz arugula
- 1/4 cup olive oil
- 2 tablespoons fresh lemon juice
- Salt and black pepper, to taste
- Optional: shaved Parmesan cheese for garnish
Cooking Instructions:
- Prepare the Melon:
- Begin by cutting the melon in half and removing the seeds. Slice the melon into wedges, approximately 1 inch thick, and remove the rind from each wedge. You should have around 12-18 melon wedges.
- Wrap with Prosciutto:
- Take each slice of prosciutto and wrap it around a melon wedge. Ascertain that the prosciutto is wrapped tightly but not so tight that it tears. Place the wrapped wedges on a serving platter.
- Prepare the Arugula Salad:
- In a large bowl, combine the arugula leaves. In a small bowl, whisk together the olive oil, fresh lemon juice, salt, and black pepper. Drizzle the dressing over the arugula and toss gently to coat the leaves evenly.
- Assemble the Dish:
- Arrange the prosciutto-wrapped melon wedges on a serving platter. Top or surround the platter with the arugula salad. If desired, sprinkle shaved Parmesan cheese over the top for added flavor and presentation.
- Serve:
- Serve immediately to enjoy the freshness of the ingredients. This dish can be served as an appetizer or a light main course.
Extra Tips:
For the best results, verify that the melon is perfectly ripe by checking for a sweet aroma and slight softness at the stem end. If preparing in advance, keep the prosciutto-wrapped melon chilled and add the arugula salad just before serving to maintain its crispness.
Additionally, experiment with different types of melon or add a sprinkle of freshly ground black pepper over the finished dish to enhance the flavors further. Enjoy this delightful blend of textures and tastes that captures the essence of an Italian spring evening.
Lemon and Herb Roasted Sea Bass

Lemon and Herb Roasted Sea Bass is an exquisite Italian dish that beautifully showcases the flavors of spring. The combination of fresh herbs and zesty lemon brings out the delicate taste of the sea bass, making it a perfect centerpiece for a spring dinner. This dish isn’t only delightful to the palate but also visually appealing, with the golden-brown crust of the roasted fish creating a stunning contrast with the vibrant herbs and lemon slices.
Whether you’re hosting a dinner party or simply treating your family to a gourmet meal, this recipe is sure to impress.
The preparation of Lemon and Herb Roasted Sea Bass is surprisingly simple, requiring only a handful of ingredients and a little bit of time in the kitchen. The key to this dish is using fresh, high-quality sea bass and herbs, which will enhance the natural flavors and guarantee a truly memorable dining experience.
This recipe serves 4-6 people, making it ideal for gatherings or family dinners. Let’s plunge into the ingredients and step-by-step instructions to help you create this delicious Italian dish at home.
Ingredients:
- 2 whole sea bass, cleaned and scaled (about 1.5-2 pounds each)
- 2 lemons, thinly sliced
- 4 cloves garlic, minced
- 1/4 cup fresh parsley, chopped
- 1/4 cup fresh basil, chopped
- 1/4 cup fresh thyme leaves
- 1/4 cup olive oil
- Salt and freshly ground black pepper to taste
- 1/2 cup white wine (optional)
- Fresh herbs and lemon wedges for garnish
Instructions:
- Preheat the Oven: Preheat your oven to 400°F (200°C). This will guarantee that the fish cooks evenly and develops a nice crust.
- Prepare the Sea Bass: Rinse the sea bass under cold water and pat dry with paper towels. Make three diagonal slashes on each side of the fish to allow the flavors to penetrate.
- Season the Fish: In a small bowl, combine the minced garlic, parsley, basil, thyme, olive oil, salt, and pepper. Rub this herb mixture inside the cavity of each fish and over the skin, making sure to get into the slashes.
- Stuff the Fish: Place lemon slices inside the cavity of each sea bass. This will infuse the fish with a fresh, citrusy aroma as it roasts.
- Roast the Fish: Place the prepared sea bass on a baking sheet lined with parchment paper. If using, pour the white wine around the fish. Roast in the preheated oven for 25-30 minutes or until the fish flakes easily with a fork and the skin is golden brown.
- Serve: Once cooked, remove the sea bass from the oven and let it rest for a few minutes. Serve hot, garnished with fresh herbs and lemon wedges.
Tips:
When cooking Lemon and Herb Roasted Sea Bass, it’s crucial to use fresh fish for the best flavor. If you’re unable to find whole sea bass, you can substitute with fillets, though the cooking time may vary.
Be sure to monitor the fish closely, as overcooking can lead to a dry texture. For an added depth of flavor, consider adding a splash of white wine or lemon juice to the roasting pan.
This dish pairs beautifully with a light, crisp white wine and a side of roasted vegetables or a fresh salad. Enjoy your Italian spring dinner with this delightful recipe!
Caprese Salad With Balsamic Reduction

Caprese Salad With Balsamic Reduction is a classic Italian dish that captures the essence of spring with its fresh, vibrant flavors. This simple yet elegant salad is perfect for an Italian spring dinner, offering a delightful combination of ripe tomatoes, creamy mozzarella, and fragrant basil leaves, all drizzled with a rich balsamic reduction.
The balance of flavors in this dish is truly exceptional, making it a delightful starter or side dish for any meal. The key to a perfect Caprese Salad is using the freshest ingredients possible. Choose tomatoes that are ripe and juicy, and opt for high-quality mozzarella, ideally buffalo mozzarella, for its rich and creamy texture.
The balsamic reduction adds a sweet and tangy depth of flavor that enhances the dish without overpowering the natural taste of the fresh ingredients. This recipe serves 4-6 people, making it an ideal choice for a small gathering or family dinner.
Ingredients (Serves 4-6):
- 4 large ripe tomatoes
- 1 pound fresh mozzarella cheese
- Fresh basil leaves
- 1 cup balsamic vinegar
- Salt and freshly ground black pepper
- Extra virgin olive oil
Cooking Instructions:
- Prepare the Balsamic Reduction: Pour the balsamic vinegar into a small saucepan and bring it to a boil over medium heat. Reduce the heat to low and let it simmer. Stir occasionally until the vinegar reduces by half and thickens to a syrup-like consistency, approximately 10-15 minutes. Remove from heat and allow it to cool.
- Slice the Ingredients: While the balsamic reduction is cooling, slice the tomatoes and mozzarella cheese into 1/4-inch thick slices. Arrange them on a large serving platter, alternating between the tomato and mozzarella slices.
- Assemble the Salad: Tuck fresh basil leaves between the slices of tomato and mozzarella. Use as many basil leaves as you like, depending on your preference for the herb’s flavor.
- Season and Dress the Salad: Drizzle extra virgin olive oil over the salad, followed by the cooled balsamic reduction. Season with salt and freshly ground black pepper to taste.
- Serve and Enjoy: Allow the salad to sit for a few minutes before serving to let the flavors meld together. Serve at room temperature for the best taste experience.
Extra Tips: To elevate the flavor of your Caprese Salad, consider using heirloom tomatoes for their unique colors and flavors. When selecting mozzarella, opt for fresh buffalo mozzarella if available, as it has a richer taste and softer texture.
If you prefer a thicker balsamic reduction, continue to simmer until it reaches your desired consistency, but remember that it will thicken further as it cools. Finally, if you like a touch of sweetness, try adding a pinch of sugar to the balsamic vinegar while reducing it.
Fava Bean and Pecorino Crostini

Fava Bean and Pecorino Crostini is a delightful Italian appetizer that celebrates the fresh, vibrant flavors of spring. This dish is perfect for entertaining or as a starter for a cozy family dinner. The creamy texture of the fava beans pairs beautifully with the sharp, salty taste of Pecorino cheese, all atop a perfectly toasted slice of crusty bread. The combination creates a harmonious blend of flavors and textures that will leave your guests craving more.
This dish not only highlights the season’s bounty but also demonstrates the simplicity and elegance of Italian cuisine. It’s a great way to introduce people to the joys of cooking with fava beans, which are a staple in many traditional Italian dishes. The crostini are easy to prepare and can be made ahead of time, making them a convenient option for dinner parties or casual gatherings. Serve these crostini with a chilled glass of white wine to complement the flavors and enhance the dining experience.
Ingredients (Serves 4-6):
- 1 pound fresh fava beans, shelled
- 1 loaf of crusty Italian bread or baguette
- 2 tablespoons extra virgin olive oil
- 1 garlic clove, halved
- 1/2 cup freshly grated Pecorino Romano cheese
- Salt and freshly ground black pepper, to taste
- Juice of 1 lemon
- Fresh mint leaves, for garnish
Cooking Instructions:
- Prepare the Fava Beans: Begin by bringing a pot of salted water to a boil. Add the shelled fava beans and blanch them for about 2-3 minutes until they’re bright green and tender. Drain the beans and transfer them to a bowl of ice water to stop the cooking process. Once cooled, gently peel the outer skin from each bean and set them aside.
- Prepare the Bread: Preheat your oven to 400°F (200°C). Slice the Italian bread or baguette into 1/2-inch thick slices. Arrange them in a single layer on a baking sheet and lightly brush each slice with olive oil. Toast in the oven for about 5-7 minutes until they’re golden brown and crispy. Remove from oven and rub the cut side of the garlic clove over each slice for added flavor.
- Make the Bean Mixture: In a medium bowl, combine the peeled fava beans, lemon juice, and half of the grated Pecorino Romano cheese. Use a fork to gently mash the beans, leaving some chunky bits for texture. Season the mixture with salt and freshly ground black pepper to taste.
- Assemble the Crostini: Spread a generous amount of the fava bean mixture onto each toasted bread slice. Sprinkle the remaining Pecorino cheese over the top and garnish with fresh mint leaves.
- Serve: Arrange the crostini on a platter and serve immediately. Enjoy them as a delicious appetizer or part of an Italian-themed meal.
Extra Tips: When working with fava beans, remember that they require a double peeling process: first the outer pod, and then the inner skin after blanching. This step guarantees the beans are tender and flavorful. If fresh fava beans aren’t available, you can use frozen ones as a substitute.
Be mindful of the bread you choose; a sturdy, crusty loaf will hold up best under the weight of the fava bean mixture. Finally, don’t skip the garlic rubbing step, as it adds a subtle yet essential layer of flavor to the crostini.
Limoncello Tiramisu

Limoncello Tiramisu is a revitalizing twist on the classic Italian dessert, perfect for a light and zesty finish to your spring dinner. This delightful variation combines the creamy richness of mascarpone cheese with the bright, citrusy flavor of limoncello, an Italian lemon liqueur.
The dessert is layered with ladyfingers soaked in a limoncello syrup, interspersed with a luscious mascarpone filling that’s infused with lemon zest and juice. The result is a dessert that’s both indulgent and invigorating, making it an ideal end to any Italian meal.
This Limoncello Tiramisu recipe serves 4-6 people, making it perfect for small gatherings or family dinners. The layers of lemony goodness aren’t only visually appealing but also offer a burst of flavor that’s sure to impress your guests.
The dessert can be prepared in advance, allowing the flavors to meld beautifully, guaranteeing a delicious treat that’s both effortless and elegant. Embrace the spirit of spring with this delightful dessert that will transport your taste buds straight to the sun-drenched coast of Italy.
Ingredients (Serves 4-6):
- 1 cup limoncello
- 1 cup water
- 1/2 cup granulated sugar
- 24-30 ladyfinger cookies
- 16 oz (450g) mascarpone cheese
- 1 cup heavy cream
- 1/2 cup powdered sugar
- Zest of 2 lemons
- Juice of 1 lemon
- 1 tsp vanilla extract
- Lemon slices and mint leaves for garnish (optional)
Cooking Instructions:
- Prepare the Limoncello Syrup: In a small saucepan, combine the limoncello, water, and granulated sugar. Heat over medium heat, stirring until the sugar dissolves completely. Remove from heat and allow to cool to room temperature.
- Make the Mascarpone Filling: In a large mixing bowl, combine the mascarpone cheese, heavy cream, powdered sugar, lemon zest, lemon juice, and vanilla extract. Use an electric mixer to beat the mixture on medium-high speed until it becomes smooth and thickened, forming soft peaks.
- Assemble the Tiramisu: Quickly dip each ladyfinger into the cooled limoncello syrup, making sure they’re soaked but not soggy. Arrange a layer of soaked ladyfingers in the bottom of a 9×9-inch (or similar) dish. Spread half of the mascarpone filling evenly over the ladyfingers.
- Repeat Layers: Add another layer of soaked ladyfingers on top of the mascarpone filling. Spread the remaining mascarpone mixture over the second layer of ladyfingers, smoothing it out with a spatula.
- Chill the Dessert: Cover the dish with plastic wrap and refrigerate for at least 4 hours, or overnight if possible. This allows the flavors to meld and the tiramisu to set properly.
- Serve and Garnish: Before serving, optionally garnish with lemon slices and fresh mint leaves. Cut into squares and serve chilled to enjoy the revitalizing, creamy dessert.
Extra Tips:
For the best results, use fresh, high-quality ingredients, particularly for the mascarpone and lemons, as they’re the stars of this dessert.
If you prefer a non-alcoholic version, you can substitute the limoncello with a homemade lemon syrup by increasing the amount of lemon juice and zest while omitting the alcohol.
Additionally, be careful not to over-soak the ladyfingers to avoid a soggy texture; a quick dip is all they need.
Finally, preparing this dessert a day in advance will enhance the flavor and texture, making it a convenient option for entertaining.