

When I think of Italian holiday dinners, I picture gatherings filled with warmth, laughter, and classic flavors that evoke cherished traditions. Imagine a table adorned with dishes like Classic Lasagna Al Forno and Rich Ossobuco, with each bite offering a taste of history. These recipes are more than just meals; they’re a tribute to our heritage. Are you curious about how these beloved dishes can enhance your festive season? Let’s explore their delicious legacy together.
Classic Lasagna Al Forno
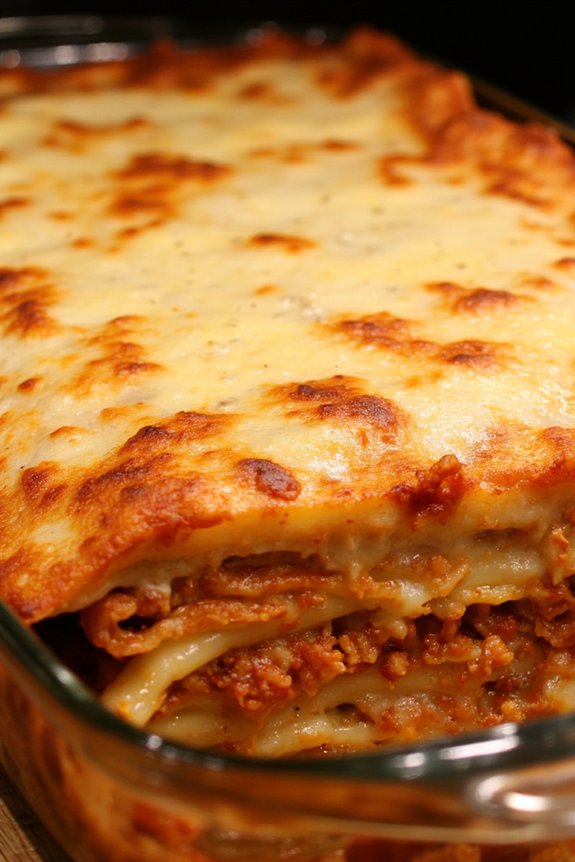
Lasagna Al Forno is a quintessential Italian dish that’s beloved for its rich layers of flavor and comforting qualities. This classic recipe embodies everything that’s wonderful about Italian cuisine: fresh ingredients, robust flavors, and the perfect marriage of textures.
Traditionally made with layers of pasta, meat sauce, béchamel, and cheese, this dish is a celebration of hearty, homemade cooking that’s perfect for festive gatherings or an indulgent family meal.
The key to creating an authentic Lasagna Al Forno lies in the preparation of each individual component. A rich ragù made with a medley of ground meats and tomatoes forms the base, which is then complemented by a smooth and creamy béchamel sauce. Fresh sheets of pasta and generous amounts of Parmigiano-Reggiano cheese complete the ensemble.
When baked to perfection, the lasagna emerges from the oven with a golden, bubbling crust that invites you to savor each mouthful.
Ingredients (Serves 4-6):
- 9-12 sheets of fresh lasagna pasta
- 1 pound ground beef
- 1/2 pound ground pork
- 1 onion, finely chopped
- 2 cloves garlic, minced
- 1 carrot, finely chopped
- 1 celery stalk, finely chopped
- 1 can (28 ounces) crushed tomatoes
- 2 tablespoons tomato paste
- 1 cup red wine
- 1 teaspoon dried oregano
- 1 teaspoon dried basil
- Salt and pepper to taste
- 2 cups whole milk
- 4 tablespoons unsalted butter
- 1/4 cup all-purpose flour
- 1/4 teaspoon ground nutmeg
- 2 cups grated Parmigiano-Reggiano cheese
- Olive oil
Cooking Instructions:
- Prepare the Ragù: In a large skillet, heat a drizzle of olive oil over medium heat. Add the chopped onion, garlic, carrot, and celery. Sauté until the vegetables are softened, about 5 minutes.
- Increase the heat to medium-high and add the ground beef and pork, cooking until browned. Drain excess fat if necessary.
- Simmer the Sauce: Stir in the tomato paste and cook for another minute. Pour in the red wine, allowing it to simmer and reduce slightly.
- Add the crushed tomatoes, oregano, basil, salt, and pepper. Reduce the heat to low and let the sauce simmer gently for 45 minutes, stirring occasionally, until thickened.
- Make the Béchamel Sauce: In a separate saucepan, melt the butter over medium heat. Stir in the flour to form a roux, cooking for a minute until slightly golden.
- Gradually whisk in the milk, making certain no lumps form. Continue to cook, whisking constantly, until the béchamel is smooth and thickened. Season with salt, pepper, and nutmeg.
- Assemble the Lasagna: Preheat your oven to 375°F (190°C). Spread a thin layer of ragù on the bottom of a baking dish.
- Place a layer of lasagna sheets on top, followed by more ragù, a layer of béchamel, and a sprinkling of Parmigiano-Reggiano. Repeat the layers until all ingredients are used, finishing with béchamel and cheese on top.
- Bake the Lasagna: Cover the baking dish with foil and bake in the preheated oven for 25 minutes.
- Remove the foil and bake for an additional 15 minutes, or until the top is golden brown and bubbling. Allow the lasagna to rest for 10 minutes before serving.
Extra Tips:
For an even richer flavor, consider making the ragù a day ahead as this allows the flavors to meld better.
If fresh pasta is unavailable, use good quality dried pasta, just make sure to slightly undercook it before assembling. To make slicing easier, let the lasagna cool slightly before cutting into it.
You can also try adding a pinch of sugar to the tomato sauce if the tomatoes are particularly acidic. Enjoy this delightful dish with a side of garlic bread and a fresh green salad.
Rich and Savory Ossobuco

Ossobuco is a traditional Italian dish that hails from Milan, featuring braised veal shanks cooked to tender perfection. This dish is celebrated for its rich flavors, aromatic herbs, and hearty texture, making it a perfect choice for a holiday dinner.
The veal shanks are slowly cooked with vegetables, wine, and broth, which allows the meat to absorb the savory essence of the ingredients. Traditionally served with gremolata—a zesty mixture of lemon zest, garlic, and parsley—Ossobuco is often paired with risotto or polenta, making it a comforting and satisfying meal.
This recipe for Rich and Savory Ossobuco serves 4-6 people and captures the authentic flavors that make this dish a beloved classic. The process involves searing the meat to lock in juices, then braising it slowly to achieve a melt-in-your-mouth texture.
The combination of white wine, tomatoes, and aromatic herbs elevates the flavor profile, creating a dish that’s both elegant and deeply satisfying. Whether you’re planning a festive holiday gathering or a special family dinner, this Ossobuco recipe is sure to impress.
Ingredients:
- 4 veal shanks (about 1 1/2 inches thick)
- Salt and freshly ground black pepper
- 1/4 cup all-purpose flour
- 1/4 cup olive oil
- 1 onion, finely chopped
- 1 carrot, diced
- 1 celery stalk, diced
- 3 cloves garlic, minced
- 1/2 cup dry white wine
- 1 cup beef broth
- 1 can (14 ounces) crushed tomatoes
- 1 teaspoon dried thyme
- 1 bay leaf
- Zest of 1 lemon
- 2 tablespoons chopped fresh parsley
- Optional: Risotto or polenta for serving
Cooking Instructions:
- Prepare the Veal Shanks:
- Season the veal shanks generously with salt and pepper. Dredge each piece in flour, shaking off any excess.
- Sear the Meat:
- Heat the olive oil in a large, heavy pot over medium-high heat. Add the veal shanks in batches, and sear them on all sides until they’re golden brown. This should take about 8-10 minutes. Remove the shanks and set them aside.
- Cook the Vegetables:
- In the same pot, add the onion, carrot, and celery. Sauté for about 5 minutes until the vegetables are softened. Add the garlic and cook for another minute.
- Deglaze and Add Liquid:
- Pour in the white wine, scraping up any browned bits from the bottom of the pot. Let the wine reduce by half, then stir in the beef broth and crushed tomatoes.
- Add Herbs and Simmer:
- Return the veal shanks to the pot. Add thyme and bay leaf. Bring the liquid to a gentle simmer, then cover the pot with a tight-fitting lid.
- Braise the Ossobuco:
- Transfer the pot to a preheated oven at 350°F (175°C) and cook for about 1 1/2 to 2 hours, or until the meat is fork-tender and falling off the bone.
- Prepare Gremolata:
- While the ossobuco is cooking, mix together the lemon zest and chopped parsley. Set aside.
- Serve:
- Remove the bay leaf from the pot. Serve the ossobuco hot, topped with a sprinkle of gremolata. Pair with risotto or polenta.
Extra Tips:
For the best results, make sure that you sear the veal shanks thoroughly to create a flavorful crust. This step locks in moisture and enhances the overall taste of the dish.
If you prefer a thicker sauce, you can remove the lid during the last 30 minutes of cooking to allow the liquid to reduce further. Additionally, consider using a bone-in veal shank, as the marrow adds a rich, velvety texture to the sauce.
Finally, adjust the seasoning to your taste before serving, and enjoy this authentic Italian delicacy with a glass of good wine.
Creamy Risotto Alla Milanese
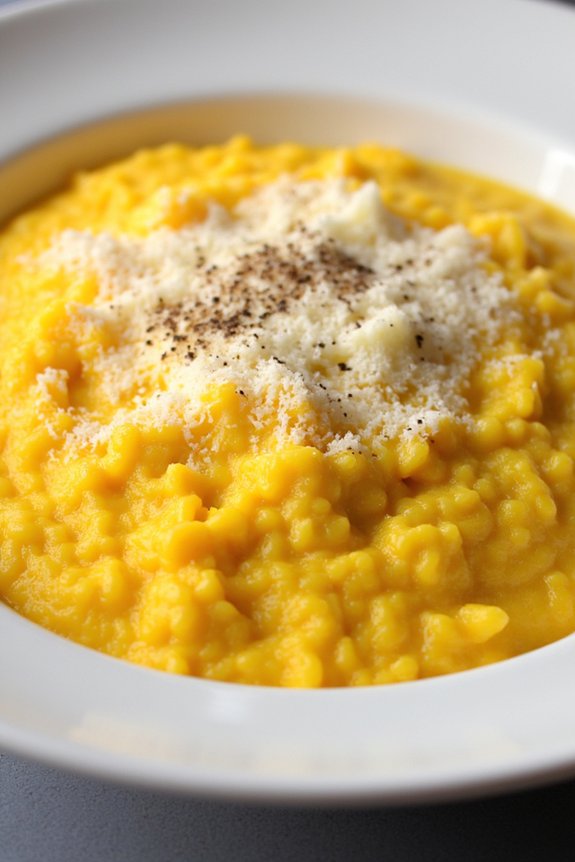
Creamy Risotto Alla Milanese is a classic Italian dish that hails from Milan, known for its rich and luxurious texture. This traditional recipe is infused with saffron, giving the risotto its signature golden hue and a subtle, yet distinct flavor.
Risotto Alla Milanese is the epitome of comfort food, perfect for a special occasion or a cozy holiday dinner. Its creamy consistency is achieved through a slow, patient cooking process that allows the Arborio rice to release its starches, creating a velvety texture that pairs beautifully with the savory notes of Parmesan cheese.
Preparing this dish requires attention to detail and a bit of patience, but the results are truly rewarding. Risotto Alla Milanese is typically served as a first course, or “primo,” in an Italian meal, but it can easily stand alone as a main dish due to its rich flavors.
The key to making a perfect risotto is to use high-quality ingredients and to add the broth gradually, allowing the rice to absorb the liquid slowly for the perfect texture. Whether you’re new to making risotto or a seasoned chef, this recipe will guide you to creating a delicious and authentic Risotto Alla Milanese.
Ingredients for 4-6 servings:
- 2 cups Arborio rice
- 1/4 cup unsalted butter
- 1 small onion, finely chopped
- 1/2 cup dry white wine
- 4 cups chicken or vegetable broth, warmed
- 1/2 teaspoon saffron threads
- 3/4 cup grated Parmesan cheese
- Salt to taste
- Freshly ground black pepper
- Optional: additional butter for finishing
Cooking Instructions:
- Prepare the Saffron Broth: Begin by warming the chicken or vegetable broth in a saucepan over low heat. Add the saffron threads to the broth and allow it to infuse while you prepare the other ingredients. This step is important to bring out the full color and flavor of the saffron.
- Cook the Onions: In a large, heavy-bottomed pot or skillet, melt 1/4 cup of unsalted butter over medium heat. Add the finely chopped onion and sauté until translucent, about 5 minutes. Be careful not to let the onions brown, as this will affect the flavor of the risotto.
- Toast the Rice: Add the Arborio rice to the pot with the onions. Stir the rice continuously for about 2-3 minutes, ensuring each grain is coated in butter and begins to toast slightly. This step helps the rice maintain its structure during cooking.
- Deglaze with Wine: Pour in the dry white wine and stir until it has mostly evaporated. This adds a depth of flavor to the risotto and helps deglaze the pan.
- Add the Broth Gradually: Begin adding the saffron-infused broth to the rice one ladle at a time, stirring frequently. Allow the rice to absorb most of the liquid before adding the next ladle. Continue this process for 18-20 minutes, or until the rice is creamy and al dente.
- Finish with Parmesan: Once the rice has reached the desired consistency, remove the pot from heat. Stir in the grated Parmesan cheese until fully melted and combined. Adjust the seasoning with salt and freshly ground black pepper to taste.
- Rest and Serve: If desired, stir in an additional knob of butter for extra creaminess. Let the risotto rest for a couple of minutes before serving, allowing the flavors to meld together.
Extra Tips:
When cooking Risotto Alla Milanese, it’s important to use a high-quality Parmesan cheese for the best flavor. Additionally, make sure to keep the broth warm throughout the cooking process; adding cold broth can halt the cooking of the rice.
Stir the risotto gently and consistently to prevent it from sticking to the bottom of the pot. Finally, don’t rush the process – risotto requires patience and attention to achieve the perfect creamy texture. Enjoy your culinary journey to Milan with this delightful dish!
Traditional Baccalà Alla Vicentina

Traditional Baccalà Alla Vicentina is a cherished Italian dish that hails from the Veneto region, renowned for its rich flavors and tender texture. This dish, made with salted cod, has been a staple in the region for centuries, often served during festive occasions and particularly beloved during the Christmas season.
The preparation involves soaking the dried cod to remove excess salt, creating a delicate balance of flavors through the slow cooking process, and combining it with onions, milk, and a touch of anchovy for a truly authentic experience.
To prepare this classic dish for your holiday table, it’s important to plan ahead, as the salted cod requires an extended soaking period to achieve the perfect texture. Once this essential step is complete, the cod is lovingly cooked with simple yet flavorful ingredients, allowing the natural taste of the fish to shine.
The resulting dish is served with creamy polenta, which perfectly complements the savory sauce and tender fish, making it an ideal centerpiece for a festive Italian meal.
Ingredients (Serves 4-6)
- 1 kg (2.2 lbs) salted cod (baccalà)
- 2 large onions, thinly sliced
- 3-4 anchovy fillets
- 1 cup (240 ml) extra-virgin olive oil
- 500 ml (2 cups) whole milk
- 50 g (1.8 oz) all-purpose flour
- 1 cup (240 ml) water
- Freshly ground black pepper, to taste
- Salt, to taste
- Polenta, to serve
Cooking Instructions
- Prepare the Cod: Begin by soaking the salted cod in cold water for 48 hours, changing the water every 8 hours. This process will remove excess salt and rehydrate the fish.
- Flake the Cod: After soaking, drain and pat the cod dry with paper towels. Remove any skin and bones, then flake the fish into medium-sized pieces.
- Sauté Onions and Anchovies: In a large, heavy-bottomed pan, heat half of the olive oil over medium heat. Add the sliced onions and sauté until they become translucent. Add the anchovy fillets, stirring until they dissolve into the onions.
- Combine Ingredients: Dredge the flaked cod in flour, shaking off the excess. Gently place the cod pieces into the pan with the onions and anchovies. Stir carefully to combine.
- Add Liquids: Pour the milk and water over the fish, making certain the cod is mostly submerged. Season with freshly ground black pepper. Be cautious with salt, as the cod retains some saltiness.
- Simmer: Bring the mixture to a gentle simmer. Reduce the heat to low, cover, and allow it to cook slowly for approximately 2 hours. Stir occasionally, ensuring the cod doesn’t stick to the bottom of the pan.
- Final Touches: In the last 10 minutes of cooking, add the remaining olive oil, stirring gently to incorporate. Taste and adjust seasoning if needed.
- Serve: Serve the Baccalà Alla Vicentina hot, accompanied by a creamy polenta to soak up the flavorful sauce.
Extra Tips
When preparing Baccalà Alla Vicentina, patience is key. The slow cooking process guarantees the cod becomes tender and the flavors meld perfectly.
Be cautious with the salt, as the cod retains some saltiness even after soaking. Make sure to use a good quality extra-virgin olive oil, as it adds richness to the dish.
Finally, pairing it with polenta not only complements the taste but also provides a traditional Italian feel to the meal.
Hearty Cacciucco Livornese
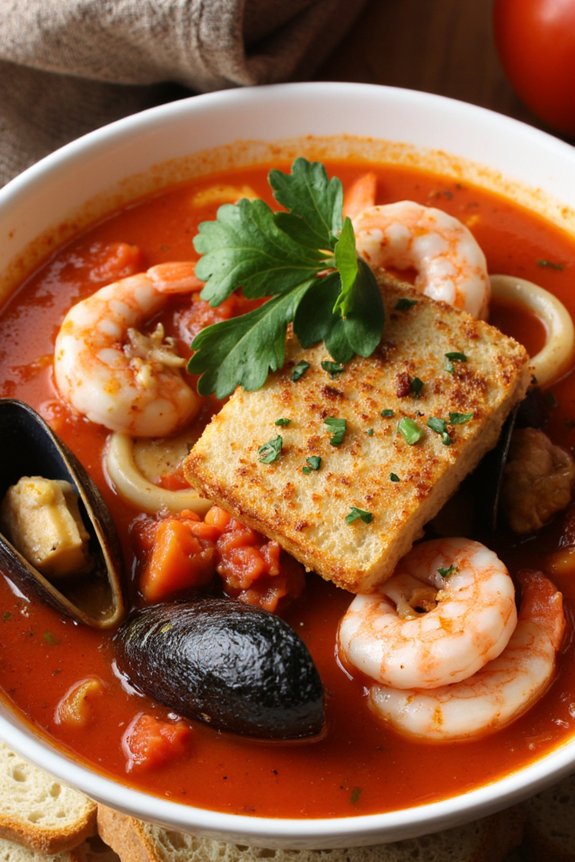
Hearty Cacciucco Livornese is an authentic Italian seafood stew originating from the coastal city of Livorno in Tuscany. Known for its rich and robust flavors, this dish is a delightful medley of various seafood simmered in a savory tomato-based broth. Traditionally, the stew is served over toasted bread, allowing the slices to soak up the flavorful broth. Cacciucco Livornese is a perfect dish for a festive holiday dinner, offering both comfort and a touch of elegance to your table.
With its roots deeply embedded in Italian culinary tradition, Cacciucco Livornese brings together a variety of seafood, including fish, squid, mussels, and shrimp. Each ingredient contributes to the depth of flavor, creating a hearty and satisfying meal that’s ideal for sharing with family and friends. This dish isn’t only a feast for the palate but also a visual treat with its vibrant colors and enticing aroma.
Preparing this stew requires a bit of patience and love, but the end result is a rewarding culinary experience that captures the essence of Italian coastal cuisine.
Ingredients for 4-6 servings:
- 1 pound mixed fish fillets (such as cod, monkfish, or haddock), cut into chunks
- 1 pound squid, cleaned and cut into rings
- 1 pound mussels, cleaned and debearded
- 1 pound shrimp, peeled and deveined
- 1/2 cup olive oil
- 1 large onion, finely chopped
- 4 cloves garlic, minced
- 1 teaspoon red pepper flakes
- 1/2 cup dry white wine
- 1 can (14 ounces) crushed tomatoes
- 1 tablespoon tomato paste
- 4 cups fish or seafood stock
- 1 bay leaf
- 1 tablespoon fresh parsley, chopped
- Salt and pepper to taste
- 6 slices crusty bread, toasted
Cooking Instructions:
- Prepare the Base: Heat olive oil in a large pot over medium heat. Add the chopped onion and sauté until translucent, about 5 minutes. Stir in the minced garlic and red pepper flakes, cooking for an additional minute until fragrant.
- Deglaze and Simmer: Pour in the white wine to deglaze the pan, stirring to scrape up any browned bits. Allow the wine to simmer for 2-3 minutes until slightly reduced.
- Add Tomato and Stock: Stir in the crushed tomatoes, tomato paste, and fish or seafood stock. Add the bay leaf, and bring the mixture to a gentle simmer. Season with salt and pepper.
- Cook the Squid: Add the squid rings to the pot, cover, and let simmer for about 20 minutes. This will tenderize the squid and infuse the broth with flavor.
- Add Remaining Seafood: Carefully add the fish chunks, mussels, and shrimp to the pot. Cover and cook for another 5-7 minutes, or until the fish is cooked through, the shrimp are pink, and the mussels have opened.
- Finish and Serve: Remove the bay leaf and discard. Stir in the chopped parsley. Ladle the stew over the toasted bread slices in serving bowls, allowing the bread to absorb the rich broth. Serve immediately.
Extra Tips:
When cooking Cacciucco Livornese, it’s crucial to use the freshest seafood available to enhance the dish’s flavor. Be sure to clean the mussels thoroughly, discarding any that don’t close when tapped.
You can also customize the stew by adding other seafood like clams or scallops, depending on your preference. For a richer taste, consider using homemade fish stock.
Finally, the stew can be prepared a day in advance, allowing the flavors to meld and deepen overnight, making it even more delicious when reheated and served.
Flavorful Porchetta Roast
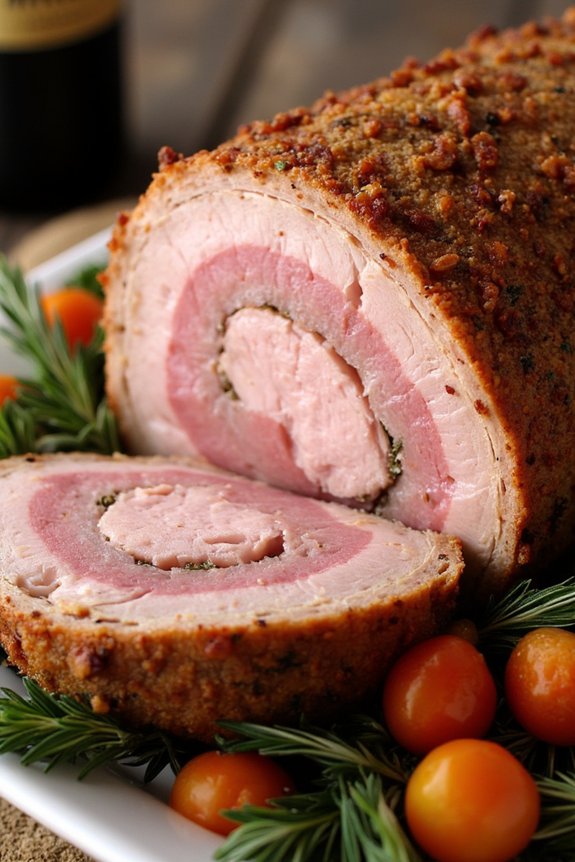
Porchetta is a classic Italian dish known for its savory and aromatic flavors, making it a perfect centerpiece for any holiday dinner. This succulent pork roast is seasoned with a blend of herbs and spices, then slow-cooked to achieve a tender and juicy interior with a crispy, golden-brown exterior. Originating from central Italy, porchetta traditionally involves a whole pig, but this recipe simplifies the process by using a pork belly or pork loin, making it more accessible for home cooks.
Preparing a Porchetta Roast is a delightful culinary experience that engages the senses from start to finish. The process begins with creating a fragrant herb mixture that infuses the meat with its robust character. When you slice into the finished roast, you’ll discover layers of perfectly seasoned pork that are both visually appealing and deliciously satisfying. Served hot from the oven, this dish is a guaranteed showstopper on any festive table.
Ingredients (Serves 4-6):
- 4-5 pound pork belly (or pork loin)
- 2 tablespoons olive oil
- 1 tablespoon fennel seeds
- 1 tablespoon kosher salt
- 1 tablespoon black pepper
- 1 tablespoon chopped fresh rosemary
- 1 tablespoon chopped fresh thyme
- 1 tablespoon chopped fresh sage
- 6 cloves garlic, minced
- Zest of 1 lemon
- Butcher’s twine
Cooking Instructions:
- Prepare the Pork: Start by laying the pork belly skin-side down on a clean surface. If using pork loin, butterfly it to create a flat surface. Score the meat with shallow cuts to help the seasoning penetrate.
- Make the Herb Mixture: In a small bowl, combine the minced garlic, fennel seeds, rosemary, thyme, sage, lemon zest, salt, and pepper. Mix these ingredients thoroughly to create a fragrant herb paste.
- Season the Pork: Rub the herb mixture evenly over the scored side of the pork. Make certain that the seasoning is pressed into the cuts to enhance flavor absorption. Roll the pork tightly into a log, skin-side out.
- Tie the Roast: Use butcher’s twine to tie the pork roll at 1-2 inch intervals. This will help the roast keep its shape during cooking.
- Preheat the Oven: Preheat your oven to 275°F (135°C). This low and slow cooking method guarantees the meat remains tender.
- Roast the Porchetta: Place the tied pork roll on a rack in a roasting pan. Drizzle olive oil over the top to help crisp the skin. Roast for approximately 3 hours, or until the internal temperature reaches 145°F (63°C).
- Crisp the Skin: Increase the oven temperature to 450°F (230°C) for the final 20-30 minutes. This step is vital for achieving a crispy skin. Keep a close eye to prevent burning.
- Rest and Serve: Remove the porchetta from the oven and let it rest for at least 15 minutes before slicing. This resting period allows the juices to redistribute, making for a moist and flavorful roast.
Extra Tips:
For an even more flavorful porchetta, consider marinating the pork overnight in the herb mixture. This allows the meat to absorb the aromatic notes more thoroughly.
Additionally, scoring the skin in a crisscross pattern can enhance the crispiness of the skin once roasted. When slicing, use a sharp knife to achieve clean cuts and maintain the roast’s presentation.
Finally, serve with your favorite Italian sides, such as roasted potatoes or a fresh salad, to complete the meal.
Authentic Tortellini in Brodo
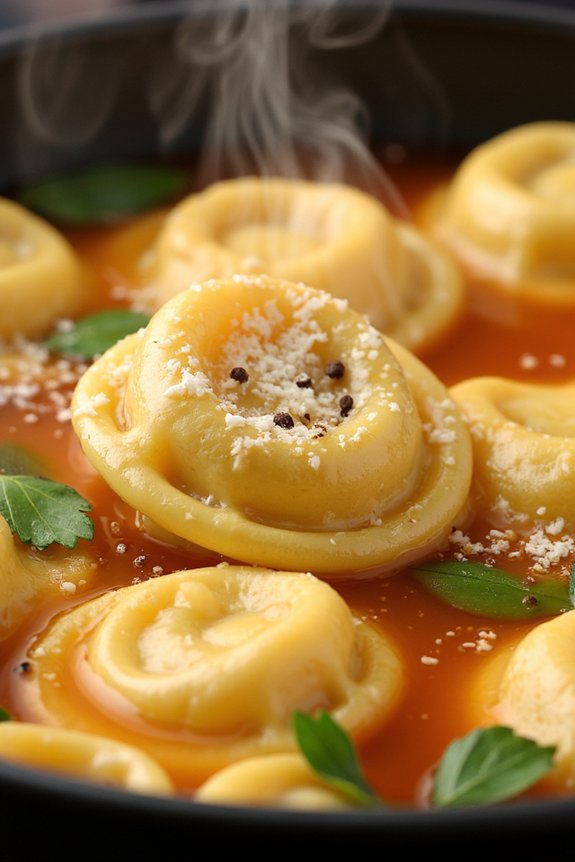
Authentic Tortellini in Brodo is a classic Italian dish that embodies the warmth and comfort of Italian holiday gatherings. Traditionally enjoyed as a first course during the festive season, this dish combines delicate tortellini filled with a rich mixture of meats and cheese, served in a savory, aromatic broth. The simplicity and depth of flavors in Tortellini in Brodo make it a beloved centerpiece of Italian holiday feasts, capturing the essence of home-cooked, traditional Italian cuisine.
To prepare Authentic Tortellini in Brodo, you’ll start by crafting homemade tortellini, a process that involves creating a tender pasta dough and a luscious filling. The tortellini are then cooked in a homemade brodo, or broth, which is often made from a mix of beef, chicken, and aromatic vegetables simmered to perfection. The resulting dish is a harmonious blend of textures and tastes, with the delicate pasta and savory filling beautifully complemented by the rich broth.
Ingredients (Serves 4-6):
For the Tortellini Dough:
- 300g all-purpose flour
- 3 large eggs
- A pinch of salt
For the Filling:
- 100g ground pork
- 100g mortadella, finely chopped
- 100g prosciutto, finely chopped
- 100g Parmesan cheese, grated
- 1 egg
- A pinch of nutmeg
- Salt and pepper to taste
For the Brodo:
- 1 kg beef bones
- 1 kg chicken pieces (with bones)
- 1 onion, halved
- 2 carrots, chopped
- 2 celery stalks, chopped
- 1 tomato, halved
- 1 bay leaf
- Salt to taste
- 3 liters of water
Cooking Instructions:
- Prepare the Brodo: In a large pot, combine the beef bones, chicken pieces, onion, carrots, celery, tomato, bay leaf, and salt. Add 3 liters of water, bring to a boil, then reduce the heat and let it simmer for about 3 hours. Skim off any foam that rises to the surface. Once done, strain the broth and set it aside.
- Make the Tortellini Dough: On a clean surface, place the flour and make a well in the center. Add the eggs and a pinch of salt into the well. Gradually incorporate the flour into the eggs using a fork, then knead the dough by hand for about 10 minutes until smooth and elastic. Wrap in plastic wrap and let it rest for at least 30 minutes.
- Prepare the Filling: In a bowl, mix the ground pork, mortadella, prosciutto, Parmesan cheese, egg, nutmeg, salt, and pepper until well combined.
- Assemble the Tortellini: Roll out the dough into a thin sheet. Cut the dough into small squares, about 5 cm each. Place a small amount of filling in the center of each square. Fold the square into a triangle, sealing the edges by pressing them firmly. Bring the two corners of the triangle together and press to seal, forming the tortellini shape.
- Cook the Tortellini: Bring the strained broth back to a gentle boil. Add the tortellini and cook for about 3-5 minutes, or until they float to the surface. Adjust the seasoning of the broth with salt, if needed.
- Serve: Ladle the tortellini and broth into bowls, confirming each serving has a good amount of both tortellini and broth. Serve immediately, with additional grated Parmesan cheese on the side.
Extra Tips:
When crafting tortellini, verify the dough is rolled out very thinly to achieve the delicate texture that’s characteristic of this dish.
If you’re short on time, you can prepare the tortellini in advance and freeze them before cooking. This dish is best enjoyed immediately after cooking; however, if you’re preparing it in advance, store the tortellini and broth separately to prevent the pasta from becoming soggy.
When making the broth, feel free to adjust the flavor by adding herbs such as parsley or thyme according to your preference.
Rustic Polenta With Sausage

Rustic Polenta with Sausage is a hearty, comforting dish that brings a touch of authentic Italian cuisine to your holiday table. This dish combines the creamy texture of polenta with the robust flavors of savory sausage, creating a meal that’s both satisfying and delicious.
The simplicity of the ingredients allows each flavor to shine, making it a perfect choice for a festive gathering or a cozy family dinner. This recipe serves 4-6 people, making it ideal for sharing with loved ones during the holiday season.
The preparation involves cooking polenta to a creamy consistency and pairing it with sausages that have been browned to perfection. The dish is often topped with a sprinkle of Parmesan cheese and fresh herbs, adding an extra layer of flavor and aroma. It’s a straightforward recipe that captures the essence of rustic Italian cooking, sure to become a favorite at your holiday feast.
Ingredients:
- 1 1/2 cups polenta (coarse cornmeal)
- 6 cups water
- 1 teaspoon salt
- 2 tablespoons butter
- 1/2 cup grated Parmesan cheese
- 1 pound Italian sausage (sweet or spicy)
- 2 tablespoons olive oil
- 1 small onion, diced
- 2 cloves garlic, minced
- 1 teaspoon dried oregano
- 1/2 teaspoon red pepper flakes (optional)
- 1/2 cup chicken broth
- Fresh parsley, chopped, for garnish
Cooking Instructions:
1. Prepare the Polenta:
In a large saucepan, bring 6 cups of water to a boil. Add the salt, then slowly whisk in the polenta to prevent lumps from forming. Reduce the heat to low and cook, stirring frequently, until the polenta thickens and becomes creamy, about 30-40 minutes.
2. Enhance the Polenta:
Once the polenta is cooked, stir in the butter and Parmesan cheese until fully incorporated. Adjust the seasoning with salt if needed. Keep the polenta warm while preparing the sausage.
3. Cook the Sausage:
In a large skillet, heat olive oil over medium heat. Add the sausages and cook until browned on all sides, about 10 minutes. Remove the sausages from the skillet and set aside.
4. Prepare the Sauce:
In the same skillet, add the diced onion and garlic. Sauté until the onion becomes translucent. Stir in the oregano and red pepper flakes, if using.
5. Simmer the Sausage:
Return the sausages to the skillet. Pour in the chicken broth and bring to a simmer. Cover and cook for another 10 minutes, allowing the sausages to absorb the flavors.
6. Serve the Dish:
Spoon the creamy polenta onto a large serving platter or individual plates. Top with the sausage and onion mixture. Garnish with freshly chopped parsley.
Extra Tips:
For the best results, use coarse-ground polenta, as it provides a superior texture compared to instant varieties. Stirring the polenta frequently is key to achieving a creamy consistency without lumps.
If the polenta becomes too thick, you can adjust the consistency by adding a bit more water or broth. When selecting sausages, opt for high-quality Italian sausages, as their flavors will greatly impact the dish’s overall taste.
Finally, feel free to customize the seasoning and herbs according to your preference, ensuring this dish truly reflects your personal taste.
Spinach and Ricotta Ravioli
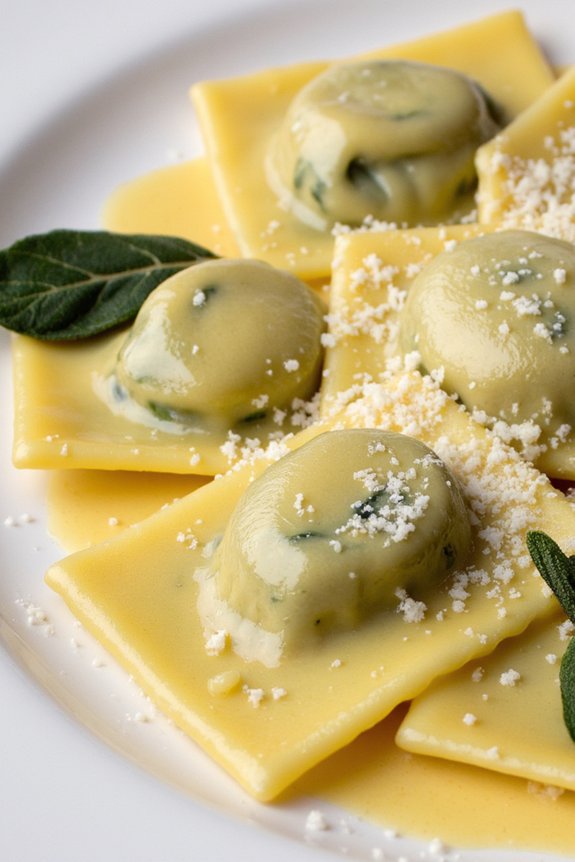
Spinach and Ricotta Ravioli is a classic Italian dish that embodies the perfect balance of flavors and textures. The delicate pasta encases a rich filling of creamy ricotta cheese blended with fresh, vibrant spinach. This dish is ideal for a holiday dinner, showcasing the simplicity and elegance of authentic Italian cuisine.
Whether served as a main course or a starter, Spinach and Ricotta Ravioli can be paired with a light sage butter sauce or a simple marinara to enhance its delightful flavors.
Preparing Spinach and Ricotta Ravioli from scratch is a labor of love, but the results are rewarding and certain to impress your guests. The process involves making fresh pasta dough, preparing the spinach and ricotta filling, and assembling the ravioli. This dish serves 4-6 people, making it perfect for a small family gathering or an intimate holiday dinner.
Ingredients for 4-6 servings:
- 2 cups all-purpose flour
- 3 large eggs
- 1 tablespoon olive oil
- 1/2 teaspoon salt
- 1 cup ricotta cheese
- 1 cup fresh spinach, chopped
- 1/2 cup grated Parmesan cheese
- 1/4 teaspoon nutmeg
- Salt and pepper to taste
- 1/4 cup unsalted butter
- 6-8 fresh sage leaves
Cooking Instructions:
- Prepare the Pasta Dough: In a large mixing bowl, combine the flour and salt. Make a well in the center and add the eggs and olive oil. Gradually mix the flour into the eggs until a dough forms. Knead the dough on a lightly floured surface for about 8-10 minutes until smooth and elastic. Wrap the dough in plastic wrap and let it rest for at least 30 minutes.
- Make the Filling: In a skillet over medium heat, lightly cook the chopped spinach until wilted. Allow it to cool slightly, then squeeze out any excess moisture. In a bowl, mix together the ricotta, spinach, Parmesan cheese, nutmeg, salt, and pepper until well combined.
- Roll the Dough: Divide the rested dough into four equal parts. Using a pasta machine or a rolling pin, roll out each piece into a thin sheet. Aim for a thickness of about 1/16 inch.
- Assemble the Ravioli: Place a sheet of pasta on a lightly floured surface. Drop teaspoons of filling at intervals, leaving about an inch between each. Brush around the filling with water, then place another sheet of pasta on top. Press around the filling to seal, making sure no air is trapped. Cut into individual ravioli using a ravioli cutter or a sharp knife.
- Cook the Ravioli: Bring a large pot of salted water to a boil. Gently drop the ravioli into the pot and cook for about 3-4 minutes, or until al dente. They’ll float to the surface when done.
- Prepare the Sauce: In a small saucepan, melt the butter over medium heat. Add the sage leaves and cook until the butter is golden brown and fragrant. Remove the sage leaves and set aside.
- Serve: Drain the cooked ravioli and gently toss them in the sage butter sauce. Serve immediately, garnished with the crispy sage leaves and additional Parmesan cheese if desired.
Extra Tips:
When making ravioli, confirm that the pasta dough is rolled out evenly and thinly to achieve the right texture. If you don’t have a pasta machine, a rolling pin will suffice, but it requires a bit more effort.
Be sure your filling isn’t too wet, as this can cause the ravioli to burst during cooking. If you’re not cooking the ravioli immediately, arrange them in a single layer on a floured baking sheet and freeze them. Once frozen, store them in an airtight container to prevent sticking.
Festive Panettone Bread
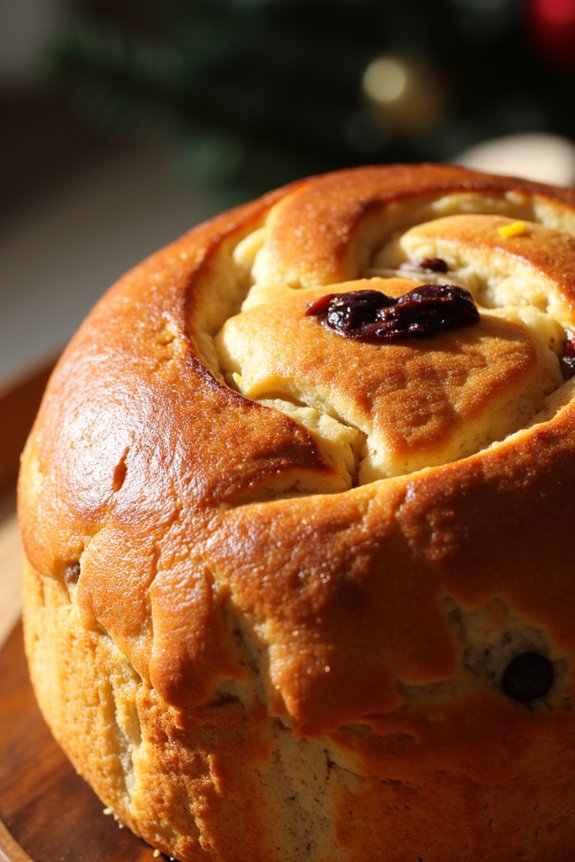
Panettone is a classic Italian holiday bread, known for its light, fluffy texture and rich, fruity flavor. Originating from Milan, it’s traditionally enjoyed during the Christmas and New Year celebrations. This sweet bread, with its delightful combination of dried fruits and citrus zest, is a perfect festive treat to share with family and friends.
Making Panettone at home may seem intimidating, but with patience and attention to detail, you can create a deliciously authentic version that rivals any store-bought offering. The process of making Panettone involves creating a wonderfully enriched dough that’s allowed to rise multiple times, guaranteeing its signature airy texture.
This recipe will guide you through the steps of crafting this beloved Italian delicacy, perfect for serving 4-6 people. Whether you’re enjoying it fresh out of the oven or toasted with a spread of butter, this homemade Panettone is sure to become a cherished holiday tradition.
Ingredients:
- 1/2 cup warm milk
- 2 1/4 teaspoons active dry yeast
- 1/2 cup granulated sugar
- 4 large eggs
- 1 teaspoon vanilla extract
- Zest of 1 orange
- Zest of 1 lemon
- 3 1/2 cups all-purpose flour
- 1/4 teaspoon salt
- 1/2 cup unsalted butter, softened
- 1 cup mixed dried fruits (such as raisins, candied orange peel, and dried cherries)
- 1 tablespoon rum or brandy (optional)
- 1 egg (for egg wash)
Instructions:
- Activate the Yeast: In a small bowl, combine the warm milk and active dry yeast. Let it sit for about 5-10 minutes until it becomes foamy. This indicates that the yeast is active and ready to use.
- Prepare the Dough: In a large mixing bowl, beat together the sugar and eggs until well combined. Add the vanilla extract, orange zest, and lemon zest, mixing thoroughly. Gradually stir in the yeast mixture.
- Mix Dry Ingredients: In another bowl, sift together the flour and salt. Gradually add this to the egg mixture, mixing until a dough begins to form.
- Incorporate Butter: Add the softened butter to the dough, a little at a time, kneading until the dough is smooth and elastic. This may take about 10 minutes.
- First Rise: Place the dough in a lightly oiled bowl, cover it with a damp cloth, and let it rise in a warm place for about 1-2 hours, or until it has doubled in size.
- Add Fruits: Once the dough has risen, punch it down and knead in the mixed dried fruits and rum or brandy, if using.
- Shape and Second Rise: Place the dough into a greased Panettone mold or a high-sided round baking pan. Cover and let it rise again in a warm place until doubled, about 1 hour.
- Preheat and Egg Wash: Preheat your oven to 350°F (175°C). Beat the remaining egg and gently brush it over the top of the dough to create a glossy finish.
- Bake: Bake the Panettone in the preheated oven for about 40-45 minutes, or until a skewer inserted into the center comes out clean. If the top browns too quickly, cover it loosely with foil.
- Cool: Allow the Panettone to cool in the mold for at least 15 minutes before transferring it to a wire rack to cool completely.
Extra Tips:
To guarantee the best results, make sure all your ingredients are at room temperature before starting, as this helps the dough rise more effectively. If you prefer, you can substitute the dried fruits with chocolate chips or nuts for a different twist.
Additionally, hanging the Panettone upside down while it cools is a traditional method to preserve its dome shape, but it isn’t necessary if handled gently. Enjoy your homemade Panettone by yourself or share with loved ones for a truly festive experience!
Sweet and Nutty Tiramisu

Tiramisu, the quintessential Italian dessert, has been beloved for its rich, creamy texture and the perfect balance of coffee and cocoa flavors. This holiday season, elevate your traditional tiramisu by adding a delightful nutty twist. Sweet and Nutty Tiramisu combines the classic elements of mascarpone cheese and coffee-soaked ladyfingers with the crunchy, earthy flavors of toasted hazelnuts.
This version offers a layered experience of flavors and textures that’s sure to impress your holiday guests. Perfect for a cozy family gathering or an elegant dinner party, this Sweet and Nutty Tiramisu serves 4-6 people. The addition of hazelnut not only complements the coffee and cocoa but also adds a unique depth to the dessert.
Whether you’re a tiramisu aficionado or trying it for the first time, this recipe will guide you through creating a show-stopping finale to your Italian holiday meal.
Ingredients:
- 1 cup strong brewed coffee, cooled
- 3 tablespoons coffee liqueur (optional)
- 3 large egg yolks
- 1/2 cup granulated sugar
- 1 cup mascarpone cheese
- 1 teaspoon vanilla extract
- 1 cup heavy cream
- 24 ladyfinger biscuits
- 1/2 cup finely chopped toasted hazelnuts
- 2 tablespoons cocoa powder
- 1/4 cup dark chocolate shavings
Instructions:
1. Prepare the Coffee Mixture: In a shallow dish, combine the cooled brewed coffee with the coffee liqueur. Set aside to allow the flavors to blend.
2. Make the Mascarpone Mixture: In a large mixing bowl, whisk the egg yolks and granulated sugar together until the mixture is pale and slightly thickened.
Gently fold in the mascarpone cheese and vanilla extract, guaranteeing a smooth consistency.
3. Whip the Cream: In a separate bowl, whip the heavy cream until stiff peaks form. Carefully fold the whipped cream into the mascarpone mixture, maintaining a light and airy texture.
4. Assemble the Tiramisu: Briefly dip each ladyfinger into the coffee mixture, guaranteeing they’re moist but not soggy.
Arrange a layer of soaked ladyfingers at the bottom of a 9×9 inch dish. Spread half of the mascarpone mixture over the ladyfingers, smoothing it with a spatula.
5. Add the Nutty Layer: Sprinkle half of the chopped toasted hazelnuts evenly over the mascarpone layer.
6. Repeat the Layers: Add a second layer of coffee-dipped ladyfingers, followed by the remaining mascarpone mixture. Smooth the top with a spatula.
7. Finish with Toppings: Dust the top layer with cocoa powder, using a fine sieve for even coverage.
Sprinkle the remaining toasted hazelnuts and the dark chocolate shavings over the cocoa layer.
8. Chill and Serve: Cover the dish with plastic wrap and refrigerate for at least 4 hours, or overnight, to allow the flavors to meld.
Serve chilled, cutting into squares for easy serving.
Extra Tips:
When making Sweet and Nutty Tiramisu, verify that the coffee has cooled to room temperature before dipping the ladyfingers to prevent them from becoming too soggy.
Toasting the hazelnuts enhances their flavor; simply spread them on a baking sheet and bake at 350°F (175°C) for about 10 minutes, or until fragrant. If possible, prepare the tiramisu a day in advance to allow the flavors to develop fully.
Finally, use a high-quality cocoa powder and dark chocolate to enhance the richness of the dessert.
Zesty Lemon Ricotta Cake

The Zesty Lemon Ricotta Cake is a delightful Italian dessert that perfectly encapsulates the zest and freshness of lemons with the creamy texture of ricotta cheese. This cake is a perfect addition to any Italian holiday dinner, offering a light yet richly flavored treat that complements the heavier dishes typically served during festive occasions.
Its soft, moist crumb and vibrant citrus notes make it a revitalizing end to any meal, leaving guests satisfied and uplifted. This cake isn’t only delicious but also surprisingly easy to make, requiring just a few simple ingredients and minimal preparation time.
The key to this cake’s delightful texture is the combination of ricotta cheese and almond flour, which together create a moist and fluffy crumb. The addition of fresh lemon juice and zest guarantees that each bite bursts with citrus flavor, while a light dusting of powdered sugar provides a touch of sweetness that balances the tanginess of the lemons.
Ingredients for 4-6 servings:
- 1 1/2 cups almond flour
- 1 cup ricotta cheese
- 3/4 cup granulated sugar
- 1/2 cup unsalted butter, softened
- 3 large eggs
- Zest of 2 lemons
- Juice of 1 lemon
- 1 teaspoon vanilla extract
- 1 teaspoon baking powder
- 1/4 teaspoon salt
- Powdered sugar, for dusting
Cooking Instructions:
1. Preheat and Prepare Pan: Preheat your oven to 350°F (175°C). Grease a 9-inch round cake pan with butter or non-stick spray, and line the bottom with parchment paper to guarantee easy removal after baking.
2. Cream Butter and Sugar: In a large mixing bowl, cream together the softened butter and granulated sugar using an electric mixer on medium speed until the mixture is light and fluffy, which should take about 3-4 minutes.
3. Add Eggs and Ricotta: Add the eggs one at a time, beating well after each addition. Once the eggs are fully incorporated, add the ricotta cheese, lemon zest, lemon juice, and vanilla extract. Mix until the mixture is smooth and well combined.
4. Combine Dry Ingredients: In a separate bowl, whisk together the almond flour, baking powder, and salt. Gradually add the dry ingredients to the wet ingredients, mixing gently with a spatula or on low speed until just combined.
Be careful not to overmix, as this can affect the cake’s texture.
5. Bake the Cake: Pour the batter into the prepared cake pan, smoothing the top with a spatula. Bake in the preheated oven for 40-45 minutes, or until the cake is golden brown and a toothpick inserted into the center comes out clean.
6. Cool and Serve: Allow the cake to cool in the pan for about 10 minutes before transferring it to a wire rack to cool completely. Once cooled, dust the top with powdered sugar before serving.
Extra Tips:
For an extra burst of lemon flavor, consider adding a teaspoon of lemon extract to the batter. If you prefer a slightly denser cake, substitute half of the almond flour with all-purpose flour.
To make sure your cake remains moist, keep an eye on it during the final stages of baking, as oven temperatures can vary. If the top starts browning too quickly, cover it loosely with aluminum foil.
Finally, for added elegance, garnish with thin lemon slices or fresh berries just before serving.